第一次接觸 Cobbler 大概是在兩、三年前吧,不過一直沒有時間好好記錄下這個好用的工具,希望藉由簡單的實作筆記來分享給需要的網友們。
這份筆記肯定不是最詳細的,但每一個步驟都是確認可行的,如果有哪個部份有寫錯,也歡迎各位指正。
實驗環境
本次的實作是以最小機器數量來達成目標,總共只需要準備一台 PC,並安裝 Hypervisor 就可以了,無論任何的虛擬環境都行,這邊使用的是 Open Source 的 Proxmox VE 4.4-1。
Cobbler Server/Client 的 OS 以 CentOS 7 為主,畢竟第七版也發佈快三年了,所以就不針對第六版來說明。
Logical Diagram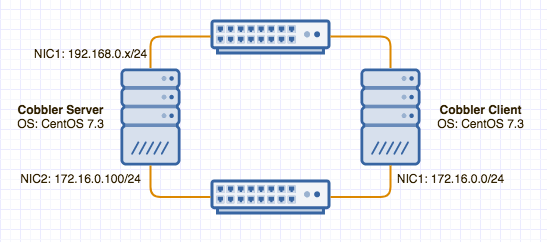
註:Cobbler 如同其它的自動部署工具一樣,會使用到 PXE、TFTP、DHCP、Kickstart 等服務,如果還不懂這些的網友們,強烈建議先瞭解過後再回來,會讓你在實作上更清楚知道自己在做什麼,這邊就不多說明了。
首先是 Cobber Server 的 OS 安裝,這部份就不說明了,官方文件上也沒有特別提到建議的硬體規格,所以就按照各位的喜好去安裝就行了。
參考文件:Cobbler 2.8.0 Prerequisites
檢查 CentOS 版本
[root@cobbler ~]# cat /etc/redhat-release
CentOS Linux release 7.3.1611 (Core)
為了方便進行這次的實作,我們先把 firewalld 和 SELinux 給關了,雖然這不是個好習慣,不過既然只是個實驗環境,就不管它了吧。
註:Production 環境下,firewalld 肯定是要開的,另外也強烈建議把 SELinux 給打開。
[root@cobbler ~]# sed -in 's/SELINUX=enforcing/SELINUX=disabled/' /etc/selinux/config
[root@cobbler ~]# cat /etc/selinux/config | egrep -i ^SELINUX
SELINUX=disabled  <-- 已經改為 disabled 了
SELINUXTYPE=targeted
接著把 firewalld 也關了
[root@cobbler ~]# systemctl stop firewalld.service
[root@cobbler ~]# systemctl status firewalld.service
● firewalld.service - firewalld - dynamic firewall daemon
   Loaded: loaded (/usr/lib/systemd/system/firewalld.service; enabled; vendor preset: enabled)
   Active: inactive (dead) since Tue 2017-05-09 02:44:55 CST; 6s ago
(以下省略)
SELinux 修改後是要重開機才會生效的,重開機前請確認這台機器上確實沒有其它服務了。
[root@cobbler ~]# reboot
簡單的前置作業結束後,終於要進到正式安裝 Cobbler 的部份了,其實安裝 Cobbler 的方式有很多種,但我還是覺得從 EPEL repository 來裝最快、最省事。
[root@cobbler ~]# yum install -y epel-release
(以下省略)
安裝 Cobbler 及需要的套件
yum install -y cobbler cobbler-web dhcp xinetd tftp-server python-ctypes pykickstart fence-agents
(以下省略)
啟動 cobblerd 及 httpd 服務,並於開機時預設開啟。
[root@cobbler ~]# systemctl enable cobblerd.service
Created symlink from /etc/systemd/system/multi-user.target.wants/cobblerd.service to /usr/lib/systemd/system/cobblerd.service.
[root@cobbler ~]# systemctl enable httpd.service
Created symlink from /etc/systemd/system/multi-user.target.wants/httpd.service to /usr/lib/systemd/system/httpd.service.
[root@cobbler ~]# systemctl start cobblerd.service
[root@cobbler ~]# systemctl start httpd.service
由 Cobbler 來下載所需的 boot loader
[root@cobbler ~]# cobbler get-loaders
(中間省略)
*** TASK COMPLETE ***
執行 cobbler check 來確認哪些部份還沒有設置完成,基本上一個一個來修正就可以了。
[root@cobbler ~]# cobbler check
The following are potential configuration items that you may want to fix:

1 : The 'server' field in /etc/cobbler/settings must be set to something other than localhost, or kickstarting features will not work.  This should be a resolvable hostname or IP for the boot server as reachable by all machines that will use it.
2 : For PXE to be functional, the 'next_server' field in /etc/cobbler/settings must be set to something other than 127.0.0.1, and should match the IP of the boot server on the PXE network.
3 : SELinux is enabled. Please review the following wiki page for details on ensuring cobbler works correctly in your SELinux environment:
    https://github.com/cobbler/cobbler/wiki/Selinux
4 : change 'disable' to 'no' in /etc/xinetd.d/tftp
5 : enable and start rsyncd.service with systemctl
6 : debmirror package is not installed, it will be required to manage debian deployments and repositories
7 : The default password used by the sample templates for newly installed machines (default_password_crypted in /etc/cobbler/settings) is still set to 'cobbler' and should be changed, try: "openssl passwd -1 -salt 'random-phrase-here' 'your-password-here'" to generate new one

Restart cobblerd and then run 'cobbler sync' to apply changes.
首先,把 server 和 next_server 這兩個值,server 指的是 Cobbler server、next_server 指的就是我們的 TFTP server,由於我們是裝在同一台 server 上,因此都指向這台 Cobbler server 的 IP 就行了,這次的實驗中是 192.168.0.104。
[root@cobbler ~]# sed -i "s/server: 127.0.0.1/server: 192.168.0.104/g" /etc/cobbler/settings
[root@cobbler ~]# sed -i "s/next_server: 127.0.0.1/next_server: 192.168.0.104/g" /etc/cobbler/settings
[root@cobbler ~]# cat /etc/cobbler/settings | egrep "^next_server|^server"
next_server: 192.168.0.104
server: 192.168.0.104
TFTP 服務是由 xinetd 這個 daemon 來管理的,因此我們去修改 /etc/xinetd.d/tftp 這個設定檔。
[root@cobbler ~]# grep -l 'disable' /etc/xinetd.d/tftp | xargs -i sed -i 's/yes/no/g' {}
[root@cobbler ~]# cat /etc/xinetd.d/tftp
(註解部份省略)
service tftp
{
	socket_type		= dgram
	protocol		= udp
	wait			= no
	user			= root
	server			= /usr/sbin/in.tftpd
	server_args		= -s /var/lib/tftpboot
	disable			= no  <-- 已經由 yes 改為 no 了
	per_source		= 11
	cps			= 100 2
	flags			= IPv4
}
將 rsyncd 及 xinetd 開啟,並設置為開機預設開啟。
[root@cobbler ~]# systemctl enable rsyncd.service
Created symlink from /etc/systemd/system/multi-user.target.wants/rsyncd.service to /usr/lib/systemd/system/rsyncd.service.
[root@cobbler ~]# systemctl enable xinetd.service
[root@cobbler ~]# systemctl start rsyncd.service
[root@cobbler ~]# systemctl start xinetd.service
下列這個步驟只有在需要安裝 Debian 系統的 Linux 才會需要,可以自行選擇要不要執行。
yum install -y debmirror
sed -i 's/@dists="sid";/#@dists="sid";/g' /etc/debmirror.conf
sed -i 's/@arches="i386";/#@arches="i386";/g' /etc/debmirror.conf
更改 Client 中的 root password,在這裡先將密碼設定為 cobbler,當然也可以依照自己的喜好來設定。
OldCobblerPassword=$(grep default_password_crypted /etc/cobbler/settings | awk '{ print$2 }')
NewCobblerPassword=$(openssl passwd -1 -salt 'salt' 'cobbler')
sed -i "s|$OldCobblerPassword|$NewCobblerPassword|g" /etc/cobbler/settings
再次下載所需的 boot loader,按理說應該是不需要再下載一次的,但實際上如果不這麼做的話,在檢查時會報錯,原因還有待查證。
[root@cobbler ~]# cobbler get-loaders
(中間省略)
*** TASK COMPLETE ***
重新啟動 cobbler 服務
[root@cobbler ~]# systemctl restart cobblerd.service
執行 cobbler sync 來將 TFTP、PXE 的部份設定完成。
[root@cobbler ~]# cobbler sync
task started: 2017-05-09_030433_sync
task started (id=Sync, time=Tue May  9 03:04:33 2017)
running pre-sync triggers
cleaning trees
removing: /var/lib/tftpboot/grub/images
copying bootloaders
copying: /var/lib/cobbler/loaders/pxelinux.0 -> /var/lib/tftpboot/pxelinux.0
copying: /var/lib/cobbler/loaders/menu.c32 -> /var/lib/tftpboot/menu.c32
copying: /var/lib/cobbler/loaders/yaboot -> /var/lib/tftpboot/yaboot
copying: /usr/share/syslinux/memdisk -> /var/lib/tftpboot/memdisk
copying: /var/lib/cobbler/loaders/grub-x86.efi -> /var/lib/tftpboot/grub/grub-x86.efi
copying: /var/lib/cobbler/loaders/grub-x86_64.efi -> /var/lib/tftpboot/grub/grub-x86_64.efi
copying distros to tftpboot
copying images
generating PXE configuration files
generating PXE menu structure
rendering TFTPD files
generating /etc/xinetd.d/tftp
cleaning link caches
running post-sync triggers
running python triggers from /var/lib/cobbler/triggers/sync/post/*
running python trigger cobbler.modules.sync_post_restart_services
running shell triggers from /var/lib/cobbler/triggers/sync/post/*
running python triggers from /var/lib/cobbler/triggers/change/*
running python trigger cobbler.modules.scm_track
running shell triggers from /var/lib/cobbler/triggers/change/*
*** TASK COMPLETE ***
再次確認是否有遺漏的部份
[root@cobbler ~]# cobbler check
No configuration problems found.  All systems go.
當看到上面的訊息時,表示 Cobbler 已經完成安裝了,是不是很簡單?
下一篇再分享後續的設定及使用 Cobbler 來部署 client。
不好意思,在下才疏學淺
請問Cobbler是什麼?
Cobbler簡介
Cobbler是一個快速網絡安裝linux的服務,而且在經過調整也可以支持網絡安裝windows。該工具使用python開發,小巧輕便(才15k行python代碼),使用簡單的命令即可完成PXE網絡安裝環境的配置,同時還可以管理DHCP、DNS、TFTP、RSYNC以及yum倉庫、構造系統ISO鏡像。Cobbler支持命令行管理,web界面管理,還提供了API接口,可以方便二次開發使用。Cobbler客戶端Koan支持虛擬機安裝和操作系統重新安裝,同時支持服務器的電源管理,使重裝系統更便捷。更多內容可以查看cobbler官方網站!
cobbler官方網站:http://cobbler.github.io/
↑我也不知道是甚麼,Google來的,一起看吧。
 Davis
Davis
