Day25最後說到的Integration Completeness清單
可以透過QuickStart文件的說明來進行製作
因為還沒有用Python實作出來
所以這篇會先以DOC上所提供的terminal指令來進行
以下步驟的指令都是在Linux系統執行
1.Send message data
Send message data的部分簡單來說就是傳送一個訊息
curl -X POST \
            https://chatbase-area120.appspot.com/api/message \
            -H 'cache-control: no-cache' \
            -H 'content-type: application/json' \
            -d '{
            "api_key": "這邊是填上Day25創立Bot帳號後可以拿到的一組API Key",
            "type": "user",
            #platform是指要連接的平台為何,例如Line或是Facebook等等
            "platform": "Line",
            "message": "Hello, bot!",
            "intent": "greeting",
            "version": "1.0",
            #user_id可以在Line_developer最下面找到
            "user_id": "user-00"
          }'
ChatBase API_Key的位置 (如下圖)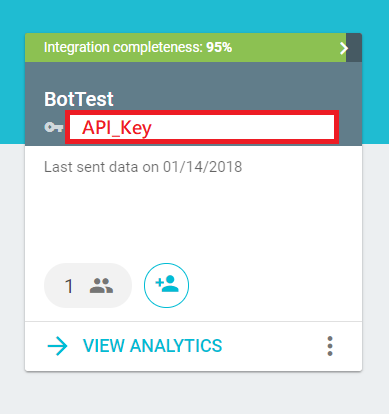
Line Developer User_id 的位置 (如下圖)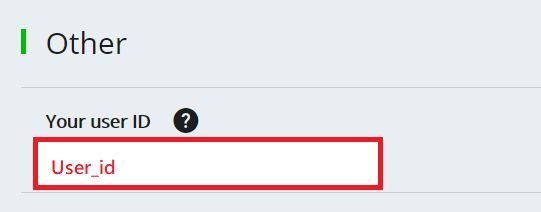
傳送如果成功,會收到 如下圖 的回應訊息
回到Chatbase看,會發現:
1.Integration Completeness多了好幾趴
Send message data 與 Set intents都顯示 Complete!
2.在Bot上也會出現你所傳送的platform (如下圖)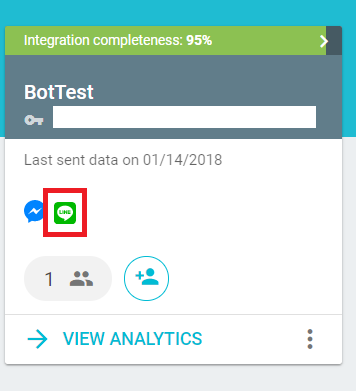
3.點選 View Analytics,就會多一個platform與version可以選擇 (如下圖)
也就是說如果新增其他platform,就會在這個地方做切換。
2.Set not_handled
標示訊息是否有被處理
curl -X POST \
            https://chatbase-area120.appspot.com/api/message \
            -H 'cache-control: no-cache' \
            -H 'content-type: application/json' \
            -d '{
            "api_key": "這邊是填上Day25創立Bot帳號後可以拿到的一組API Key",
            "type": "user",
            #platform是指要連接的平台為何,例如Line或是Facebook等等
            "platform": "Line",
            "message": "Hello, bot!",
            "intent": "greeting",
            "version": "1.0",
            #user_id可以在Line_developer最下面找到
            "user_id": "user-00",
            "not_handled": "true"
          }'
簡單來說就是增加一行 "not_handled": "true"
成功的話一樣可以看到
於是乎Set not_handled也完成了!!
Integration Completeness會到95%
最後的Enable "Links" tracking
我還沒成功QQ
成功了會更新喔!!
看起來是可以追蹤按鈕點下網址後的點擊率
以上就是QuickStart的部分
這個QuickStart就是傳送假的訊息來進行Bot的試用
用相同方式傳送幾則訊息,再進到Bot中就可以看到一些變化
[訊息量與未被處理的內容與比例]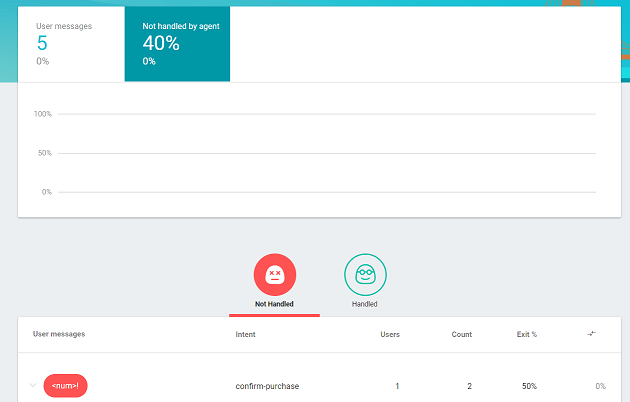
[用戶管理內容]
[對話流程分支]
會根據傳送不同Intent而自動生成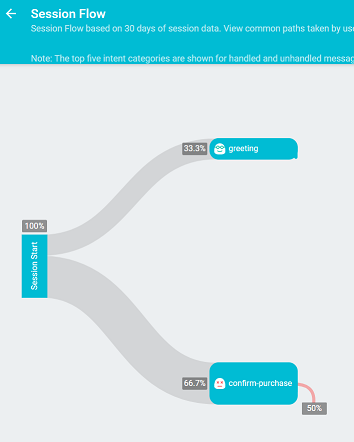
Chatbase QuickStart參考官網DOC:
https://chatbase.com/documentation/quickstart


 iThome鐵人賽