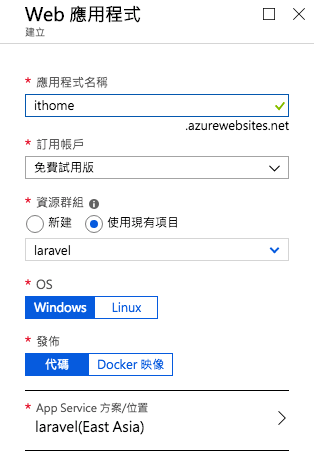
這次試著部署Angular專案到Azure的時後,遇到一些問題,趕快紀錄下來。
npm install kuduscript -g
kuduscript -y --node 產生.deployment, deploy.sh
修改deploy.sh檔(直接看到Deployment區塊)
我微修改的代碼如下,之後根據專案需要可能需要微調,
這邊以部署成功為目的,先簡單設定。
# 3. Install npm packages
if [ -e "$DEPLOYMENT_TARGET/package.json" ]; then
  cd "$DEPLOYMENT_TARGET"
  echo "Running $NPM_CMD install"
  eval $NPM_CMD install
  exitWithMessageOnError "npm failed"
  cd - > /dev/null
fi

# 4. Angular production build
if [ -e "$DEPLOYMENT_TARGET/angular.json" ]; then
  cd "$DEPLOYMENT_TARGET"
  echo "Running $NPM_CMD install -prod"
  eval $NPM_CMD run build
  exitWithMessageOnError "npm build failed"
  cd - > /dev/null
fi
因為預設的網址已經不會有 # 在 Domain後面了,所以需要加入Web.config在站台上面,
讓angular可以處理路由問題。
參考保哥說明,因為我的專案是前後端不同站台,所以設定就相對簡單一點。
// 這裡是 web.config

<?xml version="1.0"?>

<configuration>
    <system.webServer>
        <staticContent>
            <mimeMap fileExtension=".json" mimeType="application/json" />
            <mimeMap fileExtension=".woff" mimeType="application/x-font-woff" />
            <mimeMap fileExtension=".woff2" mimeType="font/woff2" />
        </staticContent>
    </system.webServer>
    <system.webServer>
    <rewrite>
        <rules>
            <rule name="angular cli routes" stopProcessing="true">
                <match url=".*" />
                <conditions logicalGrouping="MatchAll">
                    <add input="{REQUEST_FILENAME}" matchType="IsFile" negate="true" />
                    <add input="{REQUEST_FILENAME}" matchType="IsDirectory" negate="true" />
                </conditions>
                <action type="Rewrite" url="/" />
            </rule>
        </rules>
    </rewrite>
  </system.webServer>
</configuration>
// 這裡是angular.json

   "build": {
          "builder": "@angular-devkit/build-angular:browser",
          "options": {
            "outputPath": "dist/angularblog",
            "index": "src/index.html",
            "main": "src/main.ts",
            "polyfills": "src/polyfills.ts",
            "tsConfig": "src/tsconfig.app.json",
            "assets": [
              // 這邊要置入web.config
              "src/web.config",
              "src/favicon.ico",
              "src/assets"
            ],
            "styles": [
              "src/styles.scss"
            ],
            "scripts": []
          },
就不詳述了
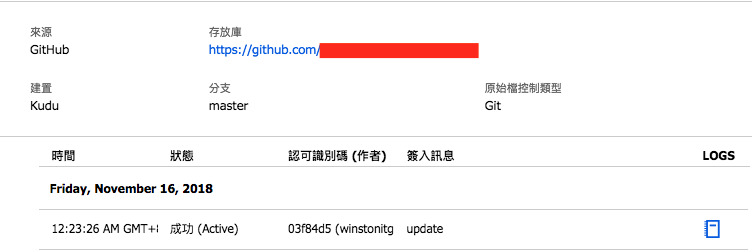
第一次因為需要npm install會較慢,屬正常
 aa71435723

 iThome鐵人賽