時間過得非常快已經快要11月了,有點混所以進度算有點小落後 。這次主要介紹
meanShift原理從直方圖循序了解,藉由本篇文章介紹主要能達到對於原理的理解並解實作。
在介紹直方圖之前,首先要先建立一個標頭檔專門在繪製直線與方塊。而直線主要是有點到點所以先建立Point,矩形則是參考OpenCV方式給予點和長寬所以建立Rect。
新增Point.h
#pragma once
#ifndef POINT_H
#define POINT_H
#include "general.h"
#include "Image.h"

class Point {
public:
	Point(C_UINT32 x, C_UINT32 y) :_x(x), _y(y) {};

	void X(C_UINT32 x);
	UINT32 X() const;

	void Y(C_UINT32 y);
	UINT32 Y() const;
private:
	UINT32 _x;
	UINT32 _y;
};
#endif // !POINT_H
新增Point.cpp
#include "Point.h"

void Point::X(C_UINT32 x) {
	_x = x;
}

UINT32 Point::X() const {
	return _x;
}

void Point::Y(C_UINT32 y) {
	_y = y;
}

UINT32 Point::Y() const {
	return _y;
}
新增Rect.h
#pragma once
#ifndef RECT_H
#define RECT_H
#include "general.h"
#include "Image.h"

class Rect {
public:
	Rect(C_UINT32 x, C_UINT32 y, C_UINT32 width, C_UINT32 height) :_x(x), _y(y), _width(width), _height(height) {  };

	void X(C_UINT32 x);
	UINT32 X() const;

	void Y(C_UINT32 y);
	UINT32 Y() const;

	void Width(C_UINT32 width);
	UINT32 Width() const;

	void Height(C_UINT32 height);
	UINT32 Height() const;

	UINT32 EndX() const;
	UINT32 EndY() const;
private:
	UINT32 _x;
	UINT32 _y;
	UINT32 _width;
	UINT32 _height;
};
#endif // !RECT_H
新增Rect.cpp
#include "Rect.h"

void Rect::X(C_UINT32 x)
{
	_x = x;
}

UINT32 Rect::X() const
{
	return _x;
}

void Rect::Y(C_UINT32 y)
{
	_y = y;
}

UINT32 Rect::Y() const
{
	return _y;
}

void Rect::Width(C_UINT32 width)
{
	_width = width;
}

UINT32 Rect::Width() const
{
	return _width;
}


void Rect::Height(C_UINT32 height)
{
	_height = height;
}

UINT32 Rect::Height() const
{
	return _height;
}

UINT32 Rect::EndX() const
{
	return _x + _width;
}

UINT32 Rect::EndY() const
{
	return _y + _height;
}
新增draw.h
#pragma once
#ifndef DRAW_H
#define DRAW_H
#include "general.h"
#include "Image.h"
#include "Point.h"
#include "Rect.h"

namespace MNDT {
	inline void DrawLine8bit(const Image& image, const Point& p1, const Point& p2, C_UCHAE& color)
	{
		assert(image.Width() > p1.X() && image.Width() > p2.X());
		assert(image.Height() > p1.Y() && image.Height() > p2.Y());

		C_UINT32 diffX = abs(static_cast<int32_t>(p1.X()) - static_cast<int32_t>(p2.X()));
		C_UINT32 diffY = abs(static_cast<int32_t>(p1.Y()) - static_cast<int32_t>(p2.Y()));
		C_UINT32 base = diffX > diffY ? diffX : diffY;

		C_FLOAT baseX = static_cast<float>(diffX) / static_cast<float>(base);
		C_FLOAT baseY = static_cast<float>(diffY) / static_cast<float>(base);

		float x = static_cast<float>(p1.X());
		float y = static_cast<float>(p1.Y());

		for (UINT32 index = 0; index < base; index++)
		{
			image.image[static_cast<UINT32>(y)][static_cast<UINT32>(x)] = color;
			x += baseX;
			y += baseY;
		}
	}

	inline void DrawLine8bit(const Image& image, const Point& p1, const Point& p2)
	{
		DrawLine8bit(image, p1, p2, 255);
	}

	inline void DrawRect8bit(const Image& image, const Rect& rect, C_UCHAE& color)
	{
		C_UINT32 endX = rect.EndX();
		C_UINT32 endY = rect.EndY();

		for (UINT32 x = rect.X(); x < endX; x++)
		{
			image.image[rect.Y()][x] = color;
			image.image[endY][x] = color;
		}

		for (UINT32 y = rect.Y(); y < endY; y++)
		{
			image.image[y][rect.X()] = color;
			image.image[y][endX] = color;
		}
	}

	inline void DrawRect8bit(const Image& image, const Rect& rect)
	{
		DrawRect8bit(image, rect, 255);
	}
}

#endif // !DRAW_H
在八位元影像當中,是由0到255像素所組成的,而直方圖顧名思義就是計算0到255的數量。
步驟
1.走訪圖片每個像素並記錄。
Library.h加入
	/*
		SetHistogram8bit Parameter:
		src			= source of image
		pur			= purpose of image
		width		= Image's width
		height		= Image's height
		minRange	= min pixel
		maxRange	= max pixel
		bin			= histogran split size
	*/
	void SetHistogram8bit(C_UCHAE* src, int32_t* histogram
		, C_UINT32 width, C_UINT32 height);

	void SetHistogram8bit(C_UCHAE* src, int32_t* histogram
		, C_UINT32 width, C_UINT32 height
		, C_UCHAE minRange, C_UCHAE maxRange
		, C_UCHAE bin);
Libary.cpp
void Library::SetHistogram8bit(C_UCHAE* src, int32_t* histogram
	, C_UINT32 width, C_UINT32 height)
{
	C_UINT32 size = width * height;

	for (UINT32 count = 0; count < size; count++)
	{
		histogram[*src]++;
		src++;
	}
}

void Library::SetHistogram8bit(C_UCHAE* src, int32_t* histogram
	, C_UINT32 width, C_UINT32 height
	, C_UCHAE minRange, C_UCHAE maxRange
	, C_UCHAE bin)
{
	assert(maxRange > minRange);

	C_UCHAE diffRange = maxRange - minRange;
	C_UCHAE interval = diffRange / bin;
	C_UINT32 size = width * height;

	for (UINT32 count = 0; count < size; count++)
	{
		histogram[*(src + count) / interval]++;
	}
}
[1]使用OpenCV的規一化有多種方法,這裡使用最大值規一化。
步驟
1.取得size大小中最大值。
2.將size個都規一化。
Library.h加入
	/*
		SetNormalizedHistogram8bit Parameter:
		histogram	= histogram data
		size		= histogram size
		base		= max pixel
	*/
	void SetNormalizedHistogram8bit(int32_t* histogram
		, C_UINT32 size
		, C_UCHAE base);
Library.cpp加入
void Library::SetNormalizedHistogram8bit(int32_t* histogram
	, C_UINT32 size
	, C_UCHAE base)
{
	int32_t max = 0;

	for (UINT32 index = 0; index < size; index++)
	{
		max = max < histogram[index] ? histogram[index] : max;
	}


	float normalizedBase = static_cast<float>(base) / max;

	for (UINT32 index = 0; index < size; index++)
	{
		histogram[index] = static_cast<int32_t>(histogram[index] * normalizedBase);
	}
}
使用上述取得值方圖資料後再規一化,並畫在256 * 256大小圖片上。
步驟
1.計算像素直方圖數量。
2.規一化直方圖數據。
3.畫出0到255直方圖。
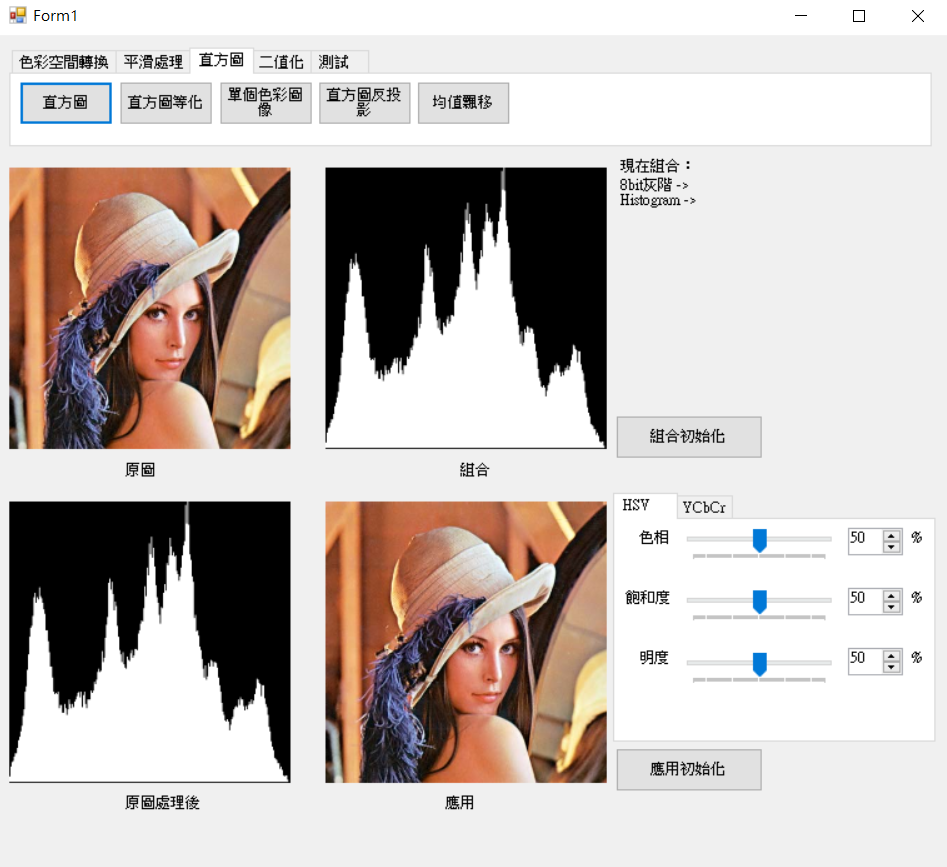
結果圖。
Library.h加入
	/*
		Histogram8bit Parameter:
		src			= source of image
		pur			= purpose of image
		width		= Image's width
		height		= Image's height
	*/
	void Histogram8bit(C_UCHAE* src, UCHAE* pur
		, C_UINT32 width, C_UINT32 height);
Library.cpp加入
void Library::Histogram8bit(C_UCHAE* src, UCHAE* pur
	, C_UINT32 width, C_UINT32 height)
{
	int32_t* histogram = new int32_t[256]{ 0 };
	int32_t max = 0;

	SetHistogram8bit(src, histogram, width, height);
	SetNormalizedHistogram8bit(histogram, 256, 255);


	Image purImage(pur, 256, 256, MNDT::GRAY_8BIT);

	for (UINT32 index = 0; index < 256; index++)
	{
		Point start(index, (255 - histogram[index]));
		Point end(index, 255);

		MNDT::DrawLine8bit(purImage, start, end);
	}

	delete[] histogram;
}
直方圖等化主要是使用累積分布函數來去改變圖片性質,圖一為直方圖數量,圖二為依序累積後的數量,然而最後依照原數量除上累積總數量則是累積分布的結果。
結果測試圖片來源[2],公式相關參考之前上課老師所提供的講義。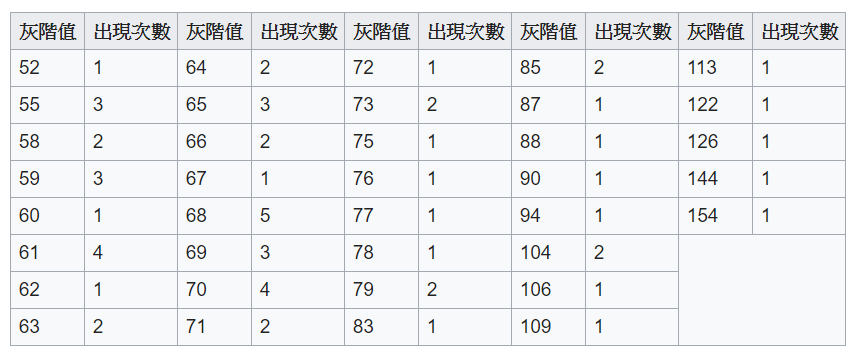
圖一來源:[2]。
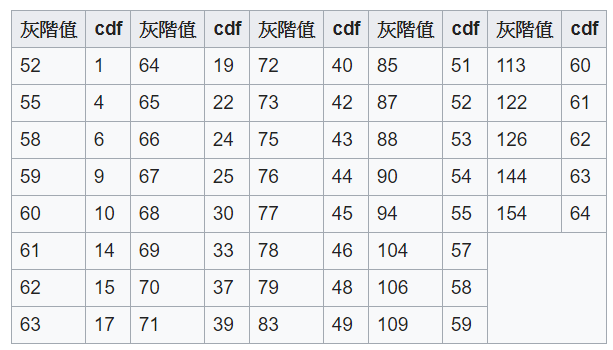
圖二來源:[2]。
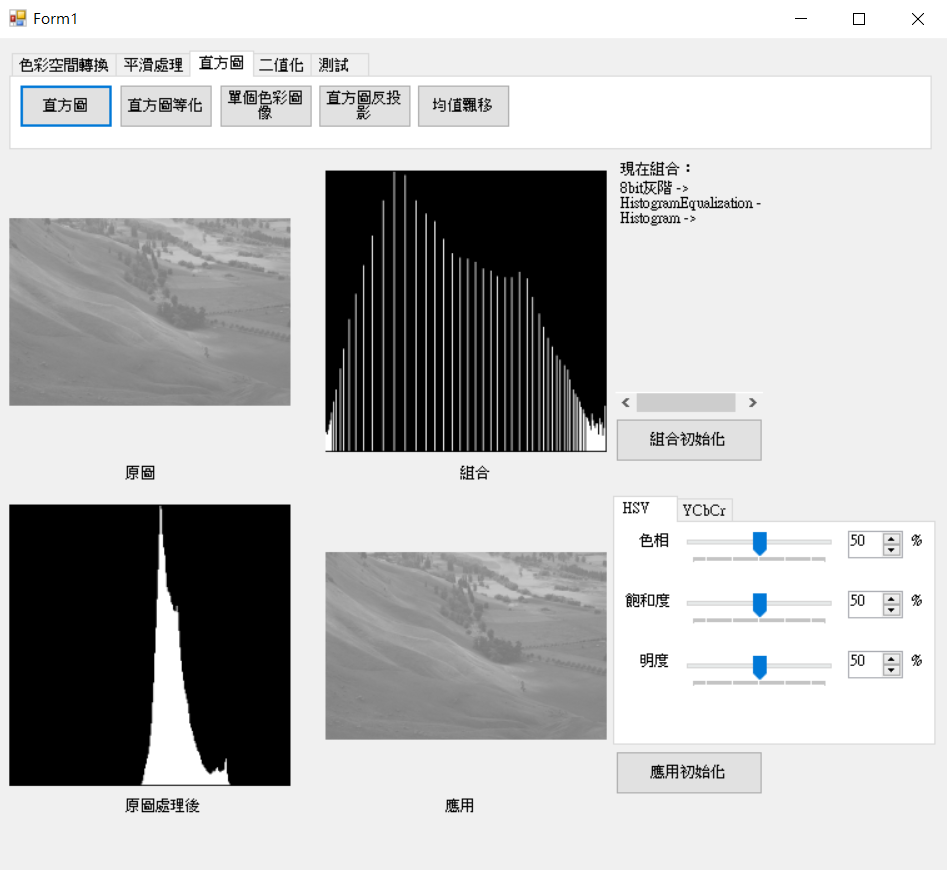
結果圖。
步驟
1.計算像素直方圖數量。
2.計算每個累積分布機率在乘上255做規一化。
3.計算後的直方圖帶入原始圖像。
Library.h加入
	/*
		HistogramEqualization8bit Parameter:
		src			= source of image
		pur			= purpose of image
		width		= Image's width
		height		= Image's height
	*/
	void HistogramEqualization8bit(C_UCHAE* src, UCHAE* pur
		, C_UINT32 width, C_UINT32 height);
Library.h加入
void Library::HistogramEqualization8bit(C_UCHAE* src, UCHAE* pur
	, C_UINT32 width, C_UINT32 height)
{
	C_UINT32 size = width * height;
	int32_t* histogram = new int32_t[256]{ 0 };

	SetHistogram8bit(src, histogram, width, height);


	float base = 0;

	for (UINT32 index = 0; index < 256; index++)
	{
		if (histogram[index] > 0)
		{
			base += static_cast<float>(histogram[index]) / static_cast<float>(size);
			histogram[index] = static_cast<int32_t>(base * 255);
		}
	}

	for (UINT32 index = 0; index < size; index++)
	{
		*(pur + index) = histogram[*(src + index)];
	}

	delete[] histogram;
}
[1]有介紹OpenCV有多種比較方法,這邊使用直方圖相減去計算誤差,設定為越接近1代表誤差越小。
步驟
1.取得兩張圖片的直方圖。
2.兩個直方圖相減計算累加。
3.一扣掉累積除上像素數量。
Library.h加入
	/*
		CompareHistogram Parameter:
		src			= source of image
		pur			= purpose of image
		width		= Image's width
		height		= Image's height
	*/
	double CompareHistogram(C_UCHAE* src, C_UCHAE* pur
		, C_UINT32 width, C_UINT32 height);
Library.cpp加入
double Library::CompareHistogram(C_UCHAE* src, C_UCHAE* pur
	, C_UINT32 width, C_UINT32 height)
{
	int32_t* srcHistogram = new int32_t[256]{ 0 };
	int32_t* purHistogram = new int32_t[256]{ 0 };

	SetHistogram8bit(src, srcHistogram, width, height);
	SetHistogram8bit(pur, purHistogram, width, height);

	int32_t diff = 0;

	for (UINT32 index = 0; index < 256; index++)
	{
		diff += abs(srcHistogram[index] - purHistogram[index]);
	}

	return 1.0 - static_cast<double>(diff) / static_cast<double>(width * height);
}
這邊介紹取出單一通道影像,因後面meanShift會使用到。主要用途為將BGR或其他色彩通道指定取得單一通道,例如BGR,通道1為只取出B色彩圖像,通道2為只取出G色彩圖像,通道3為只取出R色彩圖像。
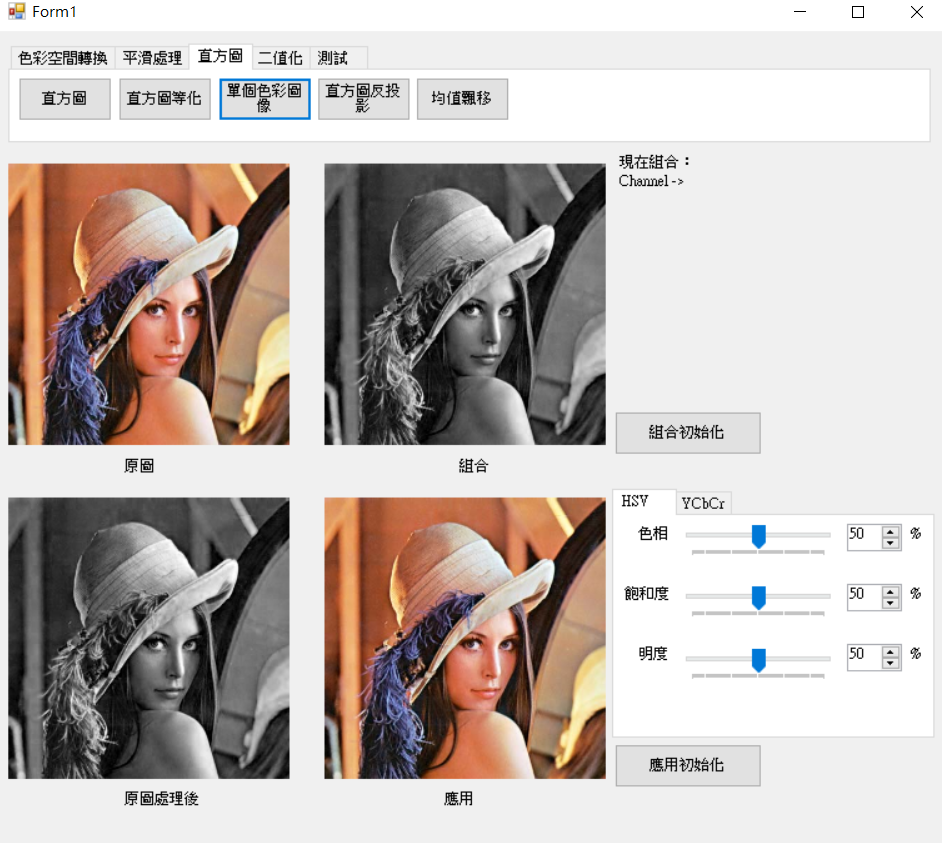
取出B通道結果圖。
Library.h加入
	/*
		Channel Parameter:
		src			= source of image
		pur			= purpose of image
		width		= Image's width
		height		= Image's height
		channel		= color channel
	*/
	void Channel(C_UCHAE* src, UCHAE* pur
		, C_UINT32 width, C_UINT32 height
		, C_UINT32 channel);
Library.cpp加入
void Library::Channel(C_UCHAE* src, UCHAE* pur
	, C_UINT32 width, C_UINT32 height
	, C_UINT32 channel)
{
	assert(src != nullptr && pur != nullptr);
	assert(width > 0 && height > 0);
	assert(channel > 0 && channel < 4);

	C_UCHAE* purEnd = pur + width * height + 1;

	src += (channel - 1);

	while (pur < purEnd)
	{
		*pur = *src;
		pur++;
		src += 3;
	}
}
主要將輸入圖片依照輸入的分布直方圖去做輸出,簡單來說先計算一張圖片的直方圖資料,再將另一張圖片像素使用計算好的直方圖資料做投影,也就是套上直方圖資料在輸入圖像的機率分布,而這邊使用HSV的H,因為H代表色度比較能代表圖片的特徵。
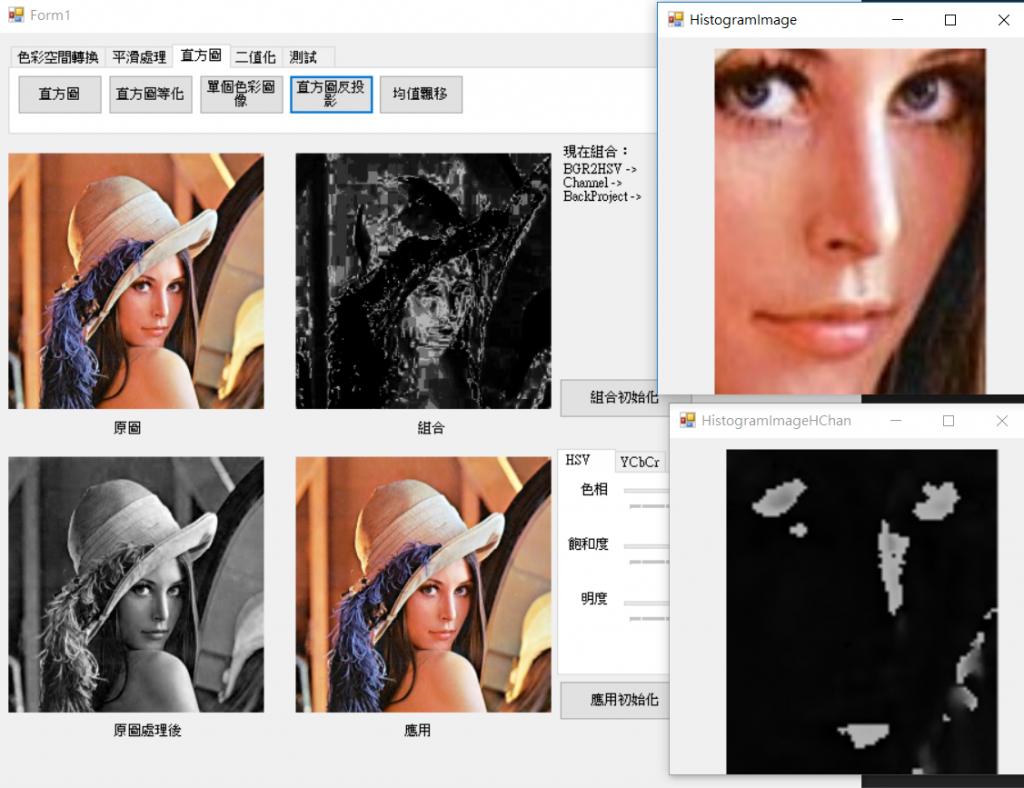
結果圖。
取得直方圖步驟-使用C#
1.將一張圖片轉為HSV。
2.使用Channel取得H。
3.計算直方圖資料。
4.直方圖資料規一化。
步驟
1.將每個像素轉為bin區間,並轉為輸入直方圖的值。
C#取得直方圖資料
hisData與之前輸入圖片原理相同,hisPtr為H通道圖像的指標。
IntPtr hisPtr = hisData.Scan0;

int[] histogram = new int[bin];

mndtSetHistogram8bit(hisPtr, histogram
                   , hisImage.Width, hisImage.Height
                   , 0, bin
                   , bin);

mndtSetNormalizedHistogram8bit(histogram, bin, bin);
Library.h加入
	/*
		BackProjection Parameter:
		src			= source of image
		pur			= purpose of image
		width		= Image's width
		height		= Image's height
		histogram	= histogram data
		minRange	= min pixel
		maxRange	= max pixel
		bin			= histogran split size
	*/
	void BackProjection(C_UCHAE* src, UCHAE* pur
		, C_UINT32 width, C_UINT32 height
		, C_UINT32* histogram
		, C_UCHAE minRange, C_UCHAE maxRange
		, C_UCHAE bin);
Library.cpp加入
void Library::BackProjection(C_UCHAE* src, UCHAE* pur
	, C_UINT32 width, C_UINT32 height
	, C_UINT32* histogram
	, C_UCHAE minRange, C_UCHAE maxRange
	, C_UCHAE bin)
{
	assert(src != nullptr && pur != nullptr);
	assert(width > 0 && height > 0);

	C_UCHAE* purEnd = pur + width * height + 1;
	C_UCHAE diffRange = maxRange - minRange;
	C_UCHAE interval = diffRange / bin;


	while (pur < purEnd)
	{
		*pur = histogram[(*src) / interval];
		pur++;
		src++;
	}
}
這邊均值漂移作法叫簡單,如下圖一,只需要已中心計算範圍內的值即可求出移動量和方向,而圖一的紅點在圖片上即是像素,像素也則代表對移動和方向的影響量。上面使用反向投影求出分布圖後,在使用均值漂移則可以求出新圖片的目標位置。
註:實際上均值漂移也是一種機器學習,通常會使用高斯核來去計算分群目標[4]。
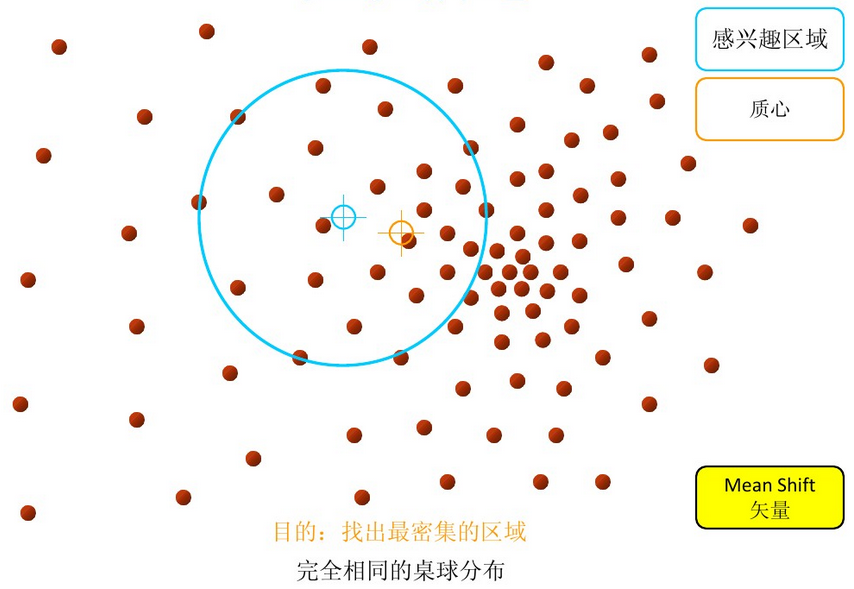
圖一來源:[4]。

結果圖,藍色為原始位置,紅色為搜尋到的位置。
公式簡介
參考[3]和OpenCV的meanShift原始碼。假設矩形大小為120 * 60,則中心位置為(60, 30)。矩形內每個座標已中心為原點(二維座標系)去累加計算x和y乘上像素(影像度),最後在除上總像素計算x和y的位移量。
原點(60, 30)。
二維座標為,G(x) = x - 60,G(y) = y - 30。
步驟
1.計算矩形內的x像素、y像素和像素總和。
2.取得x和y位移量並且修正數值。
3.偏移達到threshold或time則結束。
Library.h加入
	/*
		MeanShift Parameter:
		src			= source of image
		pur			= purpose of image
		width		= Image's width
		height		= Image's height
		rectPoint	= original rect point
		time		= trans time
		threshold	= diff threshold
	*/
	void MeanShift(C_UCHAE* src, UCHAE* pur
		, C_UINT32 width, C_UINT32 height
		, C_UINT32* rectPoint
		, C_UINT32 times
		, C_DOUBLE threshold);
Library.cpp加入
void Library::MeanShift(C_UCHAE* src, UCHAE* pur
	, C_UINT32 width, C_UINT32 height
	, C_UINT32* rectPoint
	, C_UINT32 times
	, C_DOUBLE threshold)
{
	assert(src != nullptr && pur != nullptr);
	assert(width > 0 && height > 0);

	memcpy(pur, src, width * height * sizeof(UCHAE));

	Image srcImage(const_cast<UCHAE*>(src), width, height, ColerType::BGR2GRAY_8BIT);
	Image purImage(const_cast<UCHAE*>(pur), width, height, ColerType::BGR2GRAY_8BIT);
	Rect rect(rectPoint[0], rectPoint[1], rectPoint[2], rectPoint[3]);

	MNDT::DrawRect8bit(purImage, rect);

	for (UINT32 time = 0; time < times; time++)
	{
		C_UINT32 endX = rect.EndX();
		C_UINT32 endY = rect.EndY();

		int32_t centerX = (rect.Width() >> 1) + rect.X();
		int32_t centerY = (rect.Height() >> 1) + rect.Y();
		int32_t sumX = 0;
		int32_t sumY = 0;
		int32_t sumBase = 0;

		for (UINT32 y = rect.Y(); y < endY; y++)
		{
			for (UINT32 x = rect.X(); x < endX; x++)
			{
				if (srcImage.image[y][x] > 0)
				{
					C_INT32 xDiff = x - centerX;
					C_INT32 yDiff = y - centerY;

					sumX += (xDiff * srcImage.image[y][x]);
					sumY += (yDiff * srcImage.image[y][x]);
					sumBase += srcImage.image[y][x];
				}
			}
		}

		C_DOUBLE offsetX = (static_cast<double>(sumX) / static_cast<double>(sumBase));
		C_DOUBLE offsetY = (static_cast<double>(sumY) / static_cast<double>(sumBase));
		int32_t updateX = rect.X() + static_cast<int32_t>(offsetX);
		int32_t updateY = rect.Y() + static_cast<int32_t>(offsetY);

		updateX = std::min(std::max(updateX, 0), static_cast<int32_t>(width - 1));
		updateY = std::min(std::max(updateY, 0), static_cast<int32_t>(height - 1));

		rect.X(updateX);
		rect.Y(updateY);

		// loss
		if ((offsetX * offsetX + offsetY * offsetY) <= threshold) break;
	}

	MNDT::DrawRect8bit(purImage, rect);
}
C#視窗原始碼
C++函數原始碼
感覺時間過得很快,今年又快過完了,但還有很多東西都還沒學到一個段落,看來要努力加把勁了,希望大家今年也能完成自己的目標準備朝向新的一年前進。文章若有文題歡迎留言提問謝謝。
[1]阿洲(2015). OpenCV教學 | 阿洲的程式教學 from: http://monkeycoding.com/?page_id=12 (2018.10.19).
[2]維基百科(2018). 直方图均衡化 from:https://zh.wikipedia.org/wiki/%E7%9B%B4%E6%96%B9%E5%9B%BE%E5%9D%87%E8%A1%A1%E5%8C%96 (2018.10.10).
[3]CamShift算法--Mean Shift算法 from:http://www.voidcn.com/article/p-rekabebj-zs.html
[4]简单易学的机器学习算法——Mean Shift聚类算法 from:https://blog.csdn.net/google19890102/article/details/51030884
 Kevin
Kevin

 iThome鐵人賽