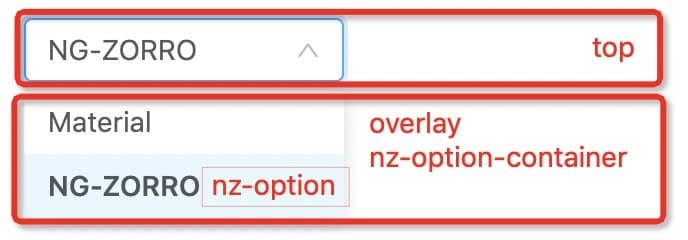
今天我們繼續介紹一個新元件 Select,當提供給使用者可選資料較多時的使用場景較多,比如省市區聯動選擇、後臺賬號管理等等。
我們仍然會以昨天的分析流程進行 Select 元件的介紹,在這幾天元件原始碼介紹過程中,我們也會逐步選擇難度上升的元件進行說明,循序漸進。
select 功能元件想必大家在學習前端時都已經接觸過了,最基礎的選擇元件至少包含顯示、下拉選項兩部分:
<select>
  <option value ="material">Material</option>
  <option value ="ng-zorro">NG-ZORRO</option>
</select>
而對於 Angular 設計而言,我們需要 select 元件支援雙向繫結、事件觸發、自定義文字等多種功能,那麼我們帶著這些需求繼續進行。
html 原生使用方式給了我們很好的設計提示,就是將 option 選項抽離出來單獨維護,那麼我們想象中的選擇元件應該是和原生使用方式類似的:
<nz-select>
  <nz-option nzValue="material">Material</nz-option>
  <nz-option nzValue="ng-zorro">NG-ZORRO</nz-option>
</nz-select>
我們查閱 NG-ZORRO 的 Select 元件文件發現實際上的確是這樣使用的,但是它提供了一個屬性 nzLabel 來直接渲染顯示文字資訊,所以我們可以這樣使用:
<nz-select>
  <nz-option nzValue="material" nzLabel="Material"></nz-option>
  <nz-option nzValue="ng-zorro" nzLabel="NG-ZORRO"></nz-option>
</nz-select>
我們看一下 Select 元件的原始碼檔案結構:
components/select
├── demo
├── doc
├── style
├── index.ts
├── nz-option-container.component.html
├── nz-option-container.component.ts
├── nz-option-container.spec.ts
├── nz-option-group.component.html
├── nz-option-group.component.ts
├── nz-option-li.component.html
├── nz-option-li.component.ts
├── nz-option-li.spec.ts
├── nz-option.component.html
├── nz-option.component.ts
├── nz-option.pipe.spec.ts
├── nz-option.pipe.ts
├── nz-select-top-control.component.html
├── nz-select-top-control.component.ts
├── nz-select-top-control.spec.ts
├── nz-select-unselectable.directive.ts
├── nz-select-unselectable.spec.ts
├── nz-select.component.html
├── nz-select.component.spec.ts
├── nz-select.component.ts
├── nz-select.module.ts
├── nz-select.service.spec.ts
├── nz-select.service.ts
├── package.json
└── public-api.ts
看起來非常多的檔案,但是我們現在只需要關注這幾個檔案 nz-select.component.* 和 nz-option.component.*,和我們之前想的一樣,NG-ZORRO 的選擇元件設計和原生 select 元素是一致的。
那麼如果讓我們用 Angular 實現最簡單的 select 元件,我們按照上述設計該怎麼實現呢?(以下為模擬設計,非 NG-ZORRO 原始碼)
@Component({
  selector: 'nz-select',
  template: '
  	<!-- 顯示選中的專案 -->
	<div>
  		{{selectedOption.nzLabel}}
	</div>
  	<!-- 投射渲染 nz-option -->
	<ng-template>
	  <ul>
		   <ng-content></ng-content>
	  </ul>
	</ng-template>
  ',
})
export class NzInputComponent {
  @ContentChildren(NzOptionComponent) listOfNzOptionComponent: QueryList<NzOptionComponent>;
}

@Component({
  selector: 'nz-option',
  template: '
	 <li>{{nzOption.nzLabel}}</li>
  ',
})
export class NzOptionComponent {}
我們仍然使用了 ng-content 進行內容投射,在 NzInputComponent 裡可以通過 ContentChildren 獲取全部選項,當然我們可以通過這個在後面進行更多操作。
我們對照原始碼分解一下現有的元件,看一下 NG-ZORRO 是如何去設計這個元件的(以下程式碼可能存在部分刪除,重點在於結構性說明):
nz-select.component.html
<div cdkOverlayOrigin
  nz-select-top-control
  class="ant-select-selection">
</div>
<ng-template
  cdkConnectedOverlay
  nzConnectedOverlay
  [cdkConnectedOverlayHasBackdrop]="true"
  [cdkConnectedOverlayMinWidth]="nzDropdownMatchSelectWidth? null : triggerWidth"
  [cdkConnectedOverlayWidth]="nzDropdownMatchSelectWidth? triggerWidth : null"
  [cdkConnectedOverlayOrigin]="cdkOverlayOrigin"
  (backdropClick)="closeDropDown()"
  (detach)="closeDropDown();"
  (positionChange)="onPositionChange($event)"
  [cdkConnectedOverlayOpen]="open">
  <div
    class="ant-select-dropdown">
    <div nz-option-container
      style="overflow: auto;transform: translateZ(0px);"
      (keydown)="onKeyDown($event)"
      [nzMenuItemSelectedIcon]="nzMenuItemSelectedIcon"
      [nzNotFoundContent]="nzNotFoundContent"
      (nzScrollToBottom)="nzScrollToBottom.emit()">
    </div>
    <ng-template [ngTemplateOutlet]="nzDropdownRender"></ng-template>
  </div>
</ng-template>
<!--can not use ViewChild since it will match sub options in option group -->
<ng-template>
  <ng-content></ng-content>
</ng-template>
我們可以看到,Select 元件被拆分成了多個部分:

我們在上面看到,點選彈出下拉選項使用的是 cdk overlay 來建立一個浮動面板,來渲染下拉列表。事實上,在所有涉及到彈出層的元件中(Modal / Drawer / Message 等等)均採用了 cdk overlay 來建立彈出層,overlay 的使用方法也是十分簡單的:
const overlayRef = overlay.create({
  height: '400px',
  width: '600px',
});
const userProfilePortal = new ComponentPortal(UserProfile);
overlayRef.attach(userProfilePortal);
在 select 元件中,我們發現使用了 cdk 的 CdkOverlayOrigin 和 cdkConnectedOverlay 指令:
更多 cdk 相關的內容,大家可以去 Material CDK 官方網站檢視。
我們今天暫時先介紹 nz-select 元件的基本設計結構,讓我們對整個元件設計有個大概的理解,當然其中具體的設計和資料同步我們還未涉及,在明天我們會繼續介紹選項列表渲染和資料同步的相關知識,大家也可以提前思考一下。
