在介紹Espresso的章節裡,我們重新用一個UI行為較複雜的範例來進行Espresso的操作,我們的情境設定在MainActivity進入的時候有一個Button可以點選,點選後會進入ListActivity,ListActivity裡有一個RecyclerView顯示User list,點選User list後會進入DetailActivity,在DetailActivity裡面我們可以看到User的Level,以及有一個EditText讓我們輸入nickname來重新顯示訊息。

在MainActivity新增一個Button元件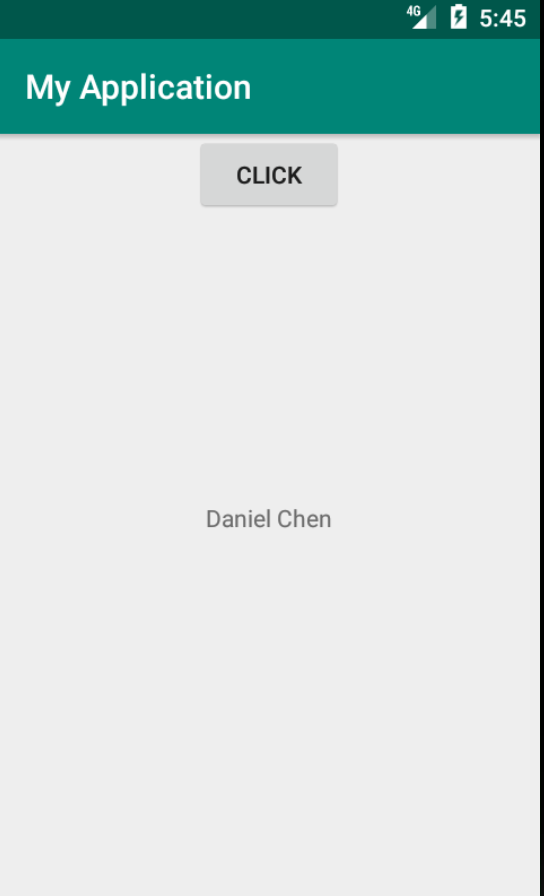
在ListActivity裡顯示跟DataManager request得到的user清單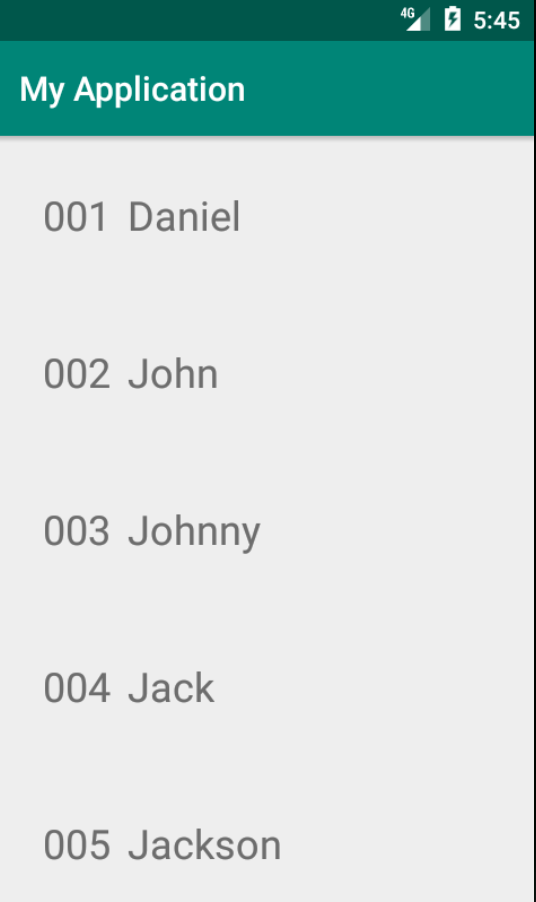
我們點選第一筆資料後進入DetailActivity,顯示User的Level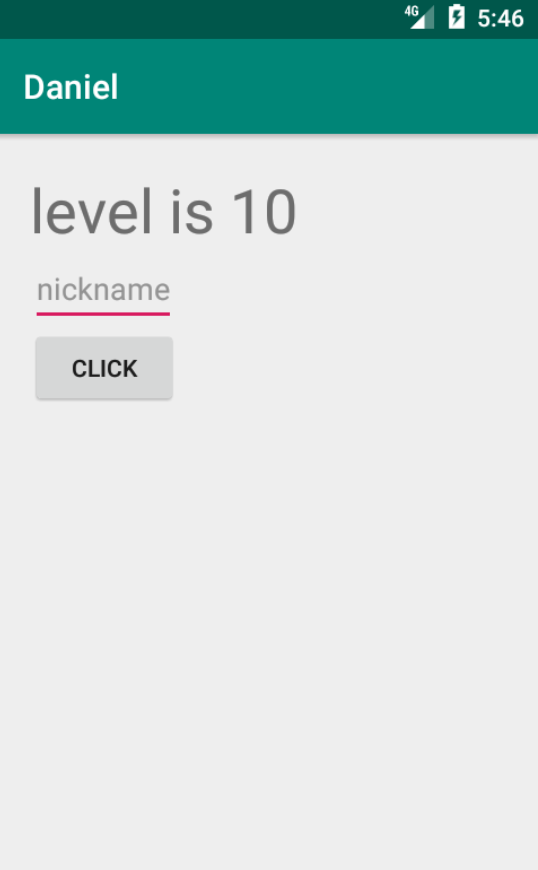
對EditText輸入nickname並且Click Button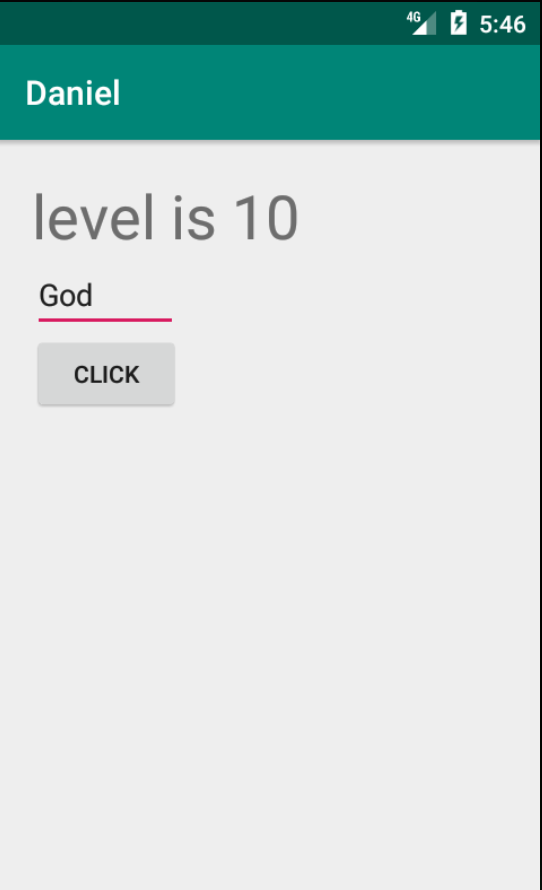
把剛才輸入的nickname重新組合顯示在DetailActivity裡的TextView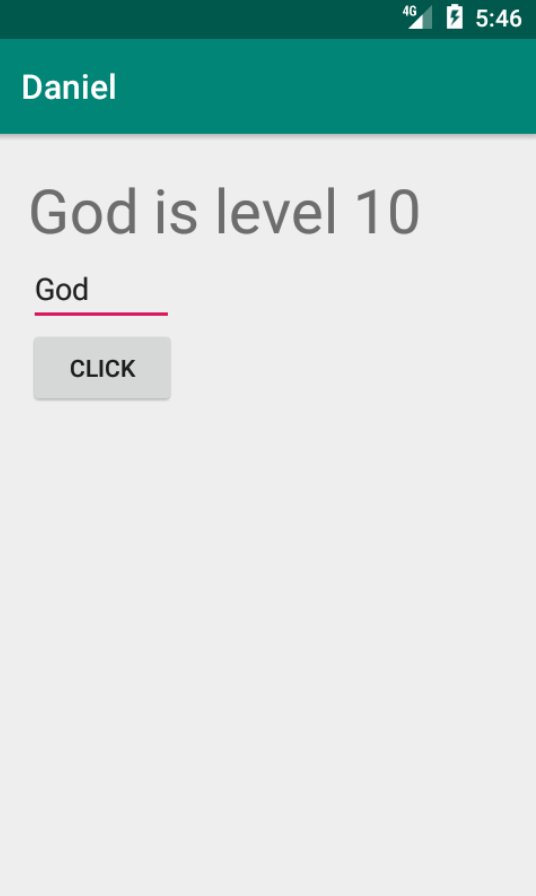
在MainActivity裡我們多一顆按鈕進入ListActivity
        button.setOnClickListener {
            startActivity(Intent(this@MainActivity, ListActivity::class.java))
        }
ListActivity layout
<?xml version="1.0" encoding="utf-8"?>
<LinearLayout xmlns:android="http://schemas.android.com/apk/res/android"
    android:orientation="vertical" android:layout_width="match_parent"
    android:layout_height="match_parent">

    <androidx.recyclerview.widget.RecyclerView
        android:id="@+id/recyclerView"
        android:layout_width="match_parent"
        android:layout_height="match_parent"
        />
</LinearLayout>
以下是ListActivity負責顯示RecyclerView的user list
//data model
data class User(val id: String, val name: String, val level: Int)

//利用DataManager來負責回傳資料
class DataManager {
    fun getUserList(): List<User> {
        return listOf(User("001", "Daniel", 10),
            User("002", "John", 9),
            User("003", "Johnny", 8),
            User("004", "Jack", 7),
            User("005", "Jackson", 6),
            User("006", "Dan", 5),
            User("007", "Barry", 4),
            User("008", "Ron", 3),
            User("009", "Adam", 2))
    }
}

//ListActivity裡有一個RecyclerView來顯示user list
class ListActivity: AppCompatActivity() {

    override fun onCreate(savedInstanceState: Bundle?) {
        super.onCreate(savedInstanceState)
        setContentView(R.layout.activity_list)
        recyclerView.layoutManager = LinearLayoutManager(this)
        recyclerView.adapter = ListAdapter(this)
    }
}

class ListAdapter(private val context: Context) : RecyclerView.Adapter<ViewHolder>() {
    var list: List<User> = DataManager().getUserList()

    override fun onCreateViewHolder(parent: ViewGroup, viewType: Int): ViewHolder {
        val view = LayoutInflater.from(context).inflate(R.layout.listitem, null)
        return ViewHolder(view)
    }

    override fun getItemCount(): Int {
        return list.size
    }

    override fun onBindViewHolder(holder: ViewHolder, position: Int) {
        holder.itemView.apply {
            val user = list[position]
            userId.text = user.id
            userName.text = user.name
            setOnClickListener {
                val intent = Intent(context, DetailActivity::class.java).apply {
                    putExtra(Constant.TAG_LEVEL, user.level)
                    putExtra(Constant.TAG_NAME, user.name)
                }
                context.startActivity(intent)
            }
        }
    }
}

class ViewHolder(view: View) : RecyclerView.ViewHolder(view)
DetailActivity layout,其中做一個EditText當做nickname的輸入元件。
<?xml version="1.0" encoding="utf-8"?>
<LinearLayout xmlns:android="http://schemas.android.com/apk/res/android"
    android:orientation="vertical" android:layout_width="match_parent"
    android:layout_height="match_parent"
    android:padding="20dp">
    <TextView
        android:id="@+id/textView"
        android:textSize="36dp"
        android:layout_width="wrap_content"
        android:layout_height="wrap_content"/>

    <EditText
        android:id="@+id/editText"
        android:hint="nickname"
        android:layout_width="wrap_content"
        android:layout_height="wrap_content"/>

    <Button
        android:id="@+id/button"
        android:text="Click"
        android:layout_width="wrap_content"
        android:layout_height="wrap_content"/>
</LinearLayout>
DetailActivity負責顯示user的level資料
class DetailActivity: AppCompatActivity() {
    override fun onCreate(savedInstanceState: Bundle?) {
        super.onCreate(savedInstanceState)
        setContentView(R.layout.layout_detail)
        val level = intent.getIntExtra(Constant.TAG_LEVEL, 0)
        val name = intent.getStringExtra(Constant.TAG_NAME)

        //設定UI顯示
        title = name
        textView.text = "level is ${level}"

        //點選button後,把editText裡的內容重新組合文字顯示在textView上
        button.setOnClickListener {
            textView.text = "${editText.text} is level ${level}"
        }
    }
}

object Constant {
    const val TAG_LEVEL = "Level"
    const val TAG_NAME = "Name"
}
我們的範例程式在設計上很常見,有一個資料清單RecyclerView顯示的需求,點選ListItem後會進入下一頁顯示更多的東西。那我們要如何利用Espresso來測試這個use case呢?我們先來定義要測試什麼,流程如下,跟前面介紹的流程一樣但是最後多了一步nickname的操作驗證。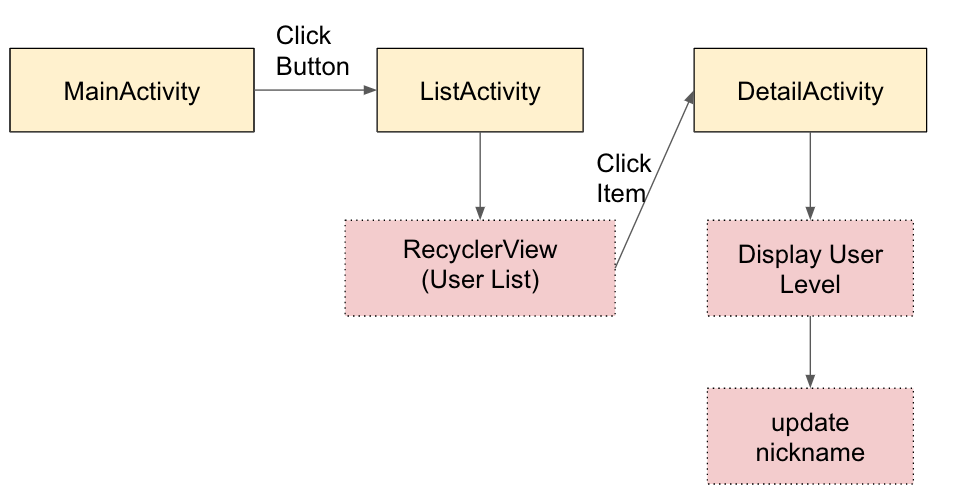
除了Day 17提到的dependencies以外,測試程式碼所需多加入的dependencies
    androidTestImplementation 'androidx.test.espresso:espresso-intents:3.3.0-alpha02'
    androidTestImplementation 'androidx.test.espresso:espresso-contrib:3.2.0'
測試程式碼如下,我們一步步來解說怎麼做。
class ExampleInstrumentedTest {

    @get:Rule
    val activityTestRule = ActivityTestRule(MainActivity::class.java)

    @Test
    fun testDisplayUser() {
        Intents.init()
        onView(withId(R.id.button)).perform(click())

        intended(hasComponent(ListActivity::class.java.name))
        onView(withId(R.id.recyclerView)).check(matches(isDisplayed()))
            .perform(RecyclerViewActions.actionOnItemAtPosition<RecyclerView.ViewHolder>(0, click()))

        intended(hasComponent(DetailActivity::class.java.name))
        onView(withText("Daniel")).check(matches(isDisplayed()))
        onView(withText("level is 10")).check(matches(isDisplayed()))

        onView(withHint("nickname")).perform(typeText("God"))
        onView(withText("Click")).perform(click())
        onView(withText("God is level 10")).check(matches(isDisplayed()))

        Intents.release()
    }
}
Intents.init()跟Intents.release()頭尾這兩行是告知Espresso我們要記錄及清除Intent被導向的歷史,像是startActivity的資料用以確認目標Activity有被開啟。intended(hasComponent(ListActivity::class.java.name))這一行就是請Espresso確認ListActivity有被開啟與否。intented(IntentMatcher)裡面需要傳入IntentMatcher的物件,而hasComponent()會回傳一個IntentMatcher的物件。
另外其它的程式碼都是在Espresso最常用的onView,check,perform,分別介紹如下:
我們來看看範例裡用到的部份,先看onView部份,withId(R.id.recyclerView)和withText("Daniel")這會回傳一個Matcher物件,傳入onView後就可以定位元件所在。
再來看check部份,check(matches(isDisplayed()))裡的matches()是讓你帶Matcher物件後回傳一個ViewAssertion物件,所以它帶入的東西跟onView是一樣的但用途略有不同。isDisplayed()是屬於UI Properties的View Matcher,因此matches(isDisplayed())會回傳ViewAssertion再放入check function就可以做判斷了。
最後看peform部份,傳入ViewAction相對容易理解,click(),doubleClick(),longClick()等等都會回傳ViewAction來做使用。
看到這裡IntentMatcher,Matcher,ViewAssertion,ViewAction,除了上面範例講的東西外我要怎麼知道還有哪些?還好google已經幫我們準備好cheat sheet了。裡面已經幫我們分門別類Matcher,ViewAssertion,ViewAction,我們只要依上述規定照著套用就可以了。
[https://android.github.io/android-test/downloads/espresso-cheat-sheet-2.1.0.pdf](Espresso Cheat Sheet)
這個章節針對Espresso做一些常用方法的介紹,下一章節會探討進階用法,如果你是用Custom Widget要如何去做測試。


 iThome鐵人賽