提醒:由於看到這系列鐵人訂閱人數漸漸變多,標記一下這些內容是在「非常萌新時期」所寫,更多技術內容請參考我的 Github,歡迎跟我一起討論 ^ ^
今天回頭來介紹 Mongoose 的基本用法。
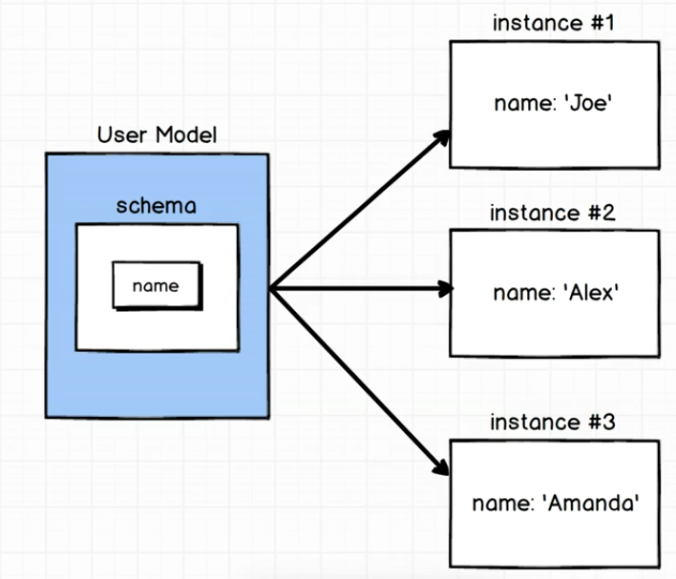
建立 Model ,依照 Model 中設定的 Schema 建立許多 Instances。
圖片來源
mongoose.connect():用來連上 database(MongoDB)。mongoose.connect('URL', { useNewUrlParser: true })
mongoose.connection:取得 mongoose.connect() 連上的默認 Connection object。const db = mongoose.connection
mongoose.createConnection():用來連結第二個以上的 database。mongoose.connect() + mongoose.connection。const db = mongoose.createConnection('URL', { useNewUrlParser: true })
mongoose.connect('URL', { useNewUrlParser: true, useUnifiedTopology: true })
*每個 model 會 map 到 MongoDB 上生成一群文件的 collection *
Schema constructor:用new來建立你的 schema instance,在{ }中設定骨架樣式(Collection 中文件的樣式)。
const SchemaName = new Schema({
    a_string: String,  // a_string 的值的型態為 String
    a_date: Date       // a_date 的值的型態為 Date
})
mongoose.model():用以建立 Model。const ModelName = mongoose.model('CollectionName', SchemaName )
required(設定為必填)min、max(最小最大值)enum:允許使用的字串集合。match:需符合 regular expression。maxlength、minlength:最大最小長度const breakfastSchema = new Schema({
// eggs - 可填的value為數字型態,範圍在6~12,小於6會顯示'Too few eggs',沒填會顯示'Why no eggs?'
eggs: {
type: Number,
min: [6, 'Too few eggs'],
max: 12,
required: [true, 'Why no eggs?']
},
// drink - 可填的value為字串型態,只可填入Coffee、Tea、Water
drink: {
type: String,
enum: ['Coffee', 'Tea', 'Water']
}
})
save():儲存進 database(MongoDb)// 以 SomeModel 建立新的 instance
const awesome_instance = new SomeModel({ name: 'awesome' })
// 檢查是否有錯誤,無誤則儲存這個 instance 至 database
awesome_instance.save(function (err) {
if (err) return handleError(err)
})
create():new+save() 建立新的 instance 並儲存。//
SomeModel.create({ name: 'also_awesome' }, function (err, awesome_instance) {
if (err) return handleError(err)
})
.name 來更改其值,改完後用 save() 或 update()儲存。awesome_instance.name = "New cool name"
awesome_instance.save(function (err) {
if (err) return handleError(err)
})
// 找出所有網球選手,並列出姓名、年齡
Athlete.find({ 'sport': 'Tennis' }, 'name age', function (err, athletes) {
  if (err) return handleError(err);
})
exec() 執行const query = Athlete.find({ 'sport': 'Tennis' })
// 選擇 姓名、年齡 輸出
query.select('name age')
// 限制為5個結果
query.limit(5)
// 以年齡排列
query.sort({ age: -1 })
// 以 `exec()` 執行
query.exec(function (err, athletes) {if (err) return handleError(err)})
where() 來設定條件,並用 . 連接起來。Athlete.
find().
where('sport').equals('Tennis'). // 網球選手
where('age').gt(17).lt(50). // 17~50歲
limit(5).
sort({ age: -1 }).
select('name age').
exec(callback)
findById():以指定id查檔findOne():只列出第一個符合配對的檔案findByIdAndRemove()等:查檔後進行更新或刪除。ObjectId:用來指向特定ID的內容。ref:用來指定從特定 model 取得內容來源。populate():從該field指定的ID取得資訊。const authorSchema = Schema({
name: String,
stories: [{ type: Schema.Types.ObjectId, ref: 'Story' }]
})
const storySchema = Schema({
// author 的值設定為:從 Author 這個 model 中,指向某特定ID的內容
author: { type: Schema.Types.ObjectId, ref: 'Author' },
title: String
})
const Story = mongoose.model('Story', storySchema)
const Author = mongoose.model('Author', authorSchema)
const bob = new Author({ name: 'Bob Smith' })
bob.save(function (err) {
if (err) return handleError(err)
// 建立一個 story 使其作者指向 bob 的 id 的內容
const story = new Story({
title: 'Bob goes sledding',
author: bob._id // 在前面建立 bob 時已自動生成自己的 id
})
story.save(function (err) {if (err) return handleError(err)})
})
Story
  .findOne({ title: 'Bob goes sledding' })
  // 使用 populate() 取得 Story 的 author 中所指向的 ID 內容
  .populate('author')
  .exec(function (err, story) {
    if (err) return handleError(err)
    console.log('The author is %s', story.author.name)
    // 在此即可以 story.author.name 直接取得該ID的 Author 中的 name 內容
  })
Story
  .find({ author: bob._id })
  .exec(function (err, stories) {
    if (err) return handleError(err)
  })
建議將每個 model 都做成一個獨立的 module ,以獨立的文檔寫成。
附上一篇覺得可以參考的 Mongoose 文章
