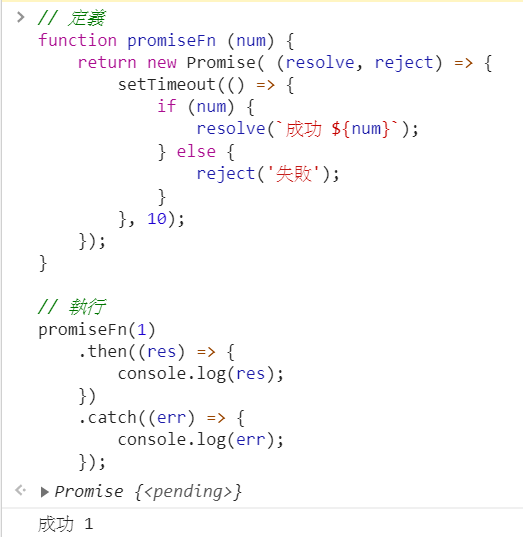
這裡用到上一篇文章所介紹到的 Promise ,並在 resolved 的狀態時,會使用樣板字面值,將船入的參數也同時顯示出來。
// 定義
function promiseFn (num) {
    return new Promise( (resolve, reject) => {
        setTimeout(() => {
            if (num) {
                resolve(`成功 ${num}`);
            } else {
                reject('失敗');
            }
        }, 10);
    });
}

// 執行
promiseFn(1)
    .then((res) => {
        console.log(res);
    })
    .catch((err) => {
        console.log(err);
    });
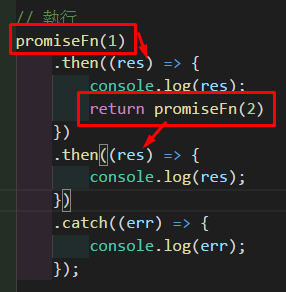
就如同之前的文章所提到,有時候我們會需要在請求非同步行為之後再一次的請求非同步行為,造成過多巢狀的問題
這時候我們要進行非同步的串接,該怎麼做呢?
promiseFn(1)
    .then((res) => {
        console.log(res);
        return promiseFn(2)
    })
    .then((res) => {
        console.log(res);
    })
    .catch((err) => {
        console.log(err);
    });
也就是在第一個成功的 then 裡面 return 第二個 Promise 的執行函式,之後再在第一個 then 下方新增第二個 then ,這樣第二個 then 所承接的結果就是第二個 Promise 所回傳的結果嚕!
很神奇吧!
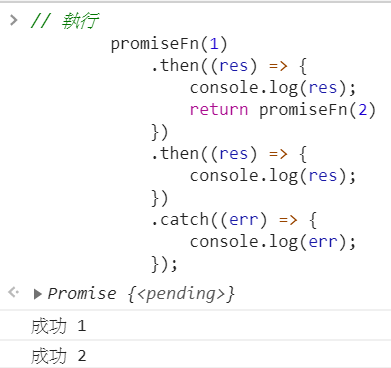
我們也可以透過這個概念一直鏈接多個 Promise 行為
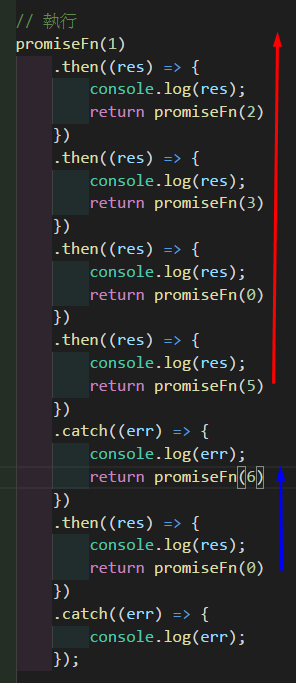
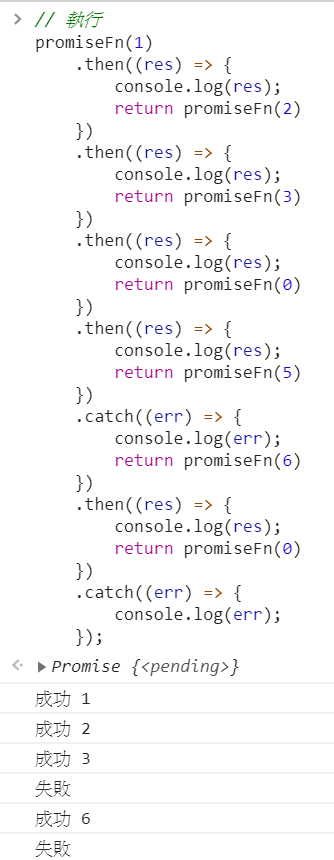
// 執行
promiseFn(1)
    .then((res) => {
        console.log(res);
        return promiseFn(2)
    })
    .then((res) => {
        console.log(res);
        return promiseFn(3)
    })
    .then((res) => {
        console.log(res);
        return promiseFn(0)
    })
    .then((res) => {
        console.log(res);
        return promiseFn(5)
    })
    .catch((err) => {
        console.log(err);
    });
而只要其中一個 Promise 有出錯的話,就會立刻跳到 catch裡面,後續的 Promise 也不會執行嚕!

那 catch 可不可以繼續練接其他的 Promsie 呢? 可以的喔!
// 執行
promiseFn(1)
    .then((res) => {
        console.log(res);
        return promiseFn(2)
    })
    .then((res) => {
        console.log(res);
        return promiseFn(3)
    })
    .then((res) => {
        console.log(res);
        return promiseFn(0)
    })
    .then((res) => {
        console.log(res);
        return promiseFn(5)
    })
    .catch((err) => {
        console.log(err);
        return promiseFn(6)
    })
    .then((res) => {
        console.log(res);
        return promiseFn(0)
    })
    .catch((err) => {
        console.log(err);
    });
只是這樣再接續的 Promise 如果發生 reject 的情形,就要用另一個 catch 來接收錯誤,也就是屬於另一個 Promise Chain 了!
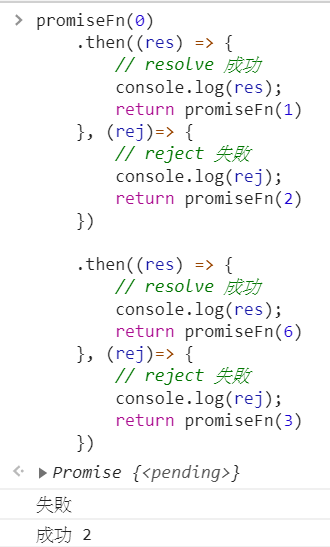
在說明這個狀況之前,我們先來介紹,我們所使用的 then 其實除了成功的結果之外,也可以接收失敗的解果喔!
promiseFn(0)
    .then((res) => {
        // resolve 成功
        console.log(res);
        return promiseFn(1)
    }, (rej)=> {
        // reject 失敗
        console.log(rej);
        return promiseFn(2)
    })

    .then((res) => {
        // resolve 成功
        console.log(res);
        return promiseFn(6)
    }, (rej)=> {
        // reject 失敗
        console.log(rej);
        return promiseFn(3)
    })
透過同時傳入兩個 callback function,來分別區分 resolve 以及 reject 的狀況,再依此進行不同非同步行為的串接。
以上就是關於 Promise Chain 的串接技巧,如果沒有問題的話就可以往下一篇文章繼續學習嚕!汪汪~
 odinhusky

 iThome鐵人賽