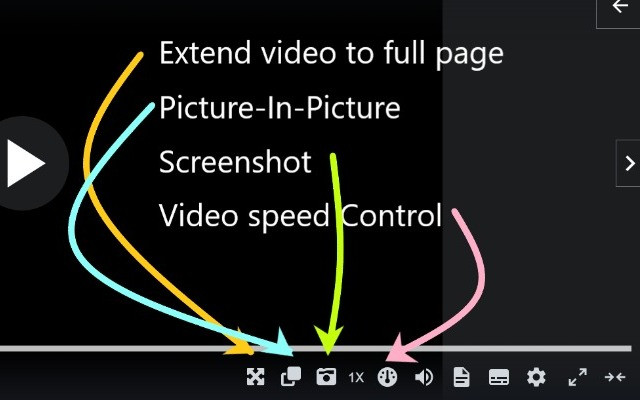
前陣子研究了 Chrome Extension(Chrome 擴充套件),並且還製作了一個和 Udemy 相關的擴充套件 Udemy Enhancer,透過這個 Chrome Extension 增加了幾個功能,包括常見的 Picture-in-Picture、螢幕截圖、控制影片播放速度、影片佔滿網頁等功能,並將原始碼開源於這個 Github Repository。

而在製作過程中我也蒐集了不少的資料和做紀錄,所以這篇主要是分享一些我覺得比較重要和通用的資訊,分享給也想自己製作一個擴充套件的讀者,內容包括:
讓 extension 設定一些預設的狀態,在套件安裝完成時自動執行。
安裝時用 chrome.storage 儲存色碼。
let color = '#3aa757';

chrome.runtime.onInstalled.addListener(() => {
  chrome.storage.sync.set({ color });
});
主要在 runtime.sendMessage() 和 tabs.sendMessage() 這兩個 api 呼叫時觸發。
runtime.sendMessage(): 向 extension 內的其他頁面發送訊息,但不包括 content scripts 內的程式碼。
content scripts 指的是例如 manifest.json 設定的資訊,這邊的程式碼會注入到指定的網頁中執行
"content_scripts": [
  {
    "matches": ["https://*.udemy.com/*"],
    "js": ["dist/js/injector.js"],
    "run_at": "document_end"
  }
]
tabs.sendMessage(): 把訊息傳送給 content script 內的專屬 api。
index.js 點擊某個按鈕觸發 chrome.runtime.sendMessage,名稱是 'inject-programmatic',所以 sw.js 會觸發 chrome.runtime.onMessage 並根據 message 的 name 去最對應的事情。
document
  .querySelector('#inject-programmatic')
  .addEventListener('click', async () => {
    const world = document.querySelector("[name='world']").value;
    chrome.runtime.sendMessage({
      name: 'inject-programmatic',
      options: { world }
    });
  });
service worker 的 sw.js:
chrome.runtime.onMessage.addListener(async ({ name, options }) => {
  if (name === 'inject-programmatic') {
    await chrome.storage.local.set({ options });
    await chrome.tabs.create({
      url: 'https://example.com/#inject-programmatic'
    });
  }
});
chrome.action 可以用來控制 extension icon 的行為,而 onClicked 便是點擊 icon 觸發的事件,但有 popup 視窗時不會觸發。
chrome.action.onClicked.addListener((tab) => {
  chrome.scripting.executeScript({
    target: {tabId: tab.id},
    files: ['content.js']
  });
});
chrome.webRequest 可以用來觀察和分析請求,並做出修改、阻擋、攔截,整個請求的生命週期可以參考文件: Life cycle of requests。

而 chrome.webRequest.onBeforeRequest api 是一個 http 請求生命週期的一個部分(看上圖),是在當一個請求發生前觸發,可以用來修改(取消、重導向)請求。
要使用這個 api 必須在 manifest.json 加上 permissions: webRequest,並且 host_permissions 加上指定的網址。
"permissions": ["webRequest", "storage", "declarativeNetRequest", "declarativeNetRequestFeedback"],
"host_permissions": ["https://*.udemy.com/*"],
語法:
chrome.webRequest.onBeforeRequest.addListener(
    callback, filter, opt_extraInfoSpec);
chrome 官方文件有提出此 api 在 manifest v3 使用中,不支援 "webRequestBlocking",也就是加上 blocking 會跳出錯誤訊息。
As of Manifest V3, the "webRequestBlocking" permission is no longer available for most extensions. Consider "declarativeNetRequest", which enables use of the declarativeNetRequest API. Aside from "webRequestBlocking", the webRequest API will be unchanged and available for normal use.
示範如何去阻擋請求到 www.evil.com:
chrome.webRequest.onBeforeRequest.addListener(
  function(details) { return {cancel: true}; },
  {urls: ["*://www.evil.com/*"]},
  ["blocking"]
);
可以用來觀察和分析請求,並做出修改、阻擋、攔截。和 chrome.webRequest 作用相當像,但也還是有些許差異:
作用和 localStorage 類似,可以用來儲存資料、狀態,允許你使用腳本在地端用資料庫的形式存取資料,但針對擴充功功能的開發特別優化。
儲存的資料地方常見有兩個: local、sync,差別在於 sync 會根據 Chrome 上登入的 google 帳戶同步資料,而 local 只儲存資料在本機。
sync 的文字部分可以換成 local,只是儲存的位置不同。
chrome.storage.sync.set({ key: value }).then(() => {
  console.log("Value is set to " + value);
});

chrome.storage.sync.get(["key"]).then((result) => {
  console.log("Value currently is " + result.key);
});

// 清除
chrome.storage.local.clear(function() {
  var error = chrome.runtime.lastError;
  if (error) {
    console.error(error);
  }
  // do something more
});

chrome.storage.sync.clear(); // callback is optional

chrome.storage.local.remove(keyName,function() {
 // Your code
 // This is an asyn function
});
chrome.tabs 是可以用來操作瀏覽器頁籤的 api,而 chrome.tabs.query 可以抓出當前瀏覽器所有的頁籤和它們的屬性。
ex:
changeColor.addEventListener("click", async () => {
  // 撈出指定屬性的 tabs
  let [tab] = await chrome.tabs.query({ active: true, currentWindow: true });

  chrome.scripting.executeScript({
    target: { tabId: tab.id },
    func: () => console.log('do something...'),
  });
});
不過記得 manifest.json 先設定開放權限才取得到。
{
  "permissions": [
    "activeTab",
    "tabs"  // 可以 query 到所有 tab 的 url
  ]
}
chrome.scripting 可以將 JS/CSS 注入到網站,和 content scripts 有點像,但 chrome.scripting 可以決定執行時間點。
chrome.scripting.executeScript 可以注入指定的程式碼到指定的地方,並記得要設定 scripting: "permissions": ["scripting", "activeTab"]。
以下範例是將 javascript 的程式碼檔案注入到指定的 tabId 中:
let changeColor = document.getElementById("changeColor");

changeColor.addEventListener("click", async () => {
  let [tab] = await chrome.tabs.query({ active: true, currentWindow: true });

  chrome.scripting.executeScript({
    target: { tabId: tab.id },
    func: setPageBackgroundColor,
  });
});
此 api 可以用來擷取當前視窗的可視範圍
要在 manifest.json 的 permissions 屬性加上 activeTab,host_permissions 加上 <all_urls> 才可以使用
  "permissions": ["activeTab"],
  "host_permissions": ["<all_urls>"],
chrome.tabs.captureVisibleTab(
  windowId?: number,
  options?: ImageDetails,
  callback?: function,
)
傳入的參數有三個:
(dataUrl: string) => void
manifest 檔用來設定套件資訊、需要的 Chrome 權限等,其中 manifest_version 版本的不同會影響撰寫的屬性設定。
設定有關 extension icon 的一些資訊、觸發行為
ex1: 點擊 icon 觸發事件
// background.js
chrome.action.onClicked.addListener((tab) => {
  chrome.scripting.executeScript({
    target: {tabId: tab.id},
    files: ['content.js']
  });
});
ex2: 可以設定 icon、點擊後的彈出網頁
{
  "name": "Action Extension",
  ...
  "action": {
    "default_icon": {              // optional
      "16": "images/icon16.png",   // optional
    },
    "default_title": "Click Me",   // optional, shown in tooltip
    "default_popup": "popup.html"  // optional
  },
  ...
}
運用 service_worker,設定會在網頁背景運作的程式碼檔案。
"background": {
  "service_worker": "background.js"
  // "scripts": ["jquery.js", "my-background.js"]
},
用來注入網頁頁面的 script,matches 用來設定哪些網域要注入 content.js 的程式碼
{
  ...
  "content_scripts": [
    {
      "js": ["scripts/content.js"],
      "matches": [
        "https://developer.chrome.com/docs/extensions/*",
        "https://developer.chrome.com/docs/webstore/*"
      ]
    }
  ]
}
設定右鍵點擊 extension 時,會出現選項名稱的這個選項,再點擊後會出現的頁面
設定這個 extension 能使用哪些瀏覽器功能的權限
ex:
"permissions": ["scripting", "activeTab"],
各屬性可參考此官方文件
設定一些網域的權限,例如可以取得網站的 cookies,解除跨域限制
{
  ...
  "host_permissions": [
    "https://developer.chrome.com/*"
  ],
  ...
}
紀錄一下各個範例的功能,也許有用到就能參考。
介紹 chrome.action 的一些 api 使用範例
介紹和一些 chrome.alarms 相關的 api
此資料夾底下還分成三個 extension
使用 chrome.declarativeNetRequest API 從 http 請求移除 "Cookie" header
使用 chrome.declarativeNetRequest API 阻擋 http 請求
將指定的 url 重新導向到指定 url
增加透過一些快捷鍵就能切換網頁 tab 的功能
Press Ctrl+Shift+Right or Ctrl+Shift+Left (Command+Shift+Right or Command+Shift+Left on a Mac) to flip through window tabs
使用了 chrome.commands api
使用 chrome.scripting api,注入 js 到網頁內
使用了一些關於 chrome.runtime 的 api 去讀取外部資源(以圖片為例)
介紹使用 chrome.scripting
在製作 extension 時,考量到 Chrome 預計會逐漸將 Manifest V2 開發出的套件做淘汰,所以我直接決定使用 Manifest V3 版本做開發,但常常會查到 Manifest V2 版本的資料,以開發功能來說,擴充套件可以參考的資源就比開發一般網站少了,而不同版本的資料導致過往的資料不好做參考,更是增加了開發的難度。
而新舊版本的 api 也是個問題,Manifest V2 有些 api 都沒有開出對應的新版 api,ex: chrome.webRequest.onBeforeRequest。
這邊整理的是在開發截圖功能碰到的困難。
原本想參考一些網路文章所介紹的截圖套件 html2canvas、Canvas2image 去實作截圖功能,但沒想到安裝套件之後,會發生類似於以下的錯誤訊息:
Refused to load the script … because it violates the following Content Security Policy directive: …, so 'script-src' is used as a fallback.
看到 Content Security Policy 可以知道是和安全性有關,自己評估是因為第三方套件的引入,其程式碼不符合網站設定的政策,所以就會被阻擋下來,這樣的設計可以避免 XSS 攻擊,讓未知的第三方 script 程式碼不能執行,因此經過考量後,決定嘗試使用原生 API 去做截圖的功能。
因為決定不使用套件的關係,所以經過一番搜尋資料後,使用到了 CanvasRenderingContext2D.drawImage() API,它可以將截取到的 Video、Image DOM 元素加上指定的位置轉換成 Canvas 然後繪製在 Canvas 畫布上,例如這個範例按下按鈕就可以截取當前影片播放的畫面,How to capture image from video?。
但是在 Udemy 網站上要去截圖時,Udemy 的網站會將影片畫面變黑掉,只要 google 搜尋 "udemy screenshot black screen" 就可以看到相當多的討論,所以我在做功能時不會直接抓取 Udemy 的 Video DOM 元素當作 CanvasRenderingContext2D.drawImage() 的第一個參數,而是透過
chrome.tabs.captureVisibleTab 先去截取整個螢幕畫面,會產生圖片 base64 的字串,並使用 JS 去產生一個 Image DOM 元素。
產生的 Image DOM 元素,再搭配使用者拖曳選取區域的功能去計算出要提供給 CanvasRenderingContext2D.drawImage() 的參數,成功截取之後就能取得圖片 base64 的字串。
由於使用者裝置不同的關係,有涉及到 devicePixelRatio 的處理,以下整理一些參考資料給需要開發類似功能的讀者。
一個螢幕是由很多個點所構成一整個畫面,而單個點的單位叫做 px(pixel),中文可以稱為畫素、像素,具有相對單位的性質,也就是有可能在固定的長度下(ex: 1 英吋),其長乘上寬的 px 數,也可稱為解析度,會有所不同,所以產生一個單位 PPI(pixels per inch),用來表示 1 英吋內有多少 pixel 的像素密度。
DPI(dots per inch) 名稱和 PPI 相當接近,對於印表機來說,dots 為墨點,DPI 表示 1 英吋內有多少 dots。
CSS 也有 px,常見用來表示 DOM 元素長寬高、邊距等的單位,和螢幕的 px 有一個倍率關係,常稱為 DPR(device pixel ratio),指 1 個 CSS px 佔用多少螢幕設備 px,而平常在用 CSS 寫網頁樣式時,瀏覽器 render 引擎都會幫我們做好 DPR 換算的工作,所以我們可以不用另外計算 CSS px,但是要加上 <meta name="viewport" content="width=device-width, initial-scale=1">,讓瀏覽器 render 出符合裝置寬度,且未縮放的頁面。
但在使用 CanvasRenderingContext2D.drawImage() 繪製截圖時,因為繪製的是 canvas 畫布等向量元素,所以就必須將 DPR 考慮進去計算,才不會截取到位置、大小不正確的圖片。
參考資料:
重新認識 Pixel、DPI / PPI 以及像素密度
Uncaught SecurityError: Failed to execute 'toDataURL' on 'HTMLCanvasElement': Tainted canvases may not be exported.
解決: 加上 img.setAttribute("crossOrigin",'Anonymous');,開放跨域的限制即可。
參考文章:
https://www.jianshu.com/p/6fe06667b748
Extension development overview
這頁蠻重要的,列出製作 extension 各功能會用到的 api
鐵人賽-你知道這是什麼嗎? Chrome Extension MV3 With Vite系列
鐵人賽-只不過是想強迫自己定時喝個水有必要那麼麻煩嗎之我想寫一個 Chrome Extension 強迫我喝水
