現在Android Studio在設計版面時是用 Layout 來決定app的外觀,主要有分為Linear Layout(線性佈局)、constraintlayout(約束布局)、Relative Layout(相對佈局)、TableLayout(表格佈局)、AbsoluteLayout(絕對佈局)、FrameLayout(框架佈局),每個Layout都有他們的優點,也有他們個別擅長的設計方式。
<TextView
            android:id="@+id/center"              //給這個原件一個名子
            android:layout_width="0dp"
            android:layout_height="match_parent" //依照原件需要使用多少的高度自動給予
            android:layout_weight="2"
            android:gravity="center"             //使文字置中
            android:text="置中"
            android:textSize="20dp"              //文字20dp
            android:textStyle="bold"/>           //文字粗體
<?xml version="1.0" encoding="utf-8"?>
<LinearLayout xmlns:android="http://schemas.android.com/apk/res/android"
    android:layout_width="match_parent"
    android:layout_height="match_parent"
    android:orientation="vertical">


    <TextView
        android:id="@+id/center"
        android:layout_width="match_parent"
        android:layout_height="wrap_content"
        android:gravity="center"
        android:text="置中"
        android:textSize="20sp"
        android:textStyle="bold" />
    <TextView
        android:layout_width="match_parent"
        android:layout_height="wrap_content"
        android:gravity="right"
        android:textSize="30dp"
        android:text="靠右"/>

</LinearLayout>
範例試圖↓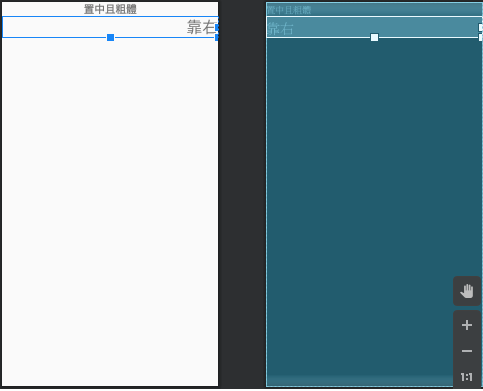
<?xml version="1.0" encoding="utf-8"?>
<RelativeLayout xmlns:android="http://schemas.android.com/apk/res/android"
    android:layout_width="match_parent"
    android:layout_height="match_parent"
    android:orientation="vertical">

    <TextView
        android:layout_width="165dp"
        android:layout_height="99dp"
        android:layout_alignParentStart="true"
        android:layout_alignParentLeft="true"
        android:layout_alignParentTop="true"
        android:layout_alignParentEnd="true"
        android:layout_alignParentRight="true"
        android:layout_alignParentBottom="true"
        android:layout_marginStart="123dp"
        android:layout_marginLeft="123dp"
        android:layout_marginTop="295dp"
        android:layout_marginEnd="123dp"
        android:layout_marginRight="123dp"
        android:layout_marginBottom="337dp" />

</RelativeLayout>
範例試圖↓
所有的佈局可以在界面上通過拖動和調整來完成,這點相對 於 RelativeLayout 要方便很多。
不需要嵌套 linearLayout,直接添加控件,將控件之間的約束調整好使用。
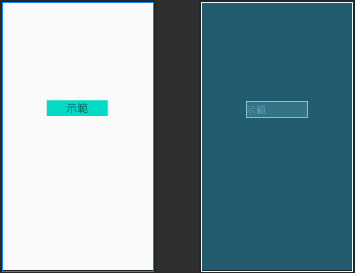
<?xml version="1.0" encoding="utf-8"?>
<androidx.constraintlayout.widget.ConstraintLayout xmlns:android="http://schemas.android.com/apk/res/android"
    xmlns:app="http://schemas.android.com/apk/res-auto"
    xmlns:tools="http://schemas.android.com/tools"
    android:layout_width="match_parent"
    android:layout_height="match_parent"
    android:orientation="vertical"
   >


    <TextView
        android:id="@+id/textView"
        android:layout_width="166dp"
        android:layout_height="43dp"
        android:layout_marginTop="268dp"
        android:background="@color/colorAccent"
        android:gravity="center"
        android:text="示範"
        android:textSize="30dp"
        app:layout_constraintEnd_toEndOf="parent"
        app:layout_constraintHorizontal_bias="0.497"
        app:layout_constraintStart_toStartOf="parent"
        app:layout_constraintTop_toTopOf="parent" />


</androidx.constraintlayout.widget.ConstraintLayout>
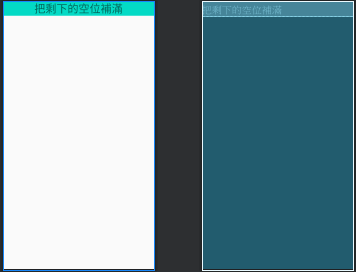
<?xml version="1.0" encoding="utf-8"?>
<TableLayout xmlns:android="http://schemas.android.com/apk/res/android"
    android:layout_width="match_parent"
    android:layout_height="match_parent"
    android:orientation="vertical"
    android:stretchColumns="1"
    android:collapseColumns="0">
    <TableRow>
    <TextView
        android:id="@+id/center"
        android:layout_width="match_parent"
        android:layout_height="wrap_content"
        android:gravity="center"
        android:text="被隱藏了"
        android:textSize="20sp"
        android:textStyle="bold" />
    <TextView
        android:layout_width="match_parent"
        android:layout_height="wrap_content"
        android:gravity="center"
        android:textSize="30dp"
        android:text="把剩下的空位補滿"
        android:background="@color/colorAccent"/>

        </TableRow>

</TableLayout>