今日的程式碼 => GIHUB

GetX 是一個很神奇的狀態管理,裡面有路由、語言、網路、還有一些內建的方法。我個人覺得他可以使用簡短的程式碼,達到想要的效果。可以看到下面的這幾張圖片。Navigation、Dialog、SnackBar、便利的資料傳遞、快速的儲存資料、簡單的國際化語言、簡單的改片 App 顏色、快速的驗證。
他可以快速的分享資料、狀態等資訊,因此他很強大。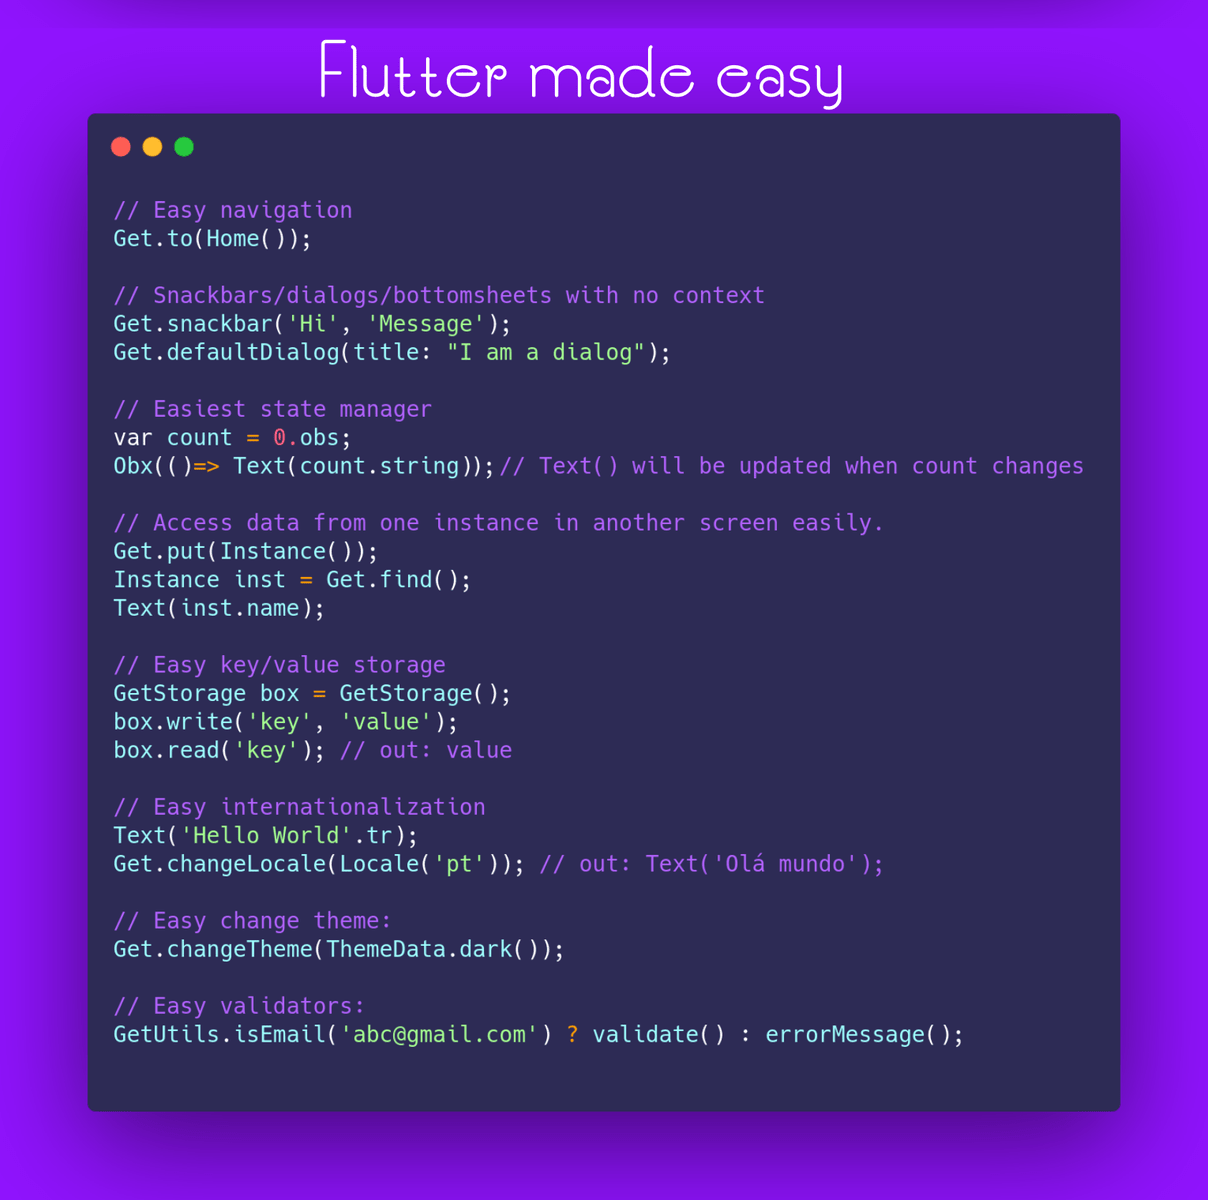
圖片來源 => https://raw.githubusercontent.com/jonataslaw/getx-community/master/getx.png
StreamController
get
StatelessWidget 節省一些記憶體,使用 Get 你可能不再需要使用 StatefulWidget。GetX 可能就需要一些時間更新了GetX 綁住以上是小弟的見解,有誤,歡迎留言底下和我說~~
首先 Model 的部分可以參考 【第七天 - Flutter Api、Json 物件教學】
GetConnect 是一個 GetX 提供給 Api 請求資料的一個類別。因此不需要去使用 Http 的套件了。
class PostService extends GetConnect {
//  請求 Api
  Future<List<PostModel>> fetchData() async {
    return await get(
      'https://jsonplaceholder.typicode.com/posts',
      decoder: (data) =>
      List<PostModel>.from(data.map((e) => PostModel.fromJson(e))),
    ).then((value) => value.body!).catchError((e) => throw e);
  }
}
GetxController 是一個控制器,我們繼承他,就可以操作了。也不用把他想的那麼複雜。
.obs 的話,代表我們可以觀察那筆資料。當我們使用 update() 就可以通知畫面我們更新數據了。
enum SortState { userID, id, title, body }

class PostController extends GetxController {
  var isLoading = true.obs;
  var postList = <PostModel>[].obs;

  @override
  void onInit() {
    super.onInit();
    fetchApi();
  }

  void fetchApi() async {
    isLoading(true);
    await PostService().fetchData().then((value) {
      postList.assignAll(value);
      isLoading(false);
      update();
    }).catchError((e) {});
  }

  // sort method
  void sort(SortState sortState) async {
    switch (sortState) {
      case SortState.title:
        postList.sort((a, b) => a.title.compareTo(b.title));
        break;
      case SortState.id:
        postList.sort((a, b) => a.id.compareTo(b.id));
        break;
      case SortState.userID:
        postList.sort((a, b) => a.userId.compareTo(b.userId));
        break;
      case SortState.body:
        postList.sort((a, b) => a.body.compareTo(b.body));
        break;
    }
    update();
  }
}
如果資料都有 .obs 的話,我們在 UI 的部分就可以直接 body: Obx(() => Widget) 的方式直接拿到數據。
初始化 controller 使你其對當下的所有子路由可用。
final PostController controller = Get.put(PostController());
你可以找到一個正在被其他頁面使用的 Controller。
Get.find<PostController>().sort(value);
class HomePage extends StatelessWidget {
  HomePage({Key? key, required this.title}) : super(key: key);
  final String title;
  final PostController controller = Get.put(PostController());

  @override
  Widget build(BuildContext context) {
    return Scaffold(
      appBar: AppBar(
        title: Text(title),
        actions: <Widget>[
          PopupMenuButton<SortState>(
            icon: Icon(Icons.more_vert),
            itemBuilder: (context) => [
              PopupMenuItem(
                child: Text('使用 userId 排序'),
                value: SortState.userID,
              ),
              PopupMenuItem(
                child: Text('使用 id 排序'),
                value: SortState.id,
              ),
              PopupMenuItem(
                child: Text('使用 title 排序'),
                value: SortState.title,
              ),
              PopupMenuItem(
                child: Text('使用 body 排序'),
                value: SortState.body,
              )
            ],
            onSelected: (SortState value) {
              Get.find<PostController>().sort(value);
            },
          )
        ],
      ),
      body: _MyListView()
    );
  }
}
class _MyListView extends StatelessWidget {
   _MyListView({Key? key}) : super(key: key);
  final PostController controller = Get.find<PostController>();
  @override
  Widget build(BuildContext context) {
    return Obx(() => controller.isLoading.value
        ? Center(child: CircularProgressIndicator())
        : ListView.builder(
      itemCount: controller.postList.length,
      itemBuilder: (context, index) {
        PostModel item = controller.postList[index];
        return Container(
            decoration: BoxDecoration(
                borderRadius: BorderRadius.all(Radius.circular(16)),
                color: Colors.white,
                border:
                Border.all(color: Colors.blueAccent, width: 2.0)),
            margin: EdgeInsets.all(8),
            padding: EdgeInsets.all(8),
            child: RichText(
              text: TextSpan(
                style: DefaultTextStyle.of(context).style,
                children: <TextSpan>[
                  TextSpan(
                    text: item.id.toString() + ". " + item.title,
                    style: TextStyle(fontSize: 18, color: Colors.red),
                  ),
                  TextSpan(
                    text: '\n' + item.body,
                    style: TextStyle(fontWeight: FontWeight.bold),
                  ),
                  TextSpan(
                    text: "\nUser ID:" + item.userId.toString(),
                    style: TextStyle(fontSize: 18),
                  ),
                ],
              ),
            ));
      },
    ));
  }
}