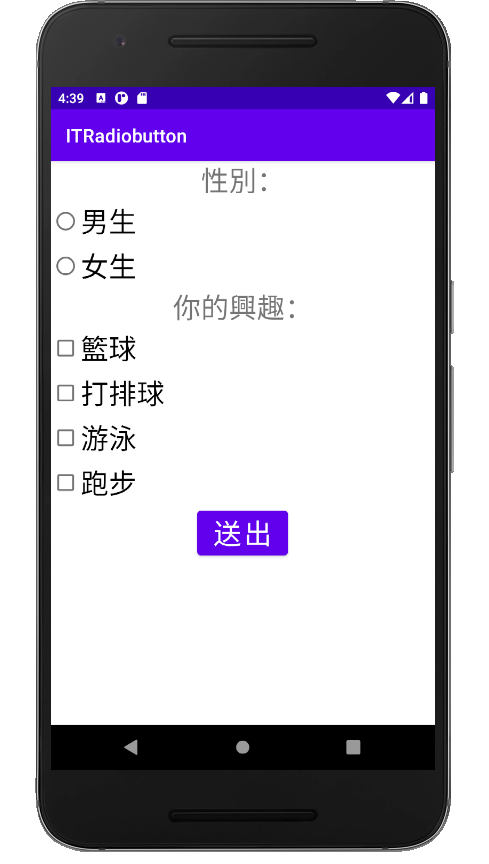
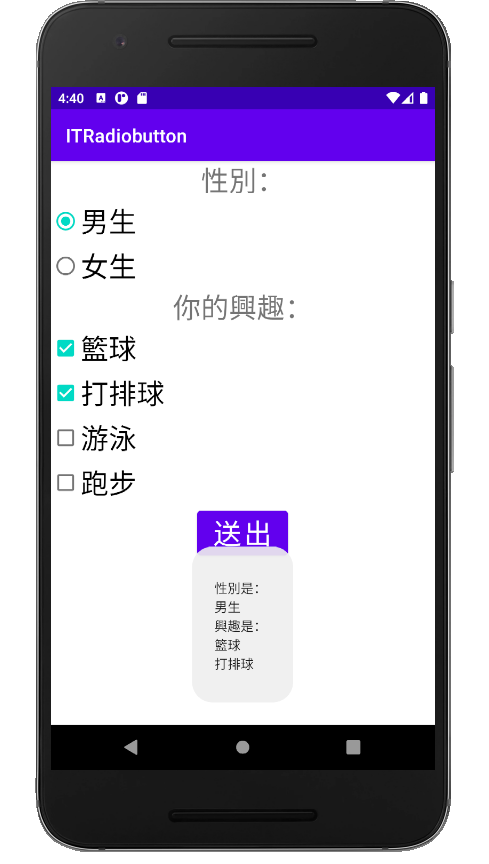
上一篇講到Radiobutton為單選,需要複選時就可以使用Checkbox
這篇我們利用Radiobutton和Checkbox
來製作選擇性別(單選)以及選擇興趣(複選)的APP!
xml檔如下:
<?xml version="1.0" encoding="utf-8"?>
<LinearLayout xmlns:android="http://schemas.android.com/apk/res/android"
    xmlns:app="http://schemas.android.com/apk/res-auto"
    xmlns:tools="http://schemas.android.com/tools"
    android:layout_width="match_parent"
    android:layout_height="match_parent"
    android:orientation="vertical"
    tools:context=".MainActivity">
    <TextView
        android:id="@+id/textView"
        android:layout_width="match_parent"
        android:layout_height="wrap_content"
        android:gravity="center"
        android:text="性別:"
        android:textSize="30dp" />
    <RadioGroup
        android:id="@+id/radioGroup"
        android:layout_width="match_parent"
        android:layout_height="wrap_content">
        <RadioButton
            android:id="@+id/radioButton"
            android:layout_width="match_parent"
            android:layout_height="wrap_content"
            android:text="男生"
            android:textSize="30dp" />
        <RadioButton
            android:id="@+id/radioButton2"
            android:layout_width="match_parent"
            android:layout_height="wrap_content"
            android:text="女生"
            android:textSize="30dp" />
    </RadioGroup>
    <TextView
        android:id="@+id/tx"
        android:layout_width="match_parent"
        android:layout_height="wrap_content"
        android:gravity="center"
        android:text="你的興趣:"
        android:textSize="30dp" />
    <CheckBox
        android:id="@+id/ch1"
        android:layout_width="match_parent"
        android:layout_height="wrap_content"
        android:textSize="30dp"
        android:text="籃球" />
    <CheckBox
        android:id="@+id/ch2"
        android:layout_width="match_parent"
        android:layout_height="wrap_content"
        android:textSize="30dp"
        android:text="打排球" />
    <CheckBox
        android:id="@+id/ch3"
        android:layout_width="match_parent"
        android:layout_height="wrap_content"
        android:textSize="30dp"
        android:text="游泳" />
    <CheckBox
        android:id="@+id/ch4"
        android:layout_width="match_parent"
        android:layout_height="wrap_content"
        android:textSize="30dp"
        android:text="跑步" />
    <Button
        android:id="@+id/okbutton"
        android:layout_width="wrap_content"
        android:layout_height="wrap_content"
        android:layout_gravity="center"
        android:text="送出"
        android:textSize="30dp" />
</LinearLayout>
MainActivity的範例如下:
package com.example.itradiobutton;

import androidx.appcompat.app.AppCompatActivity;

import android.os.Bundle;
import android.view.View;
import android.widget.Button;
import android.widget.CheckBox;
import android.widget.RadioButton;
import android.widget.RadioGroup;
import android.widget.TextView;
import android.widget.Toast;

public class MainActivity extends AppCompatActivity {
    private CheckBox ch1,ch2,ch3,ch4;
    private RadioGroup radioGroup;
    private RadioButton radioButton;
    private Button okbutton;

    @Override
    protected void onCreate(Bundle savedInstanceState) {
        super.onCreate(savedInstanceState);
        setContentView(R.layout.activity_main);
        ch1 = findViewById(R.id.ch1);
        ch2 = findViewById(R.id.ch2);
        ch3 = findViewById(R.id.ch3);
        ch4 = findViewById(R.id.ch4);
        radioGroup = findViewById(R.id.radioGroup);
        okbutton = findViewById(R.id.okbutton);
        //設定按下Button之後
        okbutton.setOnClickListener(new View.OnClickListener() {
            @Override
            public void onClick(View v) {
                StringBuffer result = new StringBuffer();

                int gender = radioGroup.getCheckedRadioButtonId();
                radioButton = findViewById(gender);
                if (radioButton != null)
                {
                    result.append("\n性別是:\n").append(radioButton.getText().toString()).append("\n");
                }

                result.append("興趣是:\n");
                if (ch1.isChecked()){
                    result.append(ch1.getText().toString()).append("\n");
                }
                if (ch2.isChecked()){
                    result.append(ch2.getText().toString()).append("\n");
                }
                if (ch3.isChecked()){
                    result.append(ch3.getText().toString()).append("\n");
                }
                if (ch4.isChecked()){
                    result.append(ch4.getText().toString()).append("\n");
                }
                Toast.makeText(MainActivity.this,result.toString(),Toast.LENGTH_LONG).show();
            }
        });
    }
}
這樣就完成囉
成果如下:

