
昨天我們成功的運行了自己做的App。
但我們還有2個步驟要做:
今天要來布局App的元件(我以最簡需求來製作)
一個影像辨識需要甚麼元件呢?
顯示標題的文字框
由於我只打算做一個頁面(不會切來切去)
所以標題只好放在最上面
顯示影像的視窗
這不用多說吧? 就最基本的讓user看到現在辨識的圖片。
執行辨識的按鈕**(否決)**
關於這點我想過兩個方案,
第一個是有辨識按鈕,在user拍照後再進行辨識。
第二個是沒有辨識按鈕,拍完照立刻辨識。
雖然感覺第二個方案的互動性變少了,
但是使用app久了,uesr會覺得多這步驟很麻煩,
所以把辨識按鈕取消掉。
打開相機的按鈕
打開相機+辨識的功能都合併在"拍照"按鈕就好。
打開相簿的按鈕
這個按鈕我有點猶豫要不要放上去,
因為在使用者體驗上,及時辨識才是需要的。
打開相簿用已經存在手機上的相片進行辨識好像只有我(測試人員)會用到。
但身為教學的文章,
多介紹一個打開相簿的功能好像也合理。
顯示辨識結果的文字框
不顯示結果是要使用者通靈嗎?
拖拉
寫code
        <Button
            android:id="@+id/button"
            android:layout_width="wrap_content"
            android:layout_height="wrap_content"
            android:text="Button" />
這兩個方式是相對應的,
你拖拉元件之後,code就會自動產生,
你寫code之後,元件就會出現在UI上。
    <TextView
        android:id="@+id/tv_header"
        android:layout_width="wrap_content"
        android:layout_height="wrap_content"
        android:layout_marginTop="20dp"
        android:text="AI Face Expression Recognition"
        android:textSize="24sp"
        app:layout_constraintEnd_toEndOf="parent"
        app:layout_constraintHorizontal_bias="0.5"
        app:layout_constraintStart_toStartOf="parent"
        app:layout_constraintTop_toTopOf="parent" />
    <ImageView
        android:id="@+id/imageView"
        android:layout_width="360dp"
        android:layout_height="360dp"
        android:layout_marginTop="20dp"
        app:layout_constraintEnd_toEndOf="parent"
        app:layout_constraintHorizontal_bias="0.5"
        app:layout_constraintStart_toStartOf="parent"
        app:layout_constraintTop_toBottomOf="@+id/tv_header"
        app:srcCompat="@android:drawable/sym_def_app_icon" />
方向為限制元件位置,End代表右側,Start代表左側,Top代表上側,Bottom代表下側。方向Of為參考相對於另一個元件的位置。app:layout_constraintTop_toBottomOf="@+id/tv_header"翻譯成白話文就是:<Button
android:id="@+id/btn_photo"
android:layout_width="wrap_content"
android:layout_height="wrap_content"
android:layout_marginTop="32dp"
android:backgroundTint="@color/teal_700"
android:text="用拍照辨識"
android:textSize="16sp"
app:icon="@android:drawable/ic_menu_camera"
app:layout_constraintEnd_toStartOf="@+id/btn_album"
app:layout_constraintHorizontal_bias="0.5"
app:layout_constraintStart_toStartOf="parent"
app:layout_constraintTop_toBottomOf="@+id/imageView" />
    <Button
        android:id="@+id/btn_album"
        android:layout_width="wrap_content"
        android:layout_height="wrap_content"
        android:layout_marginTop="32dp"
        android:backgroundTint="@color/teal_700"
        android:text="從相簿辨識"
        android:textSize="16sp"
        app:icon="@android:drawable/ic_menu_gallery"
        app:layout_constraintEnd_toEndOf="parent"
        app:layout_constraintHorizontal_bias="0.5"
        app:layout_constraintStart_toEndOf="@+id/btn_photo"
        app:layout_constraintTop_toBottomOf="@+id/imageView" />
當我要顯示的結果有很多個的時候,
TextView就不堪使用了,
ListView可以讓我一次顯示多筆資料在一個列表中。
    <ListView
        android:id="@+id/listView"
        android:layout_width="match_parent"
        android:layout_height="0dp"
        android:scrollbarStyle="insideInset"
        android:visibility="visible"
        app:layout_constraintBottom_toBottomOf="parent"
        app:layout_constraintTop_toBottomOf="@+id/btn_photo" />
最後我的們UI介面就完成了!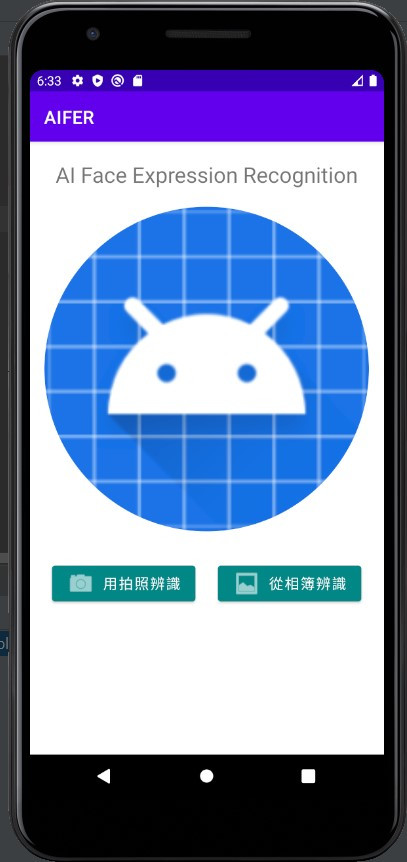
但現在看到的只是沒有功能的外殼,
明天就來介紹如何讓元件活起來吧~
