(1)製作頁面(元件)
src/views/Userboard.vue 產品navbar
src/views/UserCart.vue 產品總頁面/購物車 =>商品啟用才會顯示,已經寫好API
src/views/UserProduct.vue 產品各別頁面
(2)綁路徑
src/router/index.js
  {
    path: '/user',
    component: () => import('../views/Userboard.vue'),
    children: [
      {
        path: 'cart',
        component: () => import('../views/UserCart.vue'),
      },
      {
        path: 'product/:productId',
        component: () => import('../views/UserProduct.vue'),
      },
    ],
  },
(3)製作供使用者點擊頁面
           <div class="btn-group btn-group-sm">
             <button
               type="button"
               class="btn btn-outline-secondary"
               @click="getProduct(item.id)"
             >
               查看更多
             </button>
(1)加入購物車 按鈕+事件+方法
                  <button
                    v-on:click="addCart(item.id)"
                    type="button"
                    class="btn btn-outline-danger"
                  >
                    加到購物車
                  </button>
(2)抓到參數(id)並送入資料庫(依照API給資料)
    addCart(id) {
      console.log("id", id);
      const url = `${process.env.VUE_APP_API}api/${process.env.VUE_APP_PATH}/cart`;
      const cart = {
        product_id: id,
        qty: 1,
      };
      this.$http.post(url, { data: cart }).then((res) => {
        console.log("res", res);
      });
    },
  },
(1)新增倉庫
  data() {
    return {
      status: {
        // 個別小小讀取效果倉庫(購物車按鈕暫時無法執行)
        loadingItem: "", //對應品項id
      },
    };
  },
(2)將值寫入倉庫,供未來比對用
按下按鈕送id,賦值給倉庫
    addCart(id) {
      this.status.loadingItem = id; // 按下按鈕送id,賦值給倉庫
      };
      this.$http.post(url, { data: cart }).then((res) => {
        this.status.loadingItem = ""; //資料庫更新成功後,空

      });
    },
(2)製作 不能按(disabled) 樣式並寫入觸發條件
如果倉庫收到的值 === 當前id
                  <button
                    v-bind:disabled="this.status.loadingItem === item.id"
                    class="btn btn-outline-danger"
                  >
                    加到購物車
                  </button>
如果倉庫收到的值 === 當前id
                    <div
                      v-if="this.status.loadingItem === item.id"
                      class="spinner-grow spinner-grow-sm text-danger"
                      role="status"
                    >
                      <span class="visually-hidden">Loading...</span>
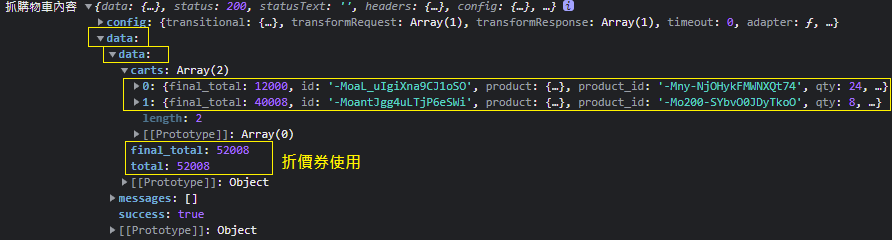
目標:新增查看購物車內容 及 購物車Icon增加
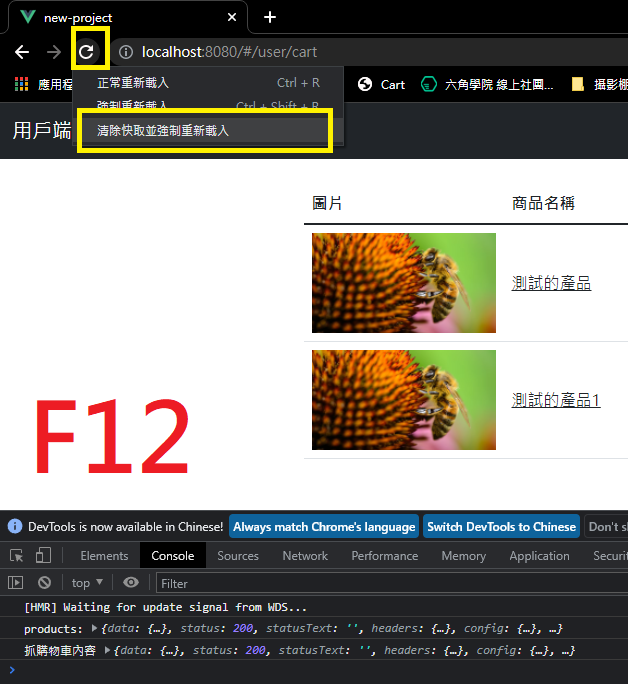
    getCart() {
      const url = `${process.env.VUE_APP_API}api/${process.env.VUE_APP_PATH}/cart`;
      this.$http.get(url).then((response) => {
        console.log("抓購物車內容", response);
        this.cart = response.data.data;
        this.isLoading = false;
      });
    },
(2)購物車內容渲染網頁上
  data() {
    return {
      cart: {},
      coupon_code: "",
    };
  },
<tr v-for="item in cart.carts" :key="item.id">
https://icons.getbootstrap.com/
(1)安裝 Bootstrap Icon
npm i bootstrap-icons
(2)匯入
main.js
//bootstrap Icons
import "bootstrap-icons/font/bootstrap-icons.css";
(3)使用
<span class="material-icons-outlined"> backspace </span>
我是使用 material-icons XD
https://www.npmjs.com/package/material-icons
說明:購物車總金額由 後端 計算
(1)限制最低數量1 min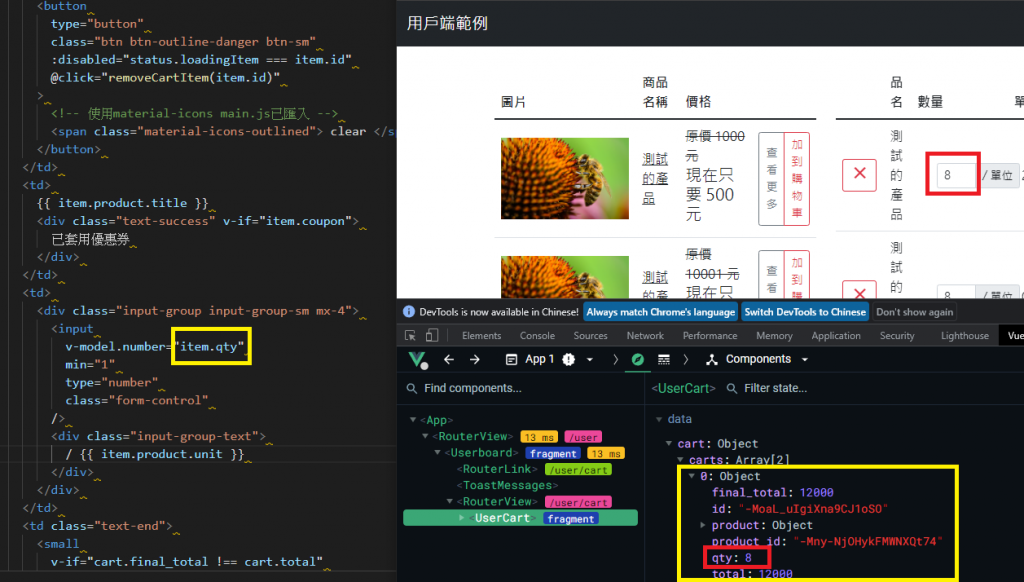
(2)product_id(String)、qty(Number)傳遞後端才能計算總金額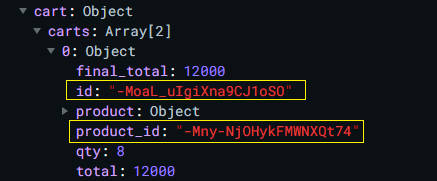
    updateCart(item) {
      const url = `${process.env.VUE_APP_API}api/${process.env.VUE_APP_PATH}/cart/${item.id}`;
      this.isLoading = true;
      const cart = {
        product_id: item.product_id,
        qty: item.qty,
      };
      this.$http.put(url, { data: cart }).then((res) => {
        console.log("res", res);
        this.getCart();
      });
    },
(3)補做讀取中暫時無法使用function
          <input
             :disabled="item.id === status.loadingItem"
           />

  data() {
    return {
      status: {
        // 小小讀取效果 + 購物車按鈕暫時無法執行 倉庫
        loadingItem: "", //對應品項id
      },


    updateCart(item) {
      this.status.loadingItem = item.id; // 按下按鈕送id,賦值給倉庫
      const cart = {
        product_id: item.product_id,
        qty: item.qty,
      };
      this.$http.put(url, { data: cart }).then((res) => {
        this.status.loadingItem = ""; // 按下按鈕送id,賦值給倉庫
        this.getCart();
      });
    },
(1)先在後台增加好優惠卷 並 啟用
shop666
(2)抓折扣碼的值,透過後端計算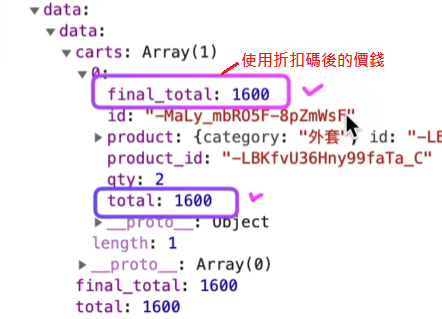
      const url = `${process.env.VUE_APP_API}api/${process.env.VUE_APP_PATH}/coupon`;
      const coupon = {
        code: this.coupon_code,
      };
(3)渲染在畫面上
              <!-- 如果不相同 顯示此tr -->
              <tr v-if="cart.final_total !== cart.total">
                <td colspan="3" class="text-end text-success">折扣價</td>
                <td class="text-end text-success">
                  {{ $filters.currency(cart.final_total) }}
                </td>
              </tr>
(1)Cli 中引入外部套件vee-validate
1-1. 安裝vee-validate套件
npm install vee-validate@next --save
1-2. 安裝vee-validate套件
https://vee-validate.logaretm.com/v4/guide/global-validators#vee-validaterules
npm install @vee-validate/rules
1-3. 安裝vee-validate套件
https://vee-validate.logaretm.com/v4/guide/i18n#using-vee-validatei18n
npm install @vee-validate/i18n
若serve正在跑的話 要先停止(ctrl+C)
1-4. 匯入main.js
import { Form, Field, ErrorMessage, defineRule, configure } from "vee-validate";
import AllRules from "@vee-validate/rules";
import { localize, setLocale } from "@vee-validate/i18n";
import zhTW from "@vee-validate/i18n/dist/locale/zh_TW.json";

//製作 vee-validate 裡面的方法都抓出來用
Object.keys(AllRules).forEach((rule) => {
  defineRule(rule, AllRules[rule]);
});


configure({
  generateMessage: localize({ zh_TW: zhTW }), // 載入繁體中文語系
  validateOnInput: true, // 當輸入任何內容直接進行驗證
});
// 設定預設語系
setLocale("zh_TW");


// vee-validate引用
app.component('Form', Form);
app.component('Field', Field);
app.component('ErrorMessage', ErrorMessage);
1-5.使用 Form、Field、ErrorMessage標籤,及 格式錯誤回報
v-slot 插入文字or外部標籤 vee-validate套件用法 引入zh_TW.json
邏輯:
1.利用v-slot抓全部的zh_TW.json
2.再靠rules="email|required"判斷 是否違反格式
3.若違反 v-slot 顯示錯誤訊息文字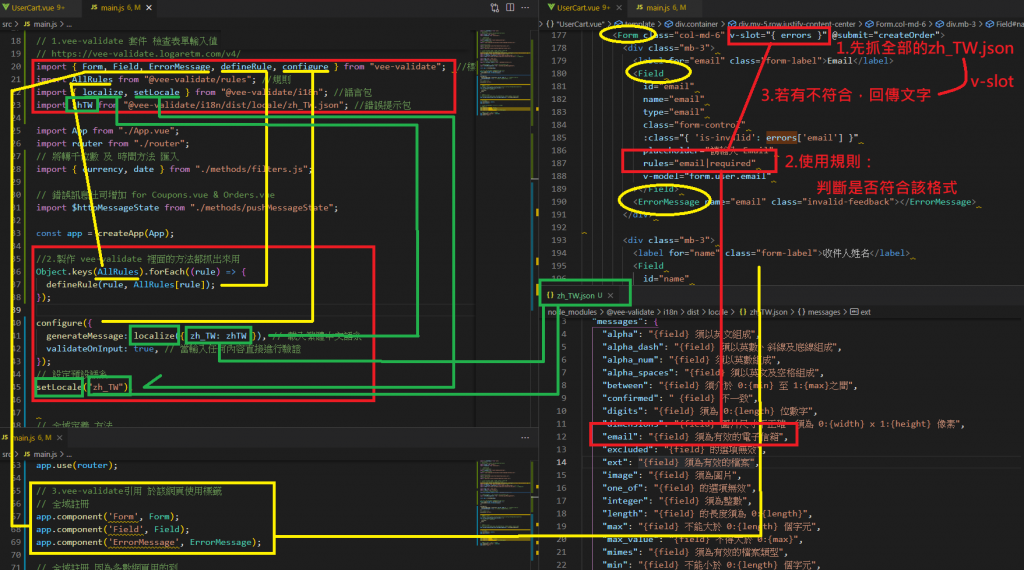
(1)建立API需要的倉庫
 // 表單資料
      form: {
        user: {
          name: "",
          email: "",
          tel: "",
          address: "",
        },
        message: "",
      },
(2)html 抓輸入的值送倉庫 v-model
        <Form class="col-md-6" v-slot="{ errors }" @submit="createOrder">

        <div class="mb-3">
          <label for="address" class="form-label">收件人地址</label>
          <Field
            id="address"
            name="地址"
            type="text"
            class="form-control"
            :class="{ 'is-invalid': errors['地址'] }"
            placeholder="請輸入地址"
            rules="required"
            v-model="form.user.address"
          ></Field>
    createOrder() {
      const url = `${process.env.VUE_APP_API}api/${process.env.VUE_APP_PATH}/order`;
      const order = this.form;
      this.$http.post(url, { data: order }).then((res) => {
        console.log(res);
      });
    },
目標:製作 送出訂單後轉址 及 確認訂單頁面
(1)製作頁面元件
src/views/UserCheckout.vue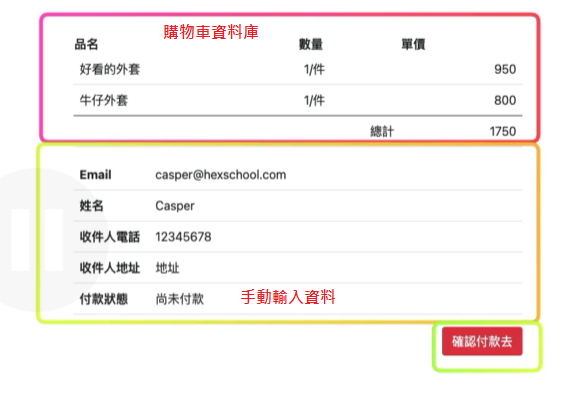
利用UserCart.vue送出訂單紐,送出orderID(Ex:-MofhSJGMRQSvlrWFZfU)
orderID抓資料回放到UserCheckout.vue確認訂單頁面
http://localhost:8080/#/user/checkout/-MofhSJGMRQSvlrWFZfU
(後端API方法)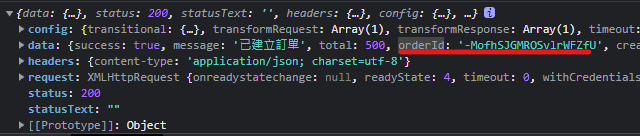
  created() {
    // $route.params 抓網址列用
    this.id = this.$route.params.productId;
    this.getProduct();
  },
(2)綁Router (checkout/:orderId)
src/router/index.js
  path: "/user",
    component: () => import("../views/Userboard.vue"),
    children: [
      {
        path: "cart",
        component: () => import("../views/UserCart.vue"),
      },
      {
        path: "product/:productId",
        component: () => import("../views/UserProduct.vue"),
      },
      {
        path: 'checkout/:orderId',
        component: () => import('../views/UserCheckout.vue'),
      },
(3)製作供使用者點擊可連結的按鈕
   <Form class="col-md-6" v-slot="{ errors }" @submit="createOrder">

    createOrder() {
      this.isLoading = true;
      const url = `${process.env.VUE_APP_API}api/${process.env.VUE_APP_PATH}/order`;
      const order = this.form;
      this.$http.post(url, { data: order }).then((res) => {
        console.log(res); // orderId
        this.isLoading = false;
        // 後端有方法會直接清空購物車
        this.getCart();

        // 抓ID送轉跳網址列
        this.orderId = res.data.orderId;
        this.$router.push(`checkout/${this.orderId}`);
      });
    },
              <tr v-if="cart.final_total !== cart.total">
                <td colspan="3" class="text-end text-success">折扣價</td>
                <td class="text-end text-success">
                  {{ $filters.currency(cart.final_total) }}
                </td>
              </tr>

            <span v-if="item.is_enabled === 1" class="text-success">啟用</span>
            <span v-else class="text-muted">未起用</span>
        :class="{ active: page === pages.current_page }"
        class="page-item"
                  <button
                    v-bind:disabled="this.status.loadingItem === item.id"
                    type="button"
                    class="btn btn-outline-danger"
                  >
(1)查看套件資料 package.json
(2)刪除套件
npm remove ???
npm remove element-ui
npm remove babel-plugin-component
 rouoxo