上次文章主要再講tailwind內建的類別的應用,而今天想來介紹tailwindcss的另一個優勢點,即是其customization(個人化)的部分,你可以在這裡定義tailwind本來沒提供的類別或字型。
這篇主要介紹一般網站以在React的做法和cdn引入tailwind的做法,另外基本上官網便能看到大部分教學。
以CDN:
<!doctype html>
<html>
<head>
  <meta charset="UTF-8">
  <meta name="viewport" content="width=device-width, initial-scale=1.0">
  <script src="https://cdn.tailwindcss.com"></script>
  <script>
    tailwind.config = {
      theme: {
        extend: {
          colors: {
            clifford: '#da373d',
          }
        }
      }
    }
  </script>
</head>
<body>
  <h1 class="text-3xl font-bold underline text-clifford">
    Hello world!
  </h1>
</body>
</html>
寫在script區塊中
在React:
在你的react專案中,可以輸入 npm install -D tailwindcss postcss autoprefixer 安裝tailwindcss及其他會用到的工具,接著你可以輸入 npx tailwindcss init -p 初始化指令會在root替你生成tailwind.config.js 和 postcss.config.js兩個檔案:
接著把tailwind.config.js改寫成這樣
/** @type {import('tailwindcss').Config} */
module.exports = {
  content: [
    "./src/**/*.{js,jsx,ts,tsx}"
  ],
  theme: {
    extend: {},
  },
  plugins: [],
}
然後在你的index.css檔案中的開頭加入這些
@tailwind base;
@tailwind components;
@tailwind utilities;
以上為最基礎的設置,接著其他設置主要都是在tailwind.config.js這個檔案中,我們來簡單介紹其中主要的選項。
剛才有設定過這個選項,這個地方你可以設置所有有用到tailwind的類別的HTML、templates、或是js寫的components
module.exports = {
  content: [
    './pages/**/*.{html,js}',
    './components/**/*.{html,js}',
    './index.html',
  ],
  // ...
}
切記不要用以下方式設置,不然tailwind可能會掃描到node_module
module.exports = {
  content: [
    './**/*.{html,js}',
  ],
  // ...
}
Theme是讓你定義顏色、字型、斷點、尺寸等等網站視覺會用到的屬性
module.exports = {
  theme: {
    screens: {
      sm: '480px',
      md: '768px',
      lg: '976px',
      xl: '1440px',
    },
    colors: {
      'blue': '#1fb6ff',
      'purple': '#7e5bef',
      'pink': '#ff49db',
      'orange': '#ff7849',
      'green': '#13ce66',
      'yellow': '#ffc82c',
      'gray-dark': '#273444',
      'gray': '#8492a6',
      'gray-light': '#d3dce6',
    },
    fontFamily: {
      sans: ['Graphik', 'sans-serif'],
      serif: ['Merriweather', 'serif'],
    },
    extend: {
      spacing: {
        '128': '32rem',
        '144': '36rem',
      },
      borderRadius: {
        '4xl': '2rem',
      }
    }
  }
}
如果你不知道某些你想個人化的屬性的設置方式,可以到官網查詢該屬性的頁面,下面有個Customizing your theme的地方會有範例,真的非常貼心XD。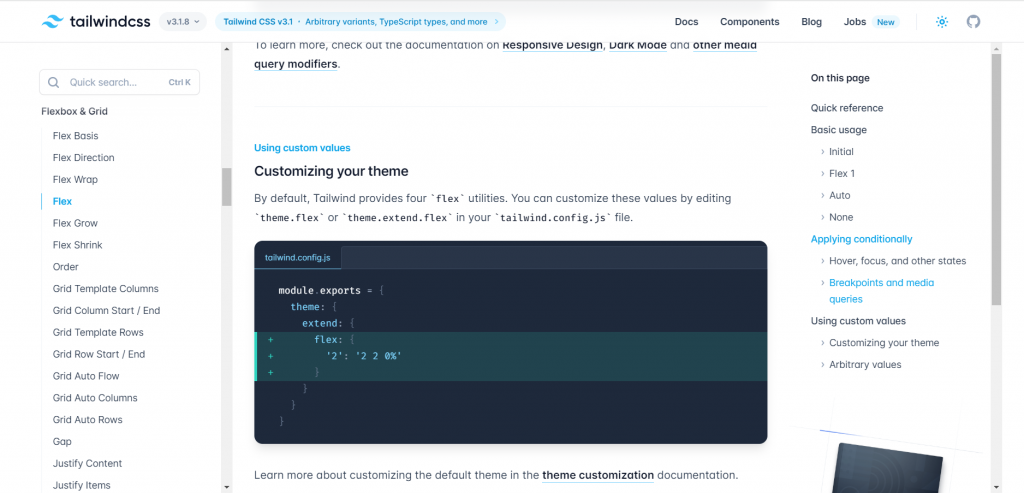
你可以在引入已寫好一套tailwind customization設置,這在多人開發的專案很有用,有時候你們會需要用一些相同的設定,來看以下範例。
寫好一個my-preset.js檔案
// Example preset
module.exports = {
  theme: {
    colors: {
      blue: {
        light: '#85d7ff',
        DEFAULT: '#1fb6ff',
        dark: '#009eeb',
      },
      pink: {
        light: '#ff7ce5',
        DEFAULT: '#ff49db',
        dark: '#ff16d1',
      },
      gray: {
        darkest: '#1f2d3d',
        dark: '#3c4858',
        DEFAULT: '#c0ccda',
        light: '#e0e6ed',
        lightest: '#f9fafc',
      }
    },
    fontFamily: {
      sans: ['Graphik', 'sans-serif'],
    },
    extend: {
      flexGrow: {
        2: '2',
        3: '3',
      },
      zIndex: {
        60: '60',
        70: '70',
        80: '80',
        90: '90',
        100: '100',
      },
    }
  },
  plugins: [
    require('@tailwindcss/typography'),
    require('@tailwindcss/aspect-ratio'),
  ],
}
在tailwind.config.js的plugin中引入my-preset.js
module.exports = {
  presets: [
    require('./my-preset.js')
  ],
  // Customizations specific to this project would go here
  theme: {
    extend: {
      minHeight: {
        48: '12rem',
      }
    }
  },
  variants: {
    extend: {
      backgroundColor: ['active']
    },
  },
}
以上即是customization的基本使用