接下來的幾篇會搭使用 gin 來講解後端架構的雛形,首先最基本的架構如下所示
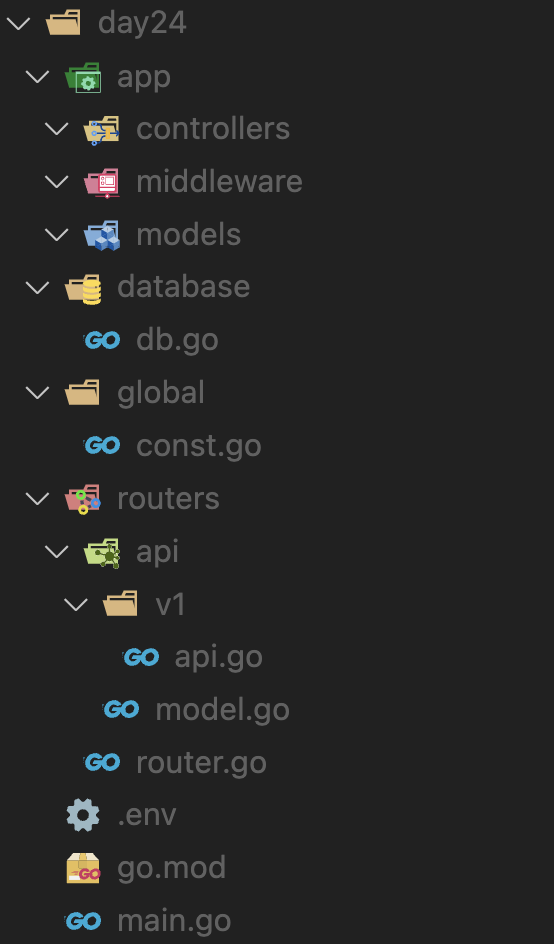
如下圖所示:

那我們今天先做一個最簡單的模型,就是打一支 api,該 api 能給出一筆資料,所謂的打 api 指的是模擬前端去呼叫一個網址,透過呼叫網址來執行一個功能,由於還不需要跟資料庫有互動,因此 app 與 database 的部分暫時不用定義,那我們會用到的有三個東西,分別為 routers 的 api 與 router 及 main:
// api.go
package v1

import (
	"net/http"

	"github.com/gin-gonic/gin"
)

// 如果是要給前端的 api,函式只能有一個輸入參數 *gin.Context 且不能有輸出
func HelloWorld(c *gin.Context) {
    // 包成 json 的格式丟給前端
	c.JSON(http.StatusOK, gin.H{
		"data": "Hello world!",
	})
}
// router.go
package routers

import (
	v1 "it/day24/routers/api/v1"

	"github.com/gin-gonic/gin"
)

func InitRouter() *gin.Engine {
	r := gin.Default()
	// 定義前端打的 api 路徑
	r.GET("/v1/hello_world", v1.HelloWorld)
	return r
}
// main.go
package main

import "it/day24/routers"

func main() {
	r := routers.InitRouter()

    // 定義在哪個 port 上執行
	r.Run(":8080")
}
執行 main,go 的時候,順利就可看到以下畫面
➜  day24 go run main.go
[GIN-debug] [WARNING] Creating an Engine instance with the Logger and Recovery middleware already attached.

[GIN-debug] [WARNING] Running in "debug" mode. Switch to "release" mode in production.
 - using env:   export GIN_MODE=release
 - using code:  gin.SetMode(gin.ReleaseMode)

[GIN-debug] GET    /v1/hello_world           --> it/day24/routers/api/v1.HelloWorld (3 handlers)
[GIN-debug] [WARNING] You trusted all proxies, this is NOT safe. We recommend you to set a value.
Please check https://pkg.go.dev/github.com/gin-gonic/gin#readme-don-t-trust-all-proxies for details.
[GIN-debug] Listening and serving HTTP on :8080
看到這個畫面,我們就可以利用 postman 來測試看看,首先先安裝官網 postman,理論上是免費的,所以如果遇到要收費的請先打著,別衝動,安裝好後會看到出現這個圖示

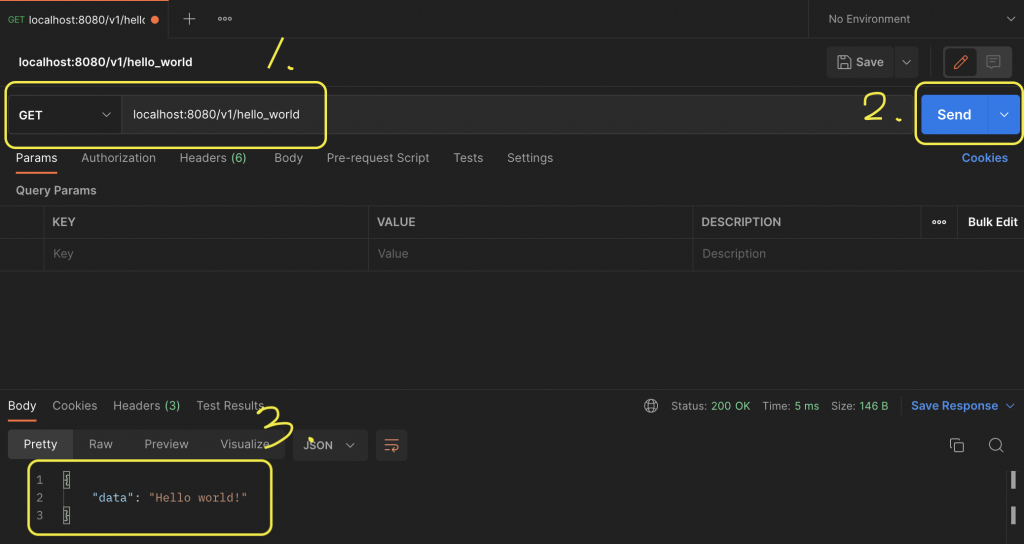
點擊後按照步驟 1 與 2 後,就可以看到結果 3

https://github.com/luckyuho/ithome30-golang/tree/main/day24
