
在一般的電腦中,我們會將某顆硬碟(或分割槽)「掛載」到某個目錄下,例如下圖:
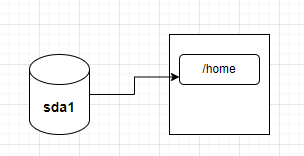
在上圖中,「sda1」是一顆硬碟分割槽,用來保存「/home」中的資料,這種方式就稱為「掛載(mount)」,而/home就稱為「掛載點(mount point)」。
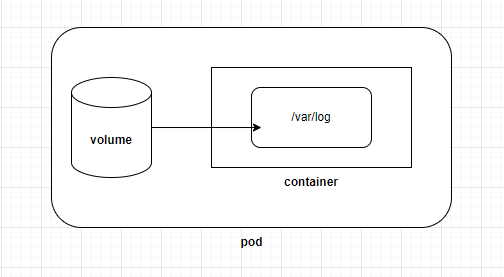
在 k8s 中,上面的「電腦」就是 Pod 中的 container,而「硬碟」就是 Pod 中的「volume」,我們同樣以「掛載」的方式將一個 volume 掛載到 Pod 中的 container:
除了存放資料之外,volume 還有另一個用途: 讓 Pod 中的多個 container 共享資料。例如在 Day 04 的「sidecar container」範例中,Pod 裡有兩個 container 需共享 log 資料,因此我們使用了一個 volume 來存放 log 資料。
在 Pod yaml 中使用 volume 的格式如下:
apiVersion: v1
kind: Pod
metadata:
  name: <pod-name>
spec:
  containers:
  - name: <container-name>
    image: <image-name>
    volumeMounts:
    - name: <volume-name>
      mountPath: <a path in container> # 就是「掛載點」
  volumes:
  - name: <volume-name>
    <volume-type>: <volume-configuration>
在上面的格式中,volume 直接定義於 Pod 內部,而不用事先定義一個 volume 物件,再引入 Pod 中,所以 Pod 與 volume 是共享同一個生命週期的。
也就是說,Pod 如果沒了,volume 也會消失。
另外可以注意到有 volume-type 需要設定,你可以依不同需求選擇 volume 類型,常見的有:
關於其他的 volume type,可參考官網
顧名思義,emptyDir 就是一個空的目錄,當 Pod 被刪除時,emptyDir 中的資料也會被刪除,所以它的目的並不是保存資料,而是讓 Pod 中的多個 container 共享資料。
範例
我們再看一次 Day 04「sidecar container」。範例中,我們使用了 emptyDir 來讓兩個 container 共享 log 資料:
# sidecar-demo.yaml
apiVersion: v1
kind: Pod
metadata:
  creationTimestamp: null
  labels:
    run: sidecar-demo
  name: sidecar-demo
spec:
  volumes:
    - name: shared-logs
      emptyDir: {}
  containers:
  - command:
    - sh
    - -c
    - while true; do date >> /var/log/date.log; sleep 1; done
    image: busybox
    name: main-container
    volumeMounts:
    - name: shared-logs
      mountPath: /var/log
  - command: ["sh", "-c", "tail -f /logs/date.log"]
    image: busybox
    name: sidecar-container
    volumeMounts:
    - name: shared-logs
      mountPath: /logs
  dnsPolicy: ClusterFirst
  restartPolicy: Always
status: {}
在上面的 yaml 中,我們在「spec.volumes」底下定義了一個名為「shared-logs」的 volume,並分別掛載到 main-container 的 /var/log 和 sidecar-container 的 /logs 目錄下:
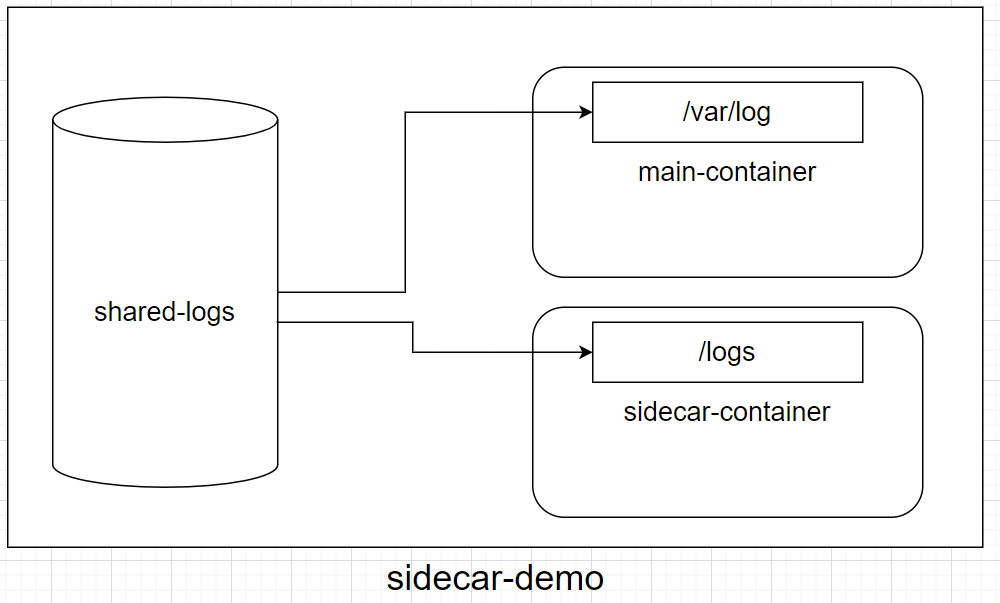
如此一來,一旦 main-container 寫入log 資料,sidecar-contaienr就能透過讀取掛載在自己 /logs 目錄下的 shared-logs,來收集 main-container 寫入的 data.log 資料。在 Day 04 有測試過共享的效果,需要的話可以回去翻一下。
CKA Tips:「用 emptyDir 來共享 Pod 中的容器資料」是一種常見的應用,建議多熟悉該應用場景和設定方式。
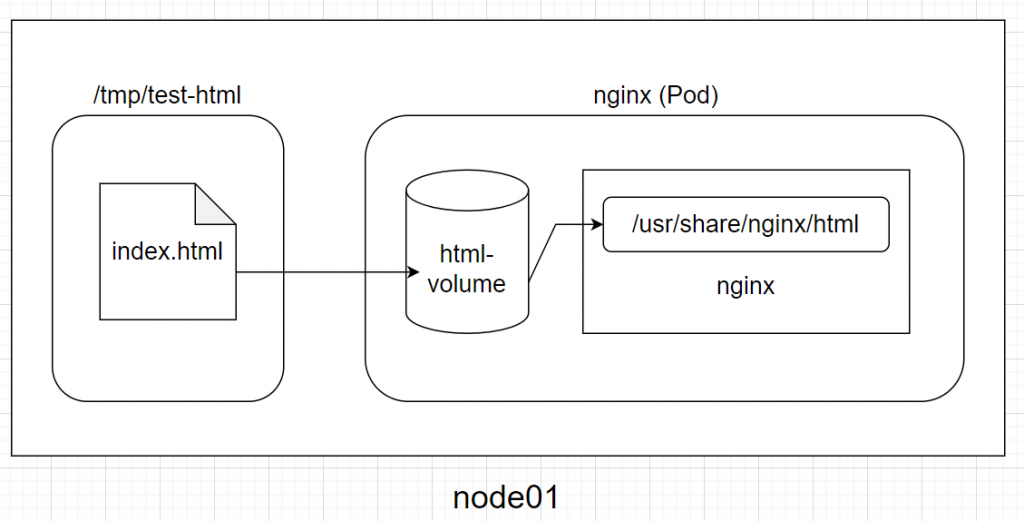
這裡的「host」指的是執行 Pod 的 Node,所以 hostPath 就是指定 Node 上的某目錄掛載到 Pod 中讓 container 存取。
不過要特別注意的是,指定的 hostPath 並不一定在每個 Node 上都有,如果 scheduler 把 Pod 調度其他 Node 上,就會造成資料無法讀取的情況。因此,hostPath 通常是用來測試 single-node cluster 的環境。
範例
在這個範例中,我們使用 hostPath 來指定自訂的 html 來取代 nginx 的預設網頁
(如果是 single-node cluster,就直接在 Master node 上建立即可)
ssh node01
mkdir /tmp/test-html
cat <<EOF | sudo tee /tmp/test-html/index.html
<!DOCTYPE html>
<html lang="en">
<head>
    <meta charset="UTF-8">
    <meta name="viewport" content="width=device-width, initial-scale=1.0">
    <title>Testing HostPath</title>
</head>
<body>
    <h1>Testing HostPath</h1>
</body>
</html>
EOF
# nginx.yaml
apiVersion: v1
kind: Pod
metadata:
  creationTimestamp: null
  labels:
    run: nginx
  name: nginx
spec:
  nodeName: node01
  containers:
  - image: nginx
    name: nginx
    ports:
    - containerPort: 80
    volumeMounts:
    - name: html-volume
      mountPath: /usr/share/nginx/html
  volumes:
  - name: html-volume
    hostPath:
      path: /tmp/test-html
kubectl apply -f nginx.yaml
如此一來,nginx 容器中的「/usr/share/nginx/html」底下就會是「/tmp/test-html」中的「index.html」:
curl $(kubectl get pod nginx -o jsonpath='{.status.podIP}')
輸出如下:
<!DOCTYPE html>
<html lang="en">
<head>
    <meta charset="UTF-8">
    <meta name="viewport" content="width=device-width, initial-scale=1.0">
    <title>Testing HostPath</title>
</head>
<body>
    <h1>Testing HostPath</h1>
</body>
</html>
可以看到標題是「Testing HostPath」,成功!
提醒
雖然 hostPath 用起來相當簡單,但是會有安全上的疑慮,例如來源不明的寫入會直接影響到 hostPath 的檔案。因此一般建議掛載成「read-only」模式:
......
  volumeMounts:
  - name: html-volume
    mountPath: /usr/share/nginx/html
    readOnly: true
......
昨天我們介紹過 configMap 和 secret,用來存放「key-value」或「檔案」,而這些資料也可以透過 volume 的方式掛載到 Pod 中。
範例
echo "USER: michael" > user.config
echo "EMAIL: micahel@mail.example" >> mail.config
kubectl create configmap user-data-config --from-file=user.config --from-file=mail.config
kubectl create secret generic user-data-secret --from-literal=PASSWORD=123456
# cm-secret.yaml
apiVersion: v1
kind: Pod
metadata:
  labels:
    run: cm-secret
  name: cm-secret
spec:
  containers:
  - image: nginx
    name: nginx
    ports:
    - containerPort: 80
    volumeMounts:
    - name: config-volume
      mountPath: /etc/config
    - name: secret-volume
      mountPath: /etc/secret
  volumes:
  - name: config-volume
    configMap:
      name: user-data-config
  - name: secret-volume
    secret:
      secretName: user-data-secret
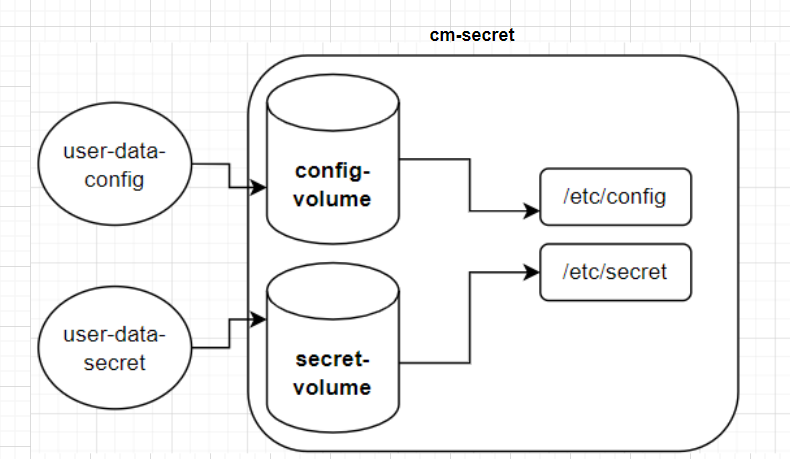
kubectl apply -f cm-secret.yaml
其實 configMap 和 secret 的掛載方式基本相同。上面 yaml 中的掛載設定圖解如下:
kubectl exec cm-secret -- cat /etc/config/user.config /etc/config/mail.config
輸出:
USER: michael
EMAIL: micahel@mail.example
kubectl exec -it cm-secret -- cat /etc/secret/PASSWORD
# output: 123456
可以發現,當 key-value 被當作檔案掛載到 Pod 中時,key 就會變成檔案名稱,value 則是檔案內容。
另外,如果我們修改 configMap 的內容,Pod 裡的檔案內容也會跟著改變:
kubectl edit configmap user-data-config
# Please edit the object below. Lines beginning with a '#' will be ignored,
# and an empty file will abort the edit. If an error occurs while saving this file will be
# reopened with the relevant failures.
#
# Please edit the object below. Lines beginning with a '#' will be ignored,
# and an empty file will abort the edit. If an error occurs while saving this file will be
# reopened with the relevant failures.
#
apiVersion: v1
data:
  mail.config: |
    EMAIL: micahel@mail.example
  user.config: |
    USER: Alice
......
sleep 60
kubectl exec -it cm-secret -- cat /etc/config/user.config
USER: Alice
之所以更新後須要過一段時間後才會看到變化,可參考官網說明。所以如果你看到還是「michael」先別著急,等一下再看。
參考資料
Configure a Pod to Use a ConfigMap
