在之前的文章 Electron 和 React 的環境設定 & 使用 Vite 來優化 Electron 應用的開發體驗,我們學習到怎麼利用現代的強大工具來整合跨平台框架:Electron ,以及前端技術:React 來實作跨平台應用程式,接下來,我們來透過簡單的實作範例來呈現如何透過這些技術方便的開發動態用戶介面。
本文將介紹如何通過 React 與 Electron 的整合來實現一個 桌面計時器應用。這個應用允許使用者創建、管理多個計時器,並且動態顯示每個計時器的倒數進度。
接下來,我們將通過一步步的操作來展示如何使用 React 和 Electron 實現一個基本的桌面計時器程式。
首先,我們將使用 electron-vite 來初始化專案,這將提供一個快速開發的環境,結合了 React 和 Electron。
執行以下命令來創建專案:
npm create @quick-start/electron desktop-timer -- --template react
cd desktop-timer
npm install

得到的目錄如下:
在 electron/main.js 中,可以看到 electron-vite 已經設定好 Electron 的主程序:創建應用視窗並載入 React 開發伺服器。
import { app, shell, BrowserWindow, ipcMain } from 'electron'
import { join } from 'path'
import { electronApp, optimizer, is } from '@electron-toolkit/utils'
import icon from '../../resources/icon.png?asset'

function createWindow() {
  // Create the browser window.
  const mainWindow = new BrowserWindow({
    width: 900,
    height: 670,
    show: false,
    autoHideMenuBar: true,
    ...(process.platform === 'linux' ? { icon } : {}),
    webPreferences: {
      preload: join(__dirname, '../preload/index.js'),
      sandbox: false
    }
  })

  mainWindow.on('ready-to-show', () => {
    mainWindow.show()
  })

  mainWindow.webContents.setWindowOpenHandler((details) => {
    shell.openExternal(details.url)
    return { action: 'deny' }
  })

  // HMR for renderer base on electron-vite cli.
  // Load the remote URL for development or the local html file for production.
  if (is.dev && process.env['ELECTRON_RENDERER_URL']) {
    mainWindow.loadURL(process.env['ELECTRON_RENDERER_URL'])
  } else {
    mainWindow.loadFile(join(__dirname, '../renderer/index.html'))
  }
}

// This method will be called when Electron has finished
// initialization and is ready to create browser windows.
// Some APIs can only be used after this event occurs.
app.whenReady().then(() => {
  // Set app user model id for windows
  electronApp.setAppUserModelId('com.electron')

  // Default open or close DevTools by F12 in development
  // and ignore CommandOrControl + R in production.
  // see https://github.com/alex8088/electron-toolkit/tree/master/packages/utils
  app.on('browser-window-created', (_, window) => {
    optimizer.watchWindowShortcuts(window)
  })

  // IPC test
  ipcMain.on('ping', () => console.log('pong'))

  createWindow()

  app.on('activate', function () {
    // On macOS it's common to re-create a window in the app when the
    // dock icon is clicked and there are no other windows open.
    if (BrowserWindow.getAllWindows().length === 0) createWindow()
  })
})

// Quit when all windows are closed, except on macOS. There, it's common
// for applications and their menu bar to stay active until the user quits
// explicitly with Cmd + Q.
app.on('window-all-closed', () => {
  if (process.platform !== 'darwin') {
    app.quit()
  }
})

// In this file you can include the rest of your app"s specific main process
// code. You can also put them in separate files and require them here.
這段程式碼會創建一個 Electron 視窗,並載入 Vite 提供的開發伺服器,在其中運行 React 應用。
接下來,我們將在 src/App.jsx 中編寫主要的計時器邏輯。這個應用允許使用者新增多個倒數計時器,每個計時器會動態更新,並且可以刪除不需要的計時器。
import React, { useState, useEffect } from 'react';
import './App.css';
function App() {
const [timers, setTimers] = useState([]);
const [newTimerName, setNewTimerName] = useState('');
const [newTimerDuration, setNewTimerDuration] = useState(60); // 預設為 60 秒
// 新增一個計時器
const addTimer = () => {
if (newTimerName.trim() && newTimerDuration > 0) {
const newTimer = {
id: Date.now(),
name: newTimerName,
duration: newTimerDuration,
remaining: newTimerDuration,
active: true
};
setTimers([...timers, newTimer]);
setNewTimerName('');
setNewTimerDuration(60); // 重設時間
}
};
// 刪除計時器
const deleteTimer = (id) => {
setTimers(timers.filter((timer) => timer.id !== id));
};
// 每秒更新計時器的剩餘時間
useEffect(() => {
const interval = setInterval(() => {
setTimers((prevTimers) =>
prevTimers.map((timer) => {
if (timer.active && timer.remaining > 0) {
return { ...timer, remaining: timer.remaining - 1 };
}
return timer;
})
);
}, 1000);
return () => clearInterval(interval);
}, []);
return (
<div className="timer-app">
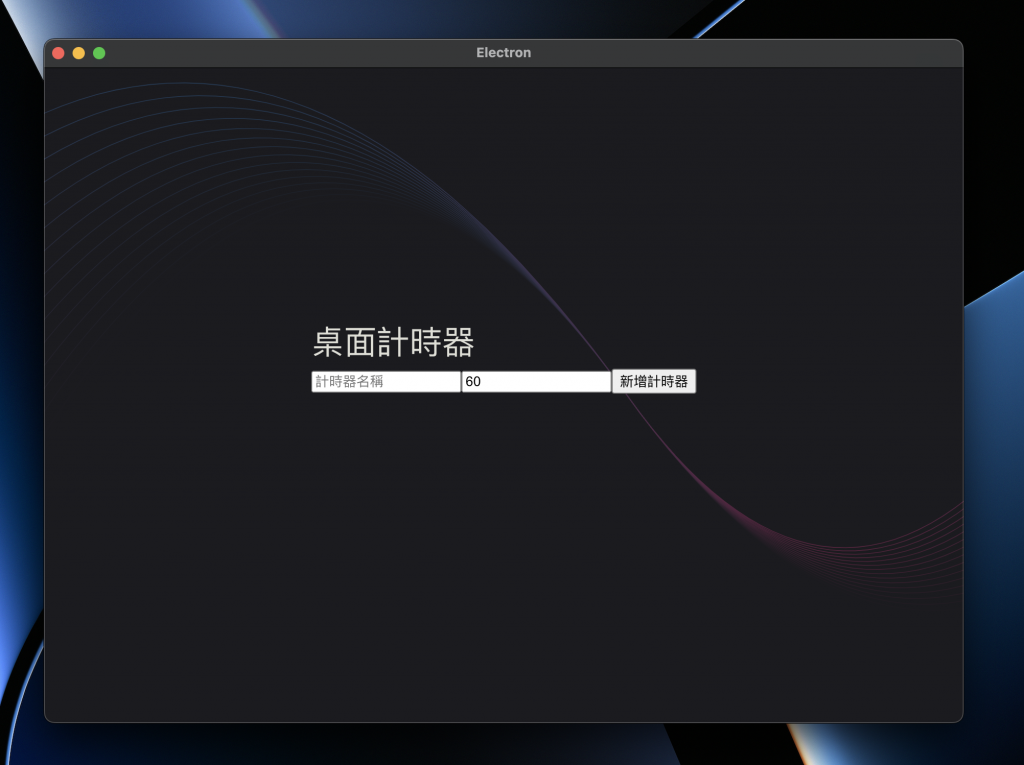
<h1>桌面計時器</h1>
<div className="input-area">
<input
type="text"
value={newTimerName}
onChange={(e) => setNewTimerName(e.target.value)}
placeholder="計時器名稱"
/>
<input
type="number"
value={newTimerDuration}
onChange={(e) => setNewTimerDuration(Number(e.target.value))}
placeholder="時間(秒)"
/>
<button onClick={addTimer}>新增計時器</button>
</div>
<ul className="timer-list">
{timers.map((timer) => (
<li key={timer.id}>
<h2>{timer.name}</h2>
<p>剩餘時間:{timer.remaining} 秒</p>
<button onClick={() => deleteTimer(timer.id)}>刪除</button>
</li>
))}
</ul>
</div>
);
}
export default App;
在這個範例中:
為了讓程式看起來更加美觀,我們可以在 src/App.css 中設置一些簡單的樣式:
body {
  font-family: Arial, sans-serif;
  margin: 0;
  padding: 0;
}

.timer-app {
  width: 400px;
  margin: 50px auto;
  text-align: center;
}

.input-area {
  margin-bottom: 20px;
}

.input-area input {
  padding: 10px;
  margin-right: 10px;
}

.timer-list {
  list-style-type: none;
  padding: 0;
}

.timer-list li {
  padding: 15px;
  margin-bottom: 10px;
  background-color: #f0f0f0;
  border-radius: 8px;
}
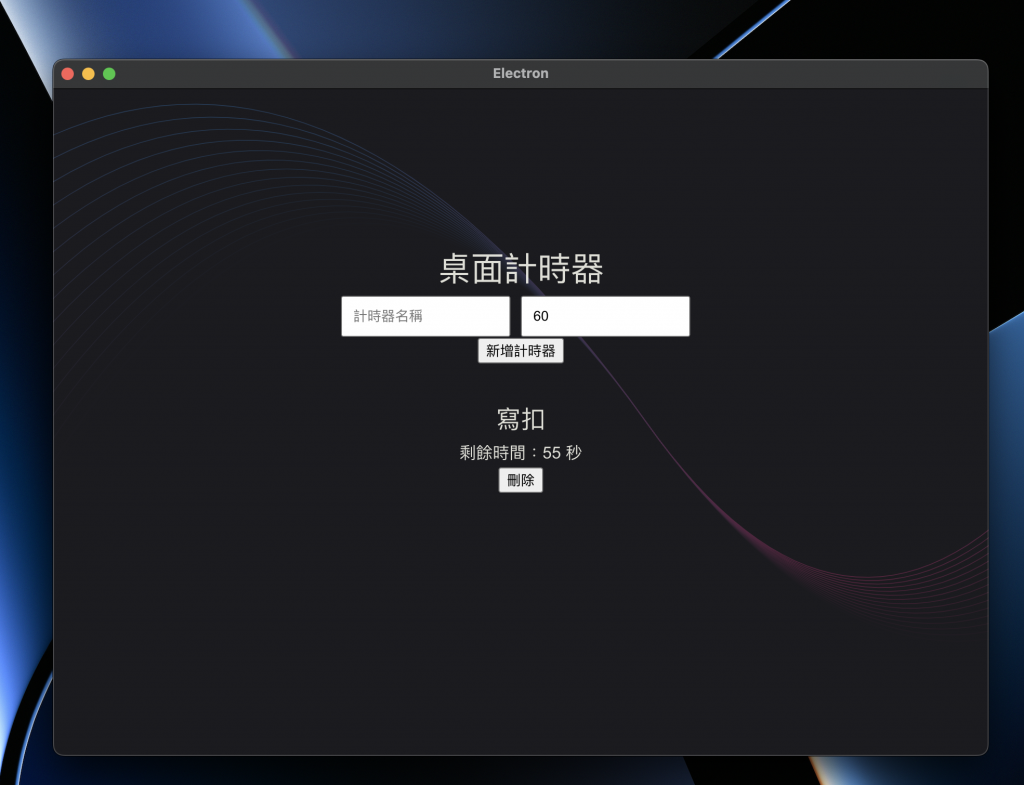
完成上述步驟後,當使用者新增一個計時器時,計時器將會即時顯示在界面上,並開始倒數。每當倒數一秒,界面上的時間也會自動更新。這是一個典型的 動態用戶界面 範例,展示了 React 如何即時響應使用者操作並更新介面內容。
讀者可以進一步擴展應用,加入例如「暫停計時器」、「倒數完成後提醒」等功能來增強使用者體驗,後面的章節會公佈答案~
通過這個 桌面計時器應用,我們展示了如何使用 React 和 Electron 來構建一個動態的桌面應用程式。React 的狀態管理讓我們能夠即時更新用戶界面,而 Electron 提供了創建桌面應用程式的能力。這個程式還可以進一步擴展,支持更多的功能,例如多視窗應用或本地文件的存儲,讓它更符合實際需求(後續的章節會說明)。
React 與 Electron 的整合不僅提升了開發效率,還提供了強大的靈活性,讓開發者能夠快速創建動態且高效的桌面應用程式。


 iThome鐵人賽