上一篇文章,恭喜您為您的網站建立了一個網域和SSL,接下來就要進入重頭戲——網頁追蹤設定!
(小提醒:別人的網站,除非您的該網站的管理員,否則不能隨意變更它的網頁原始碼。但是,為了要有效追蹤到您想要的資料,您只能建立您自己的模擬釣魚網站,並在其他電腦建立網站防火牆(Port 80、Port 443)、網域和SSL。)
首先,準備另外一台電腦,然後到親戚家架設主機(前提是要經過同意),接著上ChatGPT輸入指令生成模擬釣魚網頁,生成結果如下:
[Drink Order Website.html]
<!DOCTYPE html>
<html lang="zh-Hant">
<head>
<meta charset="UTF-8">
<meta name="viewport" content="width=device-width, initial-scale=1.0">
<title>飲料訂購網站</title>
<link rel="stylesheet" href="style.css">
</head>
<body>
<header>
<h1>歡迎訂購飲料</h1>
<img src="images/logo.png" alt="飲料店Logo" class="logo">
</header>
<main>
<form action="success.html" method="POST" id="orderForm">
<label for="name">姓名:</label>
<input type="text" id="name" name="name" required>
<label for="phone">電話:</label>
<input type="tel" id="phone" name="phone" required>
<label for="email">電子信箱:</label>
<input type="email" id="email" name="email" required>
<label for="address">地址:</label>
<input type="text" id="address" name="address" required>
<label for="drink">選擇飲料:</label>
<select id="drink" name="drink" required>
<option value="">請選擇</option>
<option value="珍珠奶茶">珍珠奶茶</option>
<option value="紅茶">紅茶</option>
<option value="綠茶">綠茶</option>
<option value="冬瓜茶">冬瓜茶</option>
</select>
<label for="quantity">數量:</label>
<input type="number" id="quantity" name="quantity" min="1" required>
<button type="submit" id="submitBtn">送出訂單</button>
</form>
</main>
<footer>
<p>© 2025 飲料訂購網站</p>
</footer>
</body>
</html>
[success.html]
<!DOCTYPE html>
<html lang="zh-Hant">
<head>
    <meta charset="UTF-8">
    <title>訂購成功</title>
    <link rel="stylesheet" href="style.css">
</head>
<body>
    <main class="success-message">
        <h2>感謝您的訂購!</h2>
        <p>我們已收到您的訂單,將盡快為您送達。</p>
        <a href="index.html">返回首頁</a>
    </main>
</body>
</html>
[style.css]
body {
    font-family: Arial, sans-serif;
    background-color: #f0f8ff;
    margin: 0;
    padding: 0;
    color: #333;
}

header {
    background-color: #4db6ac;
    color: white;
    padding: 1em;
    text-align: center;
}

.logo {
    width: 80px;
    margin-top: 10px;
}

main {
    padding: 2em;
    max-width: 600px;
    margin: auto;
    background: white;
    border-radius: 8px;
    box-shadow: 0 0 10px rgba(0,0,0,0.1);
}

form label {
    display: block;
    margin-top: 1em;
}

form input, form select {
    width: 100%;
    padding: 0.5em;
    margin-top: 0.2em;
}

button {
    margin-top: 1.5em;
    padding: 0.7em 1.5em;
    background-color: #4db6ac;
    color: white;
    border: none;
    border-radius: 5px;
    cursor: pointer;
}

button:hover {
    background-color: #00897b;
}

.success-message {
    text-align: center;
    padding: 3em;
}
生成完畢後,就放到另一台電腦的「XAMPP>htdocs」。
接下來回到SniperPhish,登入後前往快速追蹤設定,設定一個快速追蹤碼。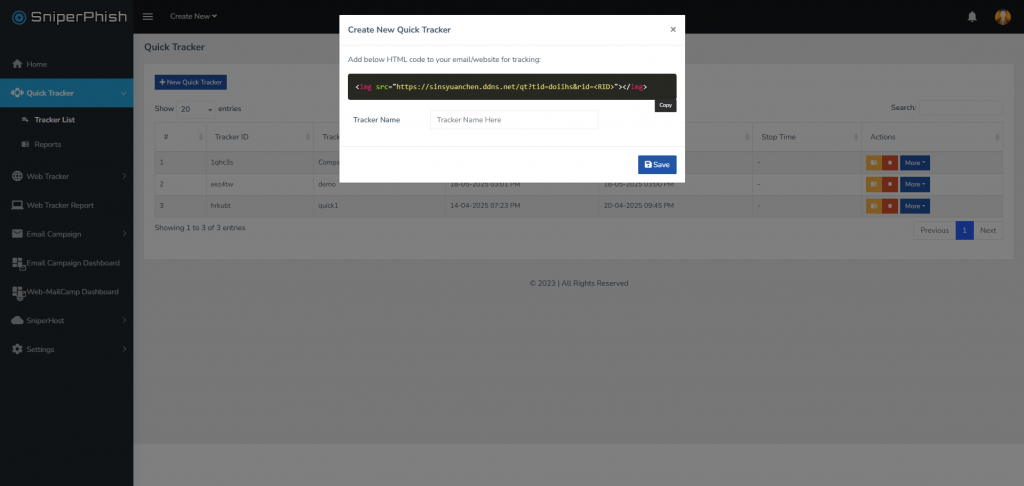
並將此追蹤碼植入到目標網頁的「Drink Order Website.html」的head裡面,呈現如下:
<!DOCTYPE html>
<html lang="zh-Hant">
<head>
    <meta charset="UTF-8">
    <meta name="viewport" content="width=device-width, initial-scale=1.0">
    <title>飲料訂購網站</title>
    <link rel="stylesheet" href="style.css">
    <img src="https://sinsyuanchen.ddns.net/qt?tid=eez4tw&rid=<RID>"></img>
</head>
<!--下略-->
這樣就成功建立一個目標網頁和快速追蹤設定了,接下來下一篇將介紹網頁追蹤!
 sinsyuan0522
