如何使用 LangGraph 來做一個 LLM Application 本身不是什麼難事,真正棘手的事情是,如何判斷一個 LLM application 應該長成哪一種 workflow shape,這是系統設計問題,不是語法問題。
事實上,大多數 LLM application 不需要一開始就做成 agent,更常見的情況是,你需要一個可控的 workflow,明確定義任務如何被拆解、分支、並行、派工與修正。
這也是 LangGraph 最實用的地方,它需要你把 LLM 系統中的控制流程寫清楚,系統設計流程的透明,也有助於未來更新和擴展。
本篇文章會聚焦五個核心 workflow patterns:
每個 pattern 我們只講三件事:
看完這篇文章,能幫助你學會如何判斷不同開發需求和情境下該如何設計 workflow,為你的 LLM Systems 開發打下一個重要的基礎!
接下來的範例都會用同一個結構進行:
如果你還不熟悉開發環境,我建議你可以先從 Google Colab 開始,並在那裡設定環境和相關套件:
!pip -q install -U langgraph langchain langchain-core langchain-google-genai
Go to Google AI Studio to obtain your API key. As of the time this article is being published, free usage credits are still available. Then set your GOOGLE_API_KEY as follows:
請前往 Google AI Studio 取得 API 金鑰,截至本文發佈時,仍有免費使用額度。然後如下設定 GOOGLE_API_KEY:
import os
import getpass

if "GOOGLE_API_KEY" not in os.environ:
    os.environ["GOOGLE_API_KEY"] = getpass.getpass("Enter your Google API key: ")
這裡我們先設定好會用到的模型物件和相關套件:
from typing import Literal
from typing_extensions import TypedDict

from langchain_google_genai import ChatGoogleGenerativeAI
from langgraph.graph import StateGraph, START, END

llm = ChatGoogleGenerativeAI(
    model="gemini-2.5-flash",
    temperature=0,
)
Prompt Chaining 是最直覺的 workflow pattern,它適合用在那些本來就有明確順序的任務,前一步先產生中間結果,後一步再接著處理這個結果,比如先產生 draft,再 polish;先寫 outline,再展開成完整文章;先生成答案,再做檢查。
這個 pattern 的重點是如何把一個大任務,拆成幾個更容易完成的小步驟,逐步完成。代價是會多幾次 LLM call,會導致 latency 增加,但每個步驟的任務會更清楚,結果通常也更加穩定。
在 LangGraph 裡,Prompt Chaining 就是一條固定流程:
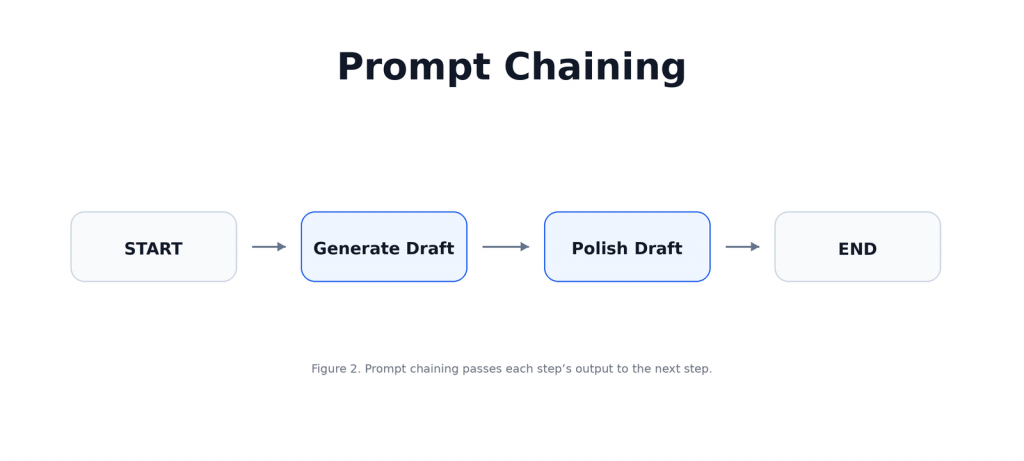
本文將設計一個簡單的文案撰寫器,先根據 topic 產生一版初稿,再把初稿改得更清楚、更有結構。這個例子的核心在於:不要讓一個 prompt 做完所有事,而是讓每個 node 專心做好一個步驟,依次傳遞完成的工作給下一個節點。
先定義這個 workflow 的 state,這裡只需要三個欄位:使用者輸入的 topic、第一步產生的 draft,以及第二步修正後的 final:
class ChainState(TypedDict):
    topic: str
    draft: str
    final: str
第一個 node 負責根據 topic 產生初稿,它不需要一次做到完美,只要先產生一版可用的草稿:
def generate_draft(state: ChainState):
    prompt = f"""
    Write a short beginner-friendly explanation of this topic in 4 bullet points:

    {state['topic']}
    """
    response = llm.invoke(prompt)
    return {"draft": response.content}
第二個 node 負責 polish,它接收上一個 node 產生的 draft,再把內容改得更清楚、更有結構:
def polish_draft(state: ChainState):
    prompt = f"""
    Improve the following draft.

    Requirements:
    - clearer
    - more structured
    - concise but practical
    - keep it beginner-friendly

    Draft:
    {state['draft']}
    """
    response = llm.invoke(prompt)
    return {"final": response.content}
接著把兩個 node 接成一條固定流程:
builder = StateGraph(ChainState)

builder.add_node("generate_draft", generate_draft)
builder.add_node("polish_draft", polish_draft)

builder.add_edge(START, "generate_draft")
builder.add_edge("generate_draft", "polish_draft")
builder.add_edge("polish_draft", END)

prompt_chain_graph = builder.compile()
最後丟入一個 topic 執行:
result = prompt_chain_graph.invoke(
    {
        "topic": "What is retrieval-augmented generation (RAG)?",
        "draft": "",
        "final": "",
    }
)

print(result["final"])
流程被拆開後,每一步的責任都變得更清楚,也能將每項任務的專注度提升,讓生成結果更符合預期。
Routing 適合用在那些「不同輸入應該走不同處理方式」的任務,因為他的核心理念是先判斷使用者的 request 屬於哪一種類型,再把它送到對應的處理路徑。也就是說,不要讓同一個 prompt 硬扛所有情境,而是先分類,再交給更適合的 node 處理。
這個 pattern 的價值在於分工,當不同任務需要不同 prompt、不同 response style、不同工具,甚至不同模型時,Routing 會比單一路徑更清楚,也更容易控制,在 LangGraph 裡,Routing 通常會長這樣:
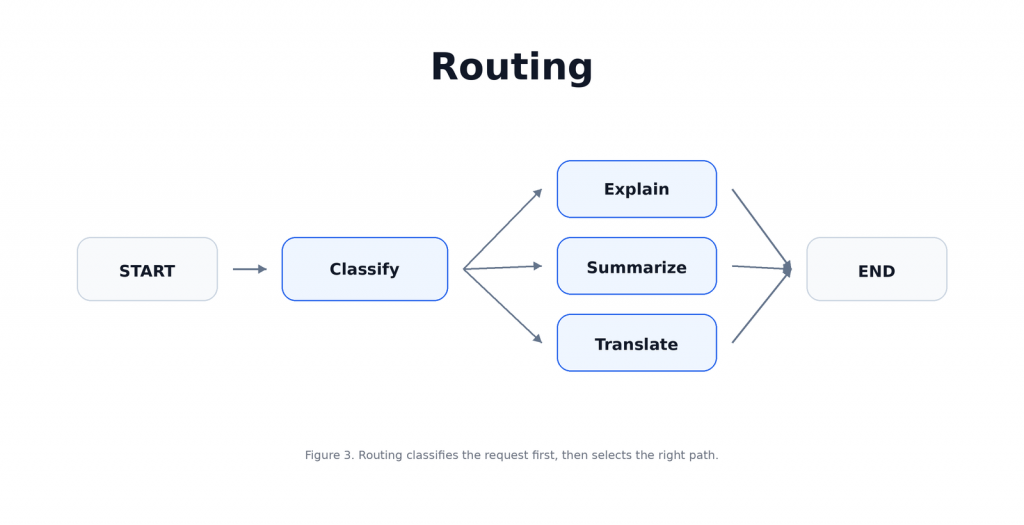
本文將設計一個簡單的三路 router,先判斷使用者輸入是要 explain、summarize,還是 translate,再把 request 送到對應的 node 處理。
接著定義 Routing workflow 的 state,這裡需要三個欄位:原始輸入 user_input、分類後的 route,以及最後產生的 output:
class RouterState(TypedDict):
    user_input: str
    route: str
    output: str
第一個 node 負責判斷使用者的 request 類型,這裡我們只允許三種 route:explain、summarize、translate:
def classify_route(state: RouterState):
    prompt = f"""
    Classify the user's request into exactly one label:
    - explain
    - summarize
    - translate

    Only return one label.

    User request:
    {state['user_input']}
    """
    response = llm.invoke(prompt)
    route = response.content.strip().lower()

    if route not in {"explain", "summarize", "translate"}:
        route = "explain"

    return {"route": route}
接著定義三個處理分支,每個 node 只負責一種任務,這就是 Routing 的重點:
def explain_node(state: RouterState):
    prompt = f"Explain this clearly for a beginner:\n\n{state['user_input']}"
    response = llm.invoke(prompt)
    return {"output": response.content}

def summarize_node(state: RouterState):
    prompt = f"Summarize this in 3 bullet points:\n\n{state['user_input']}"
    response = llm.invoke(prompt)
    return {"output": response.content}

def translate_node(state: RouterState):
    prompt = f"Translate the following into Traditional Chinese:\n\n{state['user_input']}"
    response = llm.invoke(prompt)
    return {"output": response.content}
再來寫一個 routing function,它會根據 route 的值,決定下一個要走哪個 node:
def route_by_label(
    state: RouterState,
) -> Literal["explain_node", "summarize_node", "translate_node"]:
    if state["route"] == "explain":
        return "explain_node"

    if state["route"] == "summarize":
        return "summarize_node"

    return "translate_node"
最後把 classifier 和三個分支接起來,這裡的關鍵是 add_conditional_edges(),它讓 graph 可以根據 state 選擇不同路徑:
builder = StateGraph(RouterState)

builder.add_node("classify_route", classify_route)
builder.add_node("explain_node", explain_node)
builder.add_node("summarize_node", summarize_node)
builder.add_node("translate_node", translate_node)

builder.add_edge(START, "classify_route")

builder.add_conditional_edges(
    "classify_route",
    route_by_label,
    {
        "explain_node": "explain_node",
        "summarize_node": "summarize_node",
        "translate_node": "translate_node",
    },
)

builder.add_edge("explain_node", END)
builder.add_edge("summarize_node", END)
builder.add_edge("translate_node", END)

routing_graph = builder.compile()
現在丟入一個 request 測試:
result = routing_graph.invoke(
    {
        "user_input": "Explain what a vector database is.",
        "route": "",
        "output": "",
    }
)

print("Route:", result["route"])
print()
print(result["output"])
當任務類型開始變多時,Routing 會讓整個 workflow 比單一路徑更清楚、更容易維護,同時你能夠針對不同情境設計。
Parallelization 適合用在那些可以被安全拆開、彼此不互相依賴的任務,它的核心理念是把多個可獨立執行的工作同時跑完,最後再把結果合併起來。也就是說,不讓一個 prompt 同時處理所有角度,而是把不同面向拆給不同 node,讓每個 node 專心完成自己的部分。
這個 pattern 的核心價值是讓任務分工更清楚,當你需要從不同角度分析同一個問題,例如 technical、business、beginner,或是需要同時進行回答生成與安全檢查時,Parallelization 會比單一路徑更穩,也更容易擴充,在 LangGraph 裡,Parallelization 通常會長這樣:
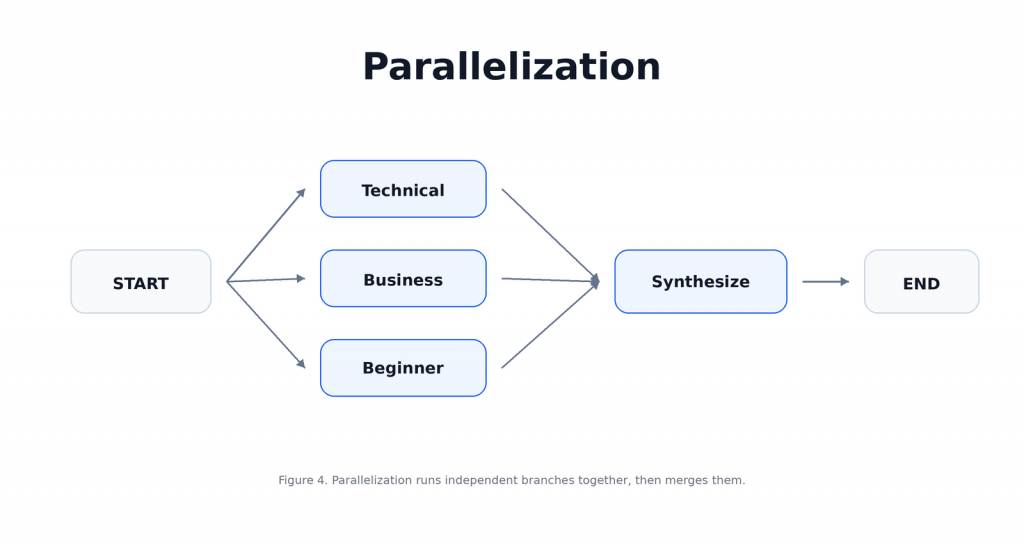
本文將設計一個簡單的多視角摘要器,讓三個 node 分別產生 technical summary、business summary 和 beginner summary,最後再由一個 synthesis node 把三個結果整合成完整回答。
這個例子的核心在於:不要讓一個 node 同時扮演所有角色,而是把可以獨立完成的工作拆開,並行處理後再統一整合。
首先定義 Parallelization workflow 的 state,這裡會保存同一個 topic,以及三個平行分支各自產生的結果,最後再存成 final_output:
class ParallelState(TypedDict):
    topic: str
    technical_summary: str
    business_summary: str
    beginner_summary: str
    final_output: str
第一個 worker 負責從 technical 角度解釋,它只專注在架構、機制與實作細節:
def technical_worker(state: ParallelState):
    prompt = f"""
    Explain the following topic for a technical audience.
    Focus on architecture, mechanisms, and implementation details.
    Keep it concise.

    Topic:
    {state['topic']}
    """
    response = llm.invoke(prompt)
    return {"technical_summary": response.content}
第二個 worker 負責從 business 角度解釋,它只專注在價值、使用情境、取捨與影響:
def business_worker(state: ParallelState):
    prompt = f"""
    Explain the following topic for a business audience.
    Focus on value, use cases, trade-offs, and impact.
    Keep it concise.

    Topic:
    {state['topic']}
    """
    response = llm.invoke(prompt)
    return {"business_summary": response.content}
第三個 worker 負責從 beginner 角度解釋,它只專注在用簡單語言和具體例子說清楚概念:
def beginner_worker(state: ParallelState):
    prompt = f"""
    Explain the following topic for a complete beginner.
    Use simple language and concrete examples.
    Keep it concise.

    Topic:
    {state['topic']}
    """
    response = llm.invoke(prompt)
    return {"beginner_summary": response.content}
接著定義 synthesis node,它會把三個分支的輸出整合成一個結構清楚的回答:
def synthesize_parallel(state: ParallelState):
    prompt = f"""
    Combine the following three perspectives into one well-structured response.

    Technical summary:
    {state['technical_summary']}

    Business summary:
    {state['business_summary']}

    Beginner summary:
    {state['beginner_summary']}

    Requirements:
    - organize clearly
    - avoid repetition
    - preserve the useful differences between perspectives
    """
    response = llm.invoke(prompt)
    return {"final_output": response.content}
最後把 graph 接起來,這裡的重點是三個 worker 都從 START 出發,代表它們可以獨立執行;三個分支完成後,再一起進入 synthesize_parallel:
builder = StateGraph(ParallelState)

builder.add_node("technical_worker", technical_worker)
builder.add_node("business_worker", business_worker)
builder.add_node("beginner_worker", beginner_worker)
builder.add_node("synthesize_parallel", synthesize_parallel)

builder.add_edge(START, "technical_worker")
builder.add_edge(START, "business_worker")
builder.add_edge(START, "beginner_worker")

builder.add_edge("technical_worker", "synthesize_parallel")
builder.add_edge("business_worker", "synthesize_parallel")
builder.add_edge("beginner_worker", "synthesize_parallel")

builder.add_edge("synthesize_parallel", END)

parallel_graph = builder.compile()
現在丟入一個 topic 執行:
result = parallel_graph.invoke(
    {
        "topic": "What is a vector database in AI applications?",
        "technical_summary": "",
        "business_summary": "",
        "beginner_summary": "",
        "final_output": "",
    }
)

print("=== Technical ===")
print(result["technical_summary"])

print("\n=== Business ===")
print(result["business_summary"])

print("\n=== Beginner ===")
print(result["beginner_summary"])

print("\n=== Final Output ===")
print(result["final_output"])
在這個例子當中,三個 worker 不需要互相等待或共享中間結果,它們只需要同一個 topic,這就是 Parallelization 適合的情境,能拆開的任務就拆開,最後再由 synthesis node 統一整合。
Orchestrator-Workers 看起來很像 Parallelization,但它處理的是更動態的問題,就是分支不是事先寫死的,且在 Parallelization 裡,你通常已經知道要開哪些分支,例如 technical、business、beginner,但在 Orchestrator-Workers 裡,你只知道目標,不一定知道任務應該怎麼拆。
所以 orchestrator 是會根據輸入內容來動態規劃任務,再把拆好的 subtasks 派給 workers 執行,最後再把 workers 的結果整合起來。
這個 pattern 的價值在於動態拆解,當每次 request 需要的子任務數量不同、類型不同,或是必須根據輸入內容才知道該怎麼分工時,Orchestrator-Workers 會比固定的 parallel branches 更適合,這樣的架構模式能提供更靈活的設計,同時設計上也要更加小心。在 LangGraph 裡,Orchestrator-Workers 通常會長成這樣:
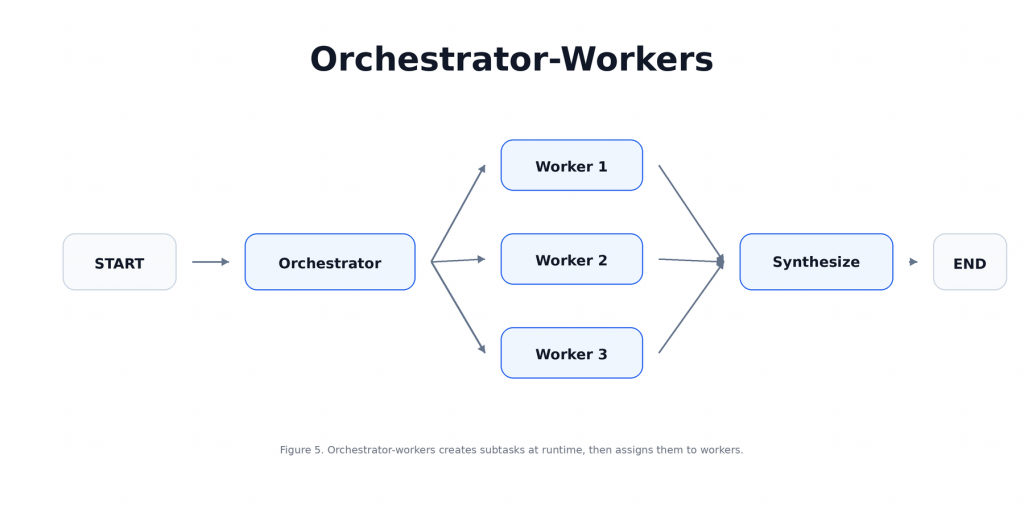
本文將設計一個簡單的 report planner,orchestrator 會先根據 topic 規劃 report sections,接著每個 worker 負責撰寫其中一個 section,最後再把所有 sections 合併成完整 report。
先定義 Orchestrator-Workers 需要的 schema,這裡我們先讓 orchestrator 輸出一組 report sections,每個 section 都有 name 和 description:
from pydantic import BaseModel, Field
from typing import List, Annotated
from langgraph.types import Send
import operator

class Section(BaseModel):
    name: str = Field(description="Section name")
    description: str = Field(description="What this section should cover")

class Sections(BaseModel):
    sections: List[Section]
接著定義 state,OrchestratorState 是整個 graph 的主要狀態,WorkerState 則是每個 worker 執行時會收到的局部狀態:
class OrchestratorState(TypedDict):
    topic: str
    sections: list[Section]
    completed_sections: Annotated[list, operator.add]
    final_report: str

class WorkerState(TypedDict):
    section: Section
    completed_sections: Annotated[list, operator.add]
第一個 node 是 orchestrator,它會根據 topic 動態規劃 report sections,而不是由我們事先寫死有哪些分支:
planner = llm.with_structured_output(Sections)

def orchestrator(state: OrchestratorState):
    planned = planner.invoke(f"""
    Create a concise report plan with 3 to 5 sections.

    Topic:
    {state['topic']}

    Each section should have:
    - a short name
    - a short description
    """)

    return {"sections": planned.sections}
接著定義 worker,每個 worker 會收到一個 section,並負責完成該 section 的內容:
def worker(state: WorkerState):
    section = state["section"]

    prompt = f"""
    Write a concise report section.

    Section name:
    {section.name}

    Section description:
    {section.description}

    Requirements:
    - clear
    - useful
    - avoid fluff
    """

    response = llm.invoke(prompt)
    formatted = f"## {section.name}\n\n{response.content}\n"

    return {"completed_sections": [formatted]}
最後定義 synthesis node,它會把所有 worker 完成的 sections 合併成一份 report:
def synthesize_report(state: OrchestratorState):
    report = "\n".join(state["completed_sections"])
    return {"final_report": report}
接著寫一個 worker assignment function,這裡的 Send 是重點,它讓 graph 可以根據 orchestrator 產生的 sections,在 runtime 動態派發 worker:
def assign_workers(state: OrchestratorState):
    return [
        Send("worker", {"section": section})
        for section in state["sections"]
    ]
最後把 graph 接起來,整個流程是 orchestrator 先規劃 sections,再動態派發 workers,最後合併結果:
builder = StateGraph(OrchestratorState)

builder.add_node("orchestrator", orchestrator)
builder.add_node("worker", worker)
builder.add_node("synthesize_report", synthesize_report)

builder.add_edge(START, "orchestrator")

builder.add_conditional_edges(
    "orchestrator",
    assign_workers,
    ["worker"],
)

builder.add_edge("worker", "synthesize_report")
builder.add_edge("synthesize_report", END)

orchestrator_graph = builder.compile()
現在丟入一個 topic 執行:
result = orchestrator_graph.invoke(
    {
        "topic": "How LangGraph workflows differ from agent-style systems",
        "sections": [],
        "completed_sections": [],
        "final_report": "",
    }
)

print("=== Planned Sections ===")
for section in result["sections"]:
    print(f"- {section.name}: {section.description}")

print("\n=== Final Report ===")
print(result["final_report"])
你可以清楚看到 workers 不是一開始就寫死在 graph 裡的固定分支,而是由 orchestrator 根據輸入內容動態產生,這也是 Orchestrator-Workers 和 Parallelization 最大的差別。
Evaluator-Optimizer 適合用在那些可以被明確評估、而且能透過回饋變好的任務。它的核心理念是先由 generator 產生一版結果,再由 evaluator 檢查品質並給出 feedback。如果結果通過,就結束;如果還不夠好,就帶著 feedback 回到 generator 重新產生。
這個 pattern 的價值在於迭代修正,但前提是你必須知道什麼叫做「更好」。如果評估標準很模糊,這個 loop 只會讓系統多花 token,卻不一定真的提升品質,在 LangGraph 裡,Evaluator-Optimizer 通常會長這樣:

本文將設計一個簡單的寫作修正器,generator 會先根據 task 產生 draft,evaluator 會判斷這份 draft 是否通過要求,如果通過就停止,如果沒有通過,就把 feedback 送回 generator 再修一次,直到通過或達到最大迭代次數。
這個例子的核心在於:不要只是讓模型一直重寫,而是讓每一輪重寫都帶著明確 feedback。
接著定義 Evaluator-Optimizer workflow 的 state,這裡需要保存任務本身、目前 draft、evaluator 給的 feedback、是否通過的 decision,以及目前迭代次數:
class EvalState(TypedDict):
    task: str
    draft: str
    feedback: str
    decision: str
    iteration: int
    max_iterations: int
第一個 node 是 generator,如果還沒有 draft,它會先產生初稿;如果已經有 feedback,它就根據 feedback 修正上一版 draft:
def generate_answer(state: EvalState):
    if state["draft"] and state["feedback"]:
        prompt = f"""
        Improve the draft according to the feedback.

        Task:
        {state['task']}

        Current draft:
        {state['draft']}

        Feedback:
        {state['feedback']}
        """
    else:
        prompt = f"""
        Complete the following task clearly and concisely.

        Task:
        {state['task']}
        """

    response = llm.invoke(prompt)

    return {
        "draft": response.content,
        "iteration": state["iteration"] + 1,
    }
第二個 node 是 evaluator,它會檢查目前 draft 是否足夠好,如果通過就回傳 pass,如果還需要修改就回傳 retry 和具體 feedback:
def evaluate_answer(state: EvalState):
    prompt = f"""
    Evaluate the draft for the task below.

    Task:
    {state['task']}

    Draft:
    {state['draft']}

    Rules:
    - If the draft is good enough, output:
      DECISION: pass
      FEEDBACK: none
    - Otherwise output:
      DECISION: retry
      FEEDBACK: <specific improvement advice>

    Keep the exact format.
    """

    response = llm.invoke(prompt).content

    decision = "retry"
    feedback = "Please improve clarity."

    for line in response.splitlines():
        if line.lower().startswith("decision:"):
            decision = line.split(":", 1)[1].strip().lower()
        elif line.lower().startswith("feedback:"):
            feedback = line.split(":", 1)[1].strip()

    if decision not in {"pass", "retry"}:
        decision = "retry"

    return {
        "decision": decision,
        "feedback": feedback,
    }
接著定義 routing function,如果 evaluator 判斷通過,就結束;如果還沒通過,而且沒有超過最大迭代次數,就回到 generator 再修一次:
def route_after_evaluation(state: EvalState):
    if state["decision"] == "pass":
        return END

    if state["iteration"] >= state["max_iterations"]:
        return END

    return "generate_answer"
最後把 graph 接起來,這裡的關鍵是 evaluate_answer 後面接 conditional edge,讓 workflow 可以選擇結束或回到 generator:
builder = StateGraph(EvalState)

builder.add_node("generate_answer", generate_answer)
builder.add_node("evaluate_answer", evaluate_answer)

builder.add_edge(START, "generate_answer")
builder.add_edge("generate_answer", "evaluate_answer")

builder.add_conditional_edges(
    "evaluate_answer",
    route_after_evaluation,
    {
        "generate_answer": "generate_answer",
        END: END,
    },
)

eval_opt_graph = builder.compile()
現在丟入一個 task 執行,這裡設定最多跑三輪,避免 loop 無限執行:
result = eval_opt_graph.invoke(
    {
        "task": "Write a 5-sentence explanation of prompt chaining for a beginner. It must be concrete and not vague.",
        "draft": "",
        "feedback": "",
        "decision": "",
        "iteration": 0,
        "max_iterations": 3,
    }
)

print("=== Final Draft ===")
print(result["draft"])

print("\n=== Final Decision ===")
print(result["decision"])

print("\n=== Final Feedback ===")
print(result["feedback"])

print("\n=== Iterations Used ===")
print(result["iteration"])
你可以看到 generator 會根據 evaluator 的 feedback 修正,Evaluator-Optimizer 真正有價值的地方是每一輪 loop 都有明確的評估標準和修正方向,迭代更新也是一個 LLM System 的成熟體現。
參考資料:
你可以將這五種 workflow patterns 理解成基礎模板,但實戰中很少只用其中一種。更常見的做法是混搭,比如:先用 Routing 判斷任務類型,再用 Orchestrator-Workers 拆任務,用 Parallelization 並行處理,最後接 Evaluator-Optimizer 做品質檢查。
設計 workflow 時,可以這樣判斷:
workflow 不是越複雜越好,每多一個 node,就多一層維護成本;每多一次 LLM call,就增加 latency 和 token cost;每多一個 branch 或 loop,就增加 debugging 和 evaluation 的難度。
所以在實際開發設計時,你要不斷思考三件事:
好的 workflow design,不是把流程做得很炫,而是讓每個 node 都有明確責任,每條 edge 都有清楚理由,每一次 LLM call 都值得。
LangGraph 真正值得學的地方,是學會把 LLM application 拆成可控的 workflow,當你能判斷一個任務該依序執行、分支處理、並行拆解、動態派工,還是迭代修正,你就不只是在使用框架,而是在設計系統,這也是從 prompt engineering 走向 LLM systems design 的關鍵一步!
I write about LLM systems, inference engineering, agentic AI, and how to turn strong models into real-world systems.
👉 Connect with me on LinkedIn
📬 Email: lucien1999s.pro@gmail.com
ℳ Read more articles: Medium
I'm happy to connect with people working on AI, research, and practical systems.
 Lucien

 iThome鐵人賽