本系列文章內容同步發佈於這裡,若有任何問題或錯誤,都歡迎直接到 GitHub 上發 PR 修正,或是在這裡留言討論。
先讓我們回顧一下前一個章節的這張圖解:
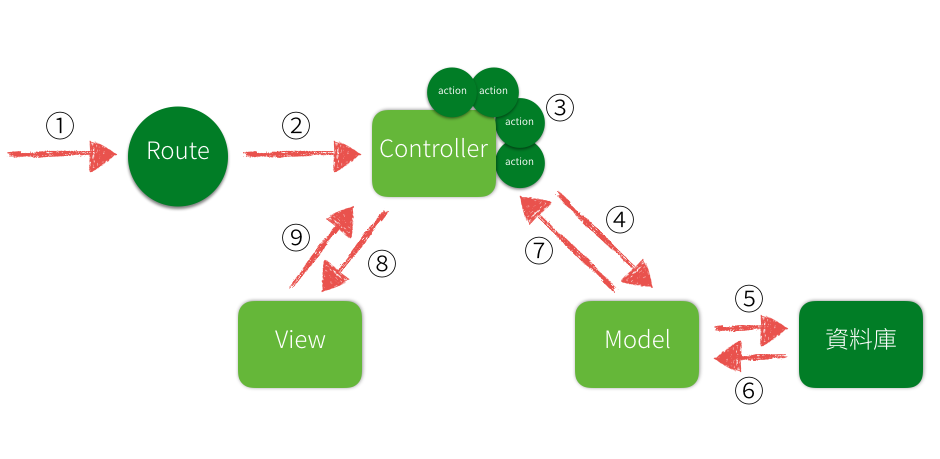
Route 是整個網站對外公開的網站路徑對照表,當使用者連上你的網站的時候,Rails 會解析使用者所輸入的網址及參數,再根據解析的結果,去找到該負責處理的單位(哪個 Controller 跟 Action)。
舉個例子來說,這個網址:
http://kaochenlong.com/posts/123
Rails 會根據 config/routes.rb 這個檔案的內容,比對在網址後面的 /posts/123 應該交給誰處理,假設檔案內容如下:
Rails.application.routes.draw do
  get "/posts", to: "posts#index"
  get "/posts/:id", to: "posts#show"
end
其中,這兩行:
get "/posts", to: "posts#index"
get "/posts/:id", to: "posts#show"
的意思就是,「當使用者輸入 posts 這個網址,它會交由 posts#index 來處理,也就是 PostsController 上的 index 方法;同理,當使用者輸入 /posts/123 這個網址之後,它會轉由 PostsController 上的 show 方法,並且把 123 當做參數(:id)傳給 Controller」。
想像一下這個情境:
客人上門了...
客人:「你好,我想要看所有的文章列表(輸入網址
/posts)」Route:「好的,我幫你轉接到
PostsController部門的index櫃台,請他幫您服務」客人:「等等,我改變主意了,我只想要看第 87 號文章就好(輸入網址
/posts/87)」Route:「沒問題,請您一樣到
PostsController部門,但這次請找show櫃台,並且把87這個號碼牌給他,他會替您調閱資料」客人:「那請問可以給我看看使用者的列表嗎 (輸入網址
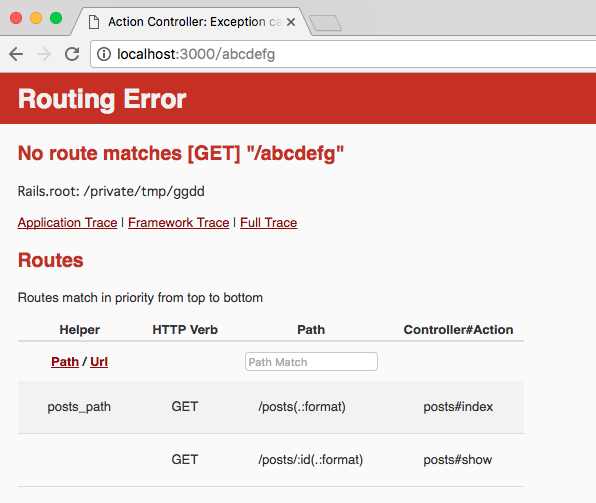
/users)」Route:「不好意思,目前我們沒有相關資料喔 (回應 HTTP 404)」
Route 的角色就類似是這樣,負責解讀使用者輸入的網址,然後轉去對應的地方,剩下的,就是 MVC(Model, View, Controller) 你們的事了。但如果找不到路徑,會出現 HTTP 404 找不到頁面的錯誤訊息,在開發模式下會出現這個畫面:
根據 MVC 的圖解說明,Route 是告知這個需求要去找哪個 Controller 的哪個 Action
再想像一下這個情境:
客人又上門了
客人:「我想要看所有的文章列表(輸入網址
/posts)」Route: 「好的,我幫你轉接到
PostsController部門的index櫃台,請他幫您服務」客人想要依照指示前往
PostsController部門,發現根本沒有這個部門!!
然後就會看到這個畫面:
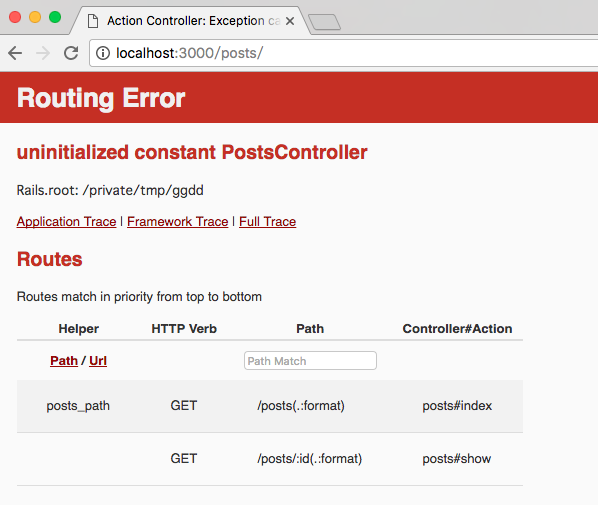
這個 uninitialized constant PostsController 錯誤訊息是指找不到 PostsController 這個常數,其實就是指找不到這個類別。
客人又再次上門了
客人:「我想要看所有的文章列表(輸入網址
/posts)」Route: 「好的,我幫你轉接到
PostsController部門的index櫃台,請他幫您服務」客人依照指示來到
PostsController部門,這次有找到部門了,但卻發現沒有index這個櫃台!!
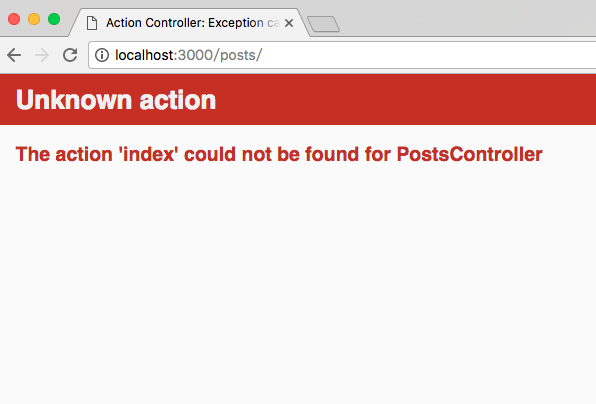
也就是說,即使 Route 有這條路徑,也不表示那個 Controller 就檔案就一定需要事先存在;就算 Controller 存在,也不表示 Action 存在。所以下回看到這些錯誤訊息就不用太擔心了。
假設我們目前 config/routes.rb 的設定如下:
Rails.application.routes.draw do
  get "/posts", to: "posts#index"
  get "/about", to: "pages#about"
end
你可以在終端機底下執行 rails routes 指令,看看目前所有的路徑設定:
$ rails routes
Prefix Verb URI Pattern      Controller#Action
 posts GET  /posts(.:format) posts#index
 about GET  /about(.:format) pages#about
注意:如果你用 Rails 版本是 4.x 版,請使用
rake routes
要設定首頁路徑可以這樣做:
get "/", to: "welcome#index"
不過 Rails 提供一個更簡單的寫法:
root "welcome#index"
Route 除了做路徑對照外,也可以直接做轉址:
get '/users', to: redirect('/accounts')
這樣一來就可以把 /users 轉往 /accounts 了;除了站內網址外,也可直接轉到外部網站:
get '/5xruby', to: redirect('https://5xruby.tw')
這樣當使用者輸入 /5xruby 這個網址的時候,就會立馬被轉址到指定的網站了。
在以前,當我們看到這樣的網址:
http://kaochenlong.com/posts/edit.php?id=2
應該就會猜「在這個網站上,有一個名為 posts 的目錄,然後裡面有個 edit.php 的 PHP 程式檔案」。但事實上在 Rails 的 Route 不是這個概念,檔案不一定需要真的存在在對應的檔案或目錄。
另外,大家也習慣從網頁的檔案來判斷這個頁面是用什麼程式語言寫的,但事實上這個也是可以造假的,例如:
Rails.application.routes.draw do
  get '/about.php', to: 'pages#about'
end
當網址是 about.php 的時候,會轉由 pages_controller 的 about 方法處理。
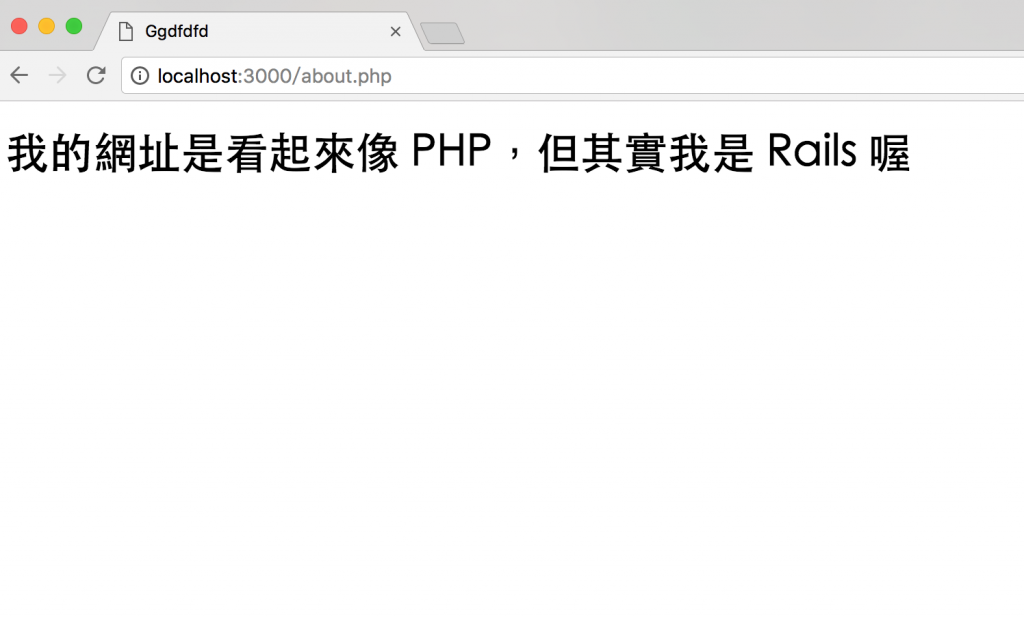
網址看起來是 PHP,但實際上它是 Rails 喔 :)
如果不小心在 Route 裡這樣寫:
Rails.application.routes.draw do
  get "/about", to: "pages#about"
  get "/about", to: "products#about"
end
查一下路由會發現兩條路由是並存的:
$ rails routes
  Prefix Verb URI Pattern      Controller#Action
   about GET  /about(.:format) pages#about
         GET  /about(.:format) products#about
如果遇到這種情況,在 Route 進行比對的時候,在前面先查到的就會先生效,也就是說寫在後面的會被覆蓋,等於是白寫的了。
REST 是 Representational State Transfer 的縮寫,中文翻譯成「具象狀態傳輸」,它是由 Roy Thomas Fielding 博士在 2000 年時提出的軟體架構。簡單的說,就是把每個網址當做資源(Resource)來看待,對同一個資源做不同的動作 (HTTP Verb) 會得到不同的結果。符合 REST 概念設計的網址,又稱之 RESTFul Route。
假設某網站的會員系統「編輯會員個人資料」功能的網址是:
http://kaochenlong.com/member_edit.php?id=2
在換了不同開發人員接手後,可能會變這樣:
http://kaochenlong.com/edit_member.php?id=2
網址(或檔名)的設計如果沒有統一的規則,有的用 member_edit.php,有的用 edit_member.php,對後面接手的開發者來說就會不知道哪個檔案才是正在使用的版本,甚至可能得用最後修改日期去猜。
但如果是在 Rails 的話比較沒這困擾,如果 member 當做「資源」的話,那「編輯會員個人資料」的網址大概會長這樣:
http://kaochenlong.com/members/2/edit
如果想要看這位會員的資料則是:
http://kaochenlong.com/members/2
同理,如果把「會員」換成「商品」:
# 檢視 2 號商品
http://kaochenlong.com/products/2

# 編輯 2 號商品
http://kaochenlong.com/products/2/edit
依此類推。
導入 REST 的設計,可讓網址變得更直觀,而且也替幫開發人員訂了一套網址設計的慣例。當你對某個網址使用 POST 方法存取表示是新增資料;當使用 PUT 或 PATCH 方法表示是更新資料,使用 DELETE 方法則是表示刪除資料。不管是老鳥或是新手,大多都會遵照這個慣例來設計。再加上 Rails 專案本身的結構跟其它的慣例,只要不要用太奇怪的寫法,專案不論大小都應該很快的可以猜出來哪個頁面是放在哪個檔案裡。
要符合 RESTful 的網址設計,除了自己一條一條自己寫之外,更建議直接使用 Rails 提供的 resources 方法:
Rails.application.routes.draw do
  resources :users
end
在 Route 裡加上這行後,使用 rails routes 指令來查看一下:
$ rails routes
   Prefix Verb   URI Pattern               Controller#Action
    users GET    /users(.:format)          users#index
          POST   /users(.:format)          users#create
 new_user GET    /users/new(.:format)      users#new
edit_user GET    /users/:id/edit(.:format) users#edit
     user GET    /users/:id(.:format)      users#show
          PATCH  /users/:id(.:format)      users#update
          PUT    /users/:id(.:format)      users#update
          DELETE /users/:id(.:format)      users#destroy
就會發現,這樣短短一行 resources :users,Rails 就幫你做出 8 條不同的路由並且對應到 Controller 的 7 個方法。讓我們把這些路由做個簡單的表格說明:
| 動詞 | Prefix | 路徑 | Controller | Aciton | 說明 |
|---|---|---|---|---|---|
| GET | users | /users | UserController | index | 使用者列表 |
| POST | users | /users | UserController | create | 新增使用者 |
| GET | new_users | /users/new | UserController | new | 新增使用者頁面 |
| GET | edit_users | /users/:id/edit | UserController | edit | 編輯使用者頁面 |
| GET | user | /users/:id | UserController | show | 檢視單一使用者 |
| PATCH | user | /users/:id | UserController | update | 更新使用者 |
| PUT | user | /users/:id | UserController | update | 更新使用者 |
| DELETE | user | /users/:id | UserController | destroy | 刪除使用者 |
在 rails routes 指令所秀出來的各項資訊中,有一欄叫 Prefix:
$ rails routes
      Prefix Verb   URI Pattern                        Controller#Action
    products GET    /products(.:format)          products#index
             POST   /products(.:format)          products#create
 new_product GET    /products/new(.:format)      products#new
edit_product GET    /products/:id/edit(.:format) products#edit
     product GET    /products/:id(.:format)      products#show
             PATCH  /products/:id(.:format)      products#update
             PUT    /products/:id(.:format)      products#update
             DELETE /products/:id(.:format)      products#destroy
它在後面接上 _path 或 _url 後可以變成「產生相對應的路徑或網址」的 View Helper。如果是站內連結,通常會使用 _path 寫法來產生站內的路徑,例如:
products + path     = products_path         => /products
new_product + path  = new_product_path      => /products/new
edit_product + path = edit_product_path(2)  => /products/2/edit
如果是使用 _url 則會產生完整的路徑,包括主機網域名稱:
products + url     = products_url         => http://kaochenlong.com/products
new_product + url  = new_product_url      => http://kaochenlong.com/products/new
edit_product + url = edit_product_url(2)  => http://kaochenlong.com/products/2/edit
通常在寄發 Email 的時候會在信件內容裡使用 _url 的完整路徑寫法。
其實不一定,這只是 Rails 的其中一個慣例罷了,不遵照這個慣例其實也不會怎麼樣,例如這樣寫:
Rails.application.routes.draw do
  resources :user
end
這樣寫所產生的路由會是:
$ rails routes
    Prefix Verb   URI Pattern                        Controller#Action
user_index GET    /user(.:format)                    user#index
           POST   /user(.:format)                    user#create
           GET    /user/new(.:format)                user#new
           GET    /user/:id/edit(.:format)           user#edit
           GET    /user/:id(.:format)                user#show
           PATCH  /user/:id(.:format)                user#update
           PUT    /user/:id(.:format)                user#update
           DELETE /user/:id(.:format)                user#destroy
一樣是 8 個路由對應到 CRUD 相關的 7 個方法,但原本會對到 users_controller 會變成 user_controller,這點需要稍微注意一下。
resources 方法可以便利做出 CRUD 相對應的路由,但這個方法一口氣就會做出 8 個。如果有時候不需要這麼多,舉個例子來說,如果一般使用者不需要對商品有「新增」、「修改」及「刪除」功能,僅需要「檢視」功能的話,可以使用 only 或 except 參數來調整產生的路由數量:
Rails.application.routes.draw do
  resources :products, only: [:index, :show]

  # 或是反過來這樣寫也行
  # resources :products, except: [:new, :create, :edit, :update, :destroy]
end
only 跟 except 兩種寫法剛好是相反效果,可視需求挑選寫起來比較簡短的。
以上面這個例子來說,需要的路由只有一、二個,雖然不靠 resources 方法直接寫也可以,但除了一些靜態頁面外,仍建議採用 resources 的寫法再加上 only 或 except 來調整數量,以維持整體路由的慣例。
這裡指的單數 Resource 不是上面這個單數名詞,而是 resource 方法本身就是單數的,這個跟複數的 resources 方法的差別在於「單數 resource 方法不會做出含有 :id 的路徑」,例如:
Rails.application.routes.draw do
  resource :profile
end
跟複數的 resources 有點像,但單數的 resource 方法僅會造出 7 個路由,像這樣:
$ rails routes
      Prefix Verb   URI Pattern             Controller#Action
     profile POST   /profile(.:format)      profiles#create
 new_profile GET    /profile/new(.:format)  profiles#new
edit_profile GET    /profile/edit(.:format) profiles#edit
             GET    /profile(.:format)      profiles#show
             PATCH  /profile(.:format)      profiles#update
             PUT    /profile(.:format)      profiles#update
             DELETE /profile(.:format)      profiles#destroy
跟複數的 resources 比起來,單數的路徑除了沒有帶有 id 之外,也沒有 index。
什麼時候會用到單數 resource ,什麼時候用複數 resources? 舉例來說,像是會員個人 profile,如果想要設計「使用者只能檢視、更新、刪除自己的 profile」的效果就可使用單數 resource,網址就會長得像:
/profile
但如果想要設計的是「系統管理員可以檢視、更新、刪除每個使用者的 profile」的話,則使用複數 resources,網址就會像這樣:
/profiles/2
resources 方法裡面其實還可以再繼續包 resources,像這樣:
Rails.application.routes.draw do
  resources :users do
    resources :posts
  end
end
這樣一來產生的結果會是:
$ rails routes
        Prefix Verb   URI Pattern                              Controller#Action
    user_posts GET    /users/:user_id/posts(.:format)          posts#index
               POST   /users/:user_id/posts(.:format)          posts#create
 new_user_post GET    /users/:user_id/posts/new(.:format)      posts#new
edit_user_post GET    /users/:user_id/posts/:id/edit(.:format) posts#edit
     user_post GET    /users/:user_id/posts/:id(.:format)      posts#show
               PATCH  /users/:user_id/posts/:id(.:format)      posts#update
               PUT    /users/:user_id/posts/:id(.:format)      posts#update
               DELETE /users/:user_id/posts/:id(.:format)      posts#destroy
         users GET    /users(.:format)                         users#index
               POST   /users(.:format)                         users#create
      new_user GET    /users/new(.:format)                     users#new
     edit_user GET    /users/:id/edit(.:format)                users#edit
          user GET    /users/:id(.:format)                     users#show
               PATCH  /users/:id(.:format)                     users#update
               PUT    /users/:id(.:format)                     users#update
               DELETE /users/:id(.:format)                     users#destroy
從產生的網址來解讀的話:
| 網址 | 說明 |
|---|---|
| /users/2 | 檢視 2 號使用者的資料 |
| /users/2/posts | 2 號使用者的所有文章 |
| /users/2/posts/3 | 檢視 2 號使用者的 3 號文章 |
| /users/2/posts/3/edit | 編輯 2 號使用者的 3 號文章 |
但實際在寫的時候會建議最多只要二層 Resources 就好,雖然可以再繼續包下去,但再包下去可能長出像這樣的東西:
/users/2/posts/3/comments/5
網址太長,而且事實上這樣設計也是沒必要的,舉例來說:
/users/2/posts/3
這個網址,看起來可以取得 2 號使用者的第 3 號文章,但事實上文章編號是自動跳號且不會重複的流水編號,所以並不需要知道使用者是誰也可以找得到這篇文章,像這樣:
/posts/3
不僅網址較短,也比較清楚就是要「檢視 3 號文章」。事實上「編輯」、「更新」以及「刪除」功能也沒有必要一定要跟在 User 後面,所以原來這樣大腸包小腸式的寫法,可以使用 only (或 except) 參數修正成這樣:
Rails.application.routes.draw do
  resources :users do
    resources :posts, only: [:index, :new, :create]
  end
  resources :posts, only: [:show, :edit, :update, :destroy]
end
整個路徑就會變成這樣:
$ rails routes
       Prefix Verb   URI Pattern                         Controller#Action
   user_posts GET    /users/:user_id/posts(.:format)     posts#index
              POST   /users/:user_id/posts(.:format)     posts#create
new_user_post GET    /users/:user_id/posts/new(.:format) posts#new
        users GET    /users(.:format)                    users#index
              POST   /users(.:format)                    users#create
     new_user GET    /users/new(.:format)                users#new
    edit_user GET    /users/:id/edit(.:format)           users#edit
         user GET    /users/:id(.:format)                users#show
              PATCH  /users/:id(.:format)                users#update
              PUT    /users/:id(.:format)                users#update
              DELETE /users/:id(.:format)                users#destroy
    edit_post GET    /posts/:id/edit(.:format)           posts#edit
         post GET    /posts/:id(.:format)                posts#show
              PATCH  /posts/:id(.:format)                posts#update
              PUT    /posts/:id(.:format)                posts#update
              DELETE /posts/:id(.:format)                posts#destroy
事實上,上面這樣的寫法還可以更精簡一點:
Rails.application.routes.draw do
  resources :users do
    resources :posts, shallow: true
  end
end
在 resources 後面加上 shallow: true 參數,就可以做出一樣的效果。
假設我幫訂單(order)用 resources 產生 RESTFul 的路徑:
Rails.application.routes.draw do
  resources :orders
end
可產生以下路徑:
$ rails routes
    Prefix Verb   URI Pattern                Controller#Action
    orders GET    /orders(.:format)          orders#index
           POST   /orders(.:format)          orders#create
 new_order GET    /orders/new(.:format)      orders#new
edit_order GET    /orders/:id/edit(.:format) orders#edit
     order GET    /orders/:id(.:format)      orders#show
           PATCH  /orders/:id(.:format)      orders#update
           PUT    /orders/:id(.:format)      orders#update
           DELETE /orders/:id(.:format)      orders#destroy
但如果覺得不夠,例如想要加上「確認訂單」或是「取消訂單」之類更改訂單狀態的路徑,可使用 collection 或是 member 方法。這兩種用法在使用上有一些差異:
例如,我想要可以檢視所有「已經取消的訂單」,網址上可能可以這樣設計:
# 在後面加參數的方式
GET /orders?type=cancelled

# 或是給它一個獨立的路徑
GET /orders/cancelled
雖然第一種做法也可以,但這樣表示必須在原來的 Action 裡多判斷、處理傳進來的 type=calcelled 參數;第二種做法則是另外開一個 Action 專門做這件事。你可以使用 collection 方法來做出這個效果:
Rails.application.routes.draw do
  resources :orders do
    collection do
      get :cancelled
    end
  end
end
把 collection 包在 orders 這個 Resources 裡,這樣的寫法,會產生以下路徑:
$ rails routes
          Prefix Verb   URI Pattern                 Controller#Action
cancelled_orders GET    /orders/cancelled(.:format) orders#cancelled
          orders GET    /orders(.:format)           orders#index
                 POST   /orders(.:format)           orders#create
       new_order GET    /orders/new(.:format)       orders#new
      edit_order GET    /orders/:id/edit(.:format)  orders#edit
           order GET    /orders/:id(.:format)       orders#show
                 PATCH  /orders/:id(.:format)       orders#update
                 PUT    /orders/:id(.:format)       orders#update
                 DELETE /orders/:id(.:format)       orders#destroy
你可以看到,除了原來的 8 個之外,還多了一個 /orders/cancelled 的路徑,並且指向 orders#cancelled 這個 Action。不想用 Block 方式寫的話,也可這樣寫,效果是一樣的:
Rails.application.routes.draw do
  resources :orders do
    get :cancelled, on: :collection
  end
end
如果我想要「確認第 2 號訂單」或是「取消第 3 號訂單」,resources 做出來的 8 個路徑好像都不太適用,我想要做出像這樣的路徑:
# 確認 2 號訂單
POST /orders/2/confirm

# 取消 3 號訂單
DELETE /orders/3/cancel
跟 collection 有點類似,就是在 orders 這個 Resources 裡加上 member:
Rails.application.routes.draw do
  resources :orders do
    member do
      post :confirm
      delete :cancel
    end
  end
end
這樣一來會產生以下路徑:
$ rails routes
       Prefix Verb   URI Pattern                   Controller#Action
confirm_order POST   /orders/:id/confirm(.:format) orders#confirm
 cancel_order DELETE /orders/:id/cancel(.:format)  orders#cancel
       orders GET    /orders(.:format)             orders#index
              POST   /orders(.:format)             orders#create
    new_order GET    /orders/new(.:format)         orders#new
   edit_order GET    /orders/:id/edit(.:format)    orders#edit
        order GET    /orders/:id(.:format)         orders#show
              PATCH  /orders/:id(.:format)         orders#update
              PUT    /orders/:id(.:format)         orders#update
              DELETE /orders/:id(.:format)         orders#destroy
可以看得出來跟 collection 方法做出來的路徑有點不同,使用 member 方式產生的路徑,會帶有 :id 在裡面,這個 :id 會傳到 Controller 裡變成 params 這個變數的一部份。同樣,如果不想使用 Block 方式寫的話,也可這樣寫,效果一樣:
Rails.application.routes.draw do
  resources :orders do
    post :confirm, on: :member
    delete :cancel, on: :member
  end
end
開發網站常會有另外製作後台可以管理文章、商品、訂單等功能,這些功能通常希望是跟一般使用者的功能是分開的,在網址的設計上常會長得像這樣:
http://kaochenlong.com/admin/products
就是多加一個 admin 路徑在前面。想要做到這樣的網址設計可以直接在 resources 後面接上 path:
Rails.application.routes.draw do
  resources :products, path: "/admin/products"
end
這樣一來,路由就會變成:
$ rails routes
      Prefix Verb   URI Pattern                        Controller#Action
    products GET    /admin/products(.:format)          products#index
             POST   /admin/products(.:format)          products#create
 new_product GET    /admin/products/new(.:format)      products#new
edit_product GET    /admin/products/:id/edit(.:format) products#edit
     product GET    /admin/products/:id(.:format)      products#show
             PATCH  /admin/products/:id(.:format)      products#update
             PUT    /admin/products/:id(.:format)      products#update
             DELETE /admin/products/:id(.:format)      products#destroy
路徑就會多了 admin。
不過,在做後台的時候,會更常使用 namespace 方法來把 resources 包起來,隔出後台專屬的路徑:
Rails.application.routes.draw do
  namespace :admin do
    resources :products
    resources :articles
  end
end
用 namespace 包起來之後,路由就變成這樣:
$ rails routes
            Prefix Verb   URI Pattern                        Controller#Action
    admin_products GET    /admin/products(.:format)          admin/products#index
                   POST   /admin/products(.:format)          admin/products#create
 new_admin_product GET    /admin/products/new(.:format)      admin/products#new
edit_admin_product GET    /admin/products/:id/edit(.:format) admin/products#edit
     admin_product GET    /admin/products/:id(.:format)      admin/products#show
                   PATCH  /admin/products/:id(.:format)      admin/products#update
                   PUT    /admin/products/:id(.:format)      admin/products#update
                   DELETE /admin/products/:id(.:format)      admin/products#destroy
    admin_articles GET    /admin/articles(.:format)          admin/articles#index
                   POST   /admin/articles(.:format)          admin/articles#create
 new_admin_article GET    /admin/articles/new(.:format)      admin/articles#new
edit_admin_article GET    /admin/articles/:id/edit(.:format) admin/articles#edit
     admin_article GET    /admin/articles/:id(.:format)      admin/articles#show
                   PATCH  /admin/articles/:id(.:format)      admin/articles#update
                   PUT    /admin/articles/:id(.:format)      admin/articles#update
                   DELETE /admin/articles/:id(.:format)      admin/articles#destroy
可以看得出來原來的路由在前面通通加上了 admin,同時對應的 Controller 也變得不一樣了。這部份會在 Controller 章節有更詳細的說明。
如果網站的後台網址被猜到,即使有擋帳號密碼,總是還是有被猜到帳密的機會。所以通常不建議大家直接使用像 admin 或 backend 這種太常見或容易猜的網址做為後台。透過 Rails 的 Route 設計,可以把原來 admin 的 namespace 的路徑改成比較不好猜的,例如:
Rails.application.routes.draw do
  namespace :admin, path: "cs19oq1ej30" do
    resources :products
  end
end
這樣一來,路由就會變成:
$ rails routes
            Prefix Verb   URI Pattern                              Controller#Action
    admin_products GET    /cs19oq1ej30/products(.:format)          admin/products#index
                   POST   /cs19oq1ej30/products(.:format)          admin/products#create
 new_admin_product GET    /cs19oq1ej30/products/new(.:format)      admin/products#new
edit_admin_product GET    /cs19oq1ej30/products/:id/edit(.:format) admin/products#edit
     admin_product GET    /cs19oq1ej30/products/:id(.:format)      admin/products#show
                   PATCH  /cs19oq1ej30/products/:id(.:format)      admin/products#update
                   PUT    /cs19oq1ej30/products/:id(.:format)      admin/products#update
                   DELETE /cs19oq1ej30/products/:id(.:format)      admin/products#destroy
後台的網址就會由原本的 /admin 變成 /cs19oq1ej30:
http://kaochenlong.com/cs19oq1ej30/products
即使網址變得不好猜,但後台原本的 Controller 還是沒變。
本系列文章內容同步發佈於這裡,若有任何問題或錯誤,都歡迎直接到 GitHub 上發 PR 修正,或是在這裡留言討論。