Layout 決定app的外觀,來介紹幾個常見的Layout元件。
Layout元件主要有分五種:Linear Layout(線性佈局)、Relative Layout(相對佈局)、TableLayout(表格佈局)、AbsoluteLayout(絕對佈局)、FrameLayout(框架佈局)。
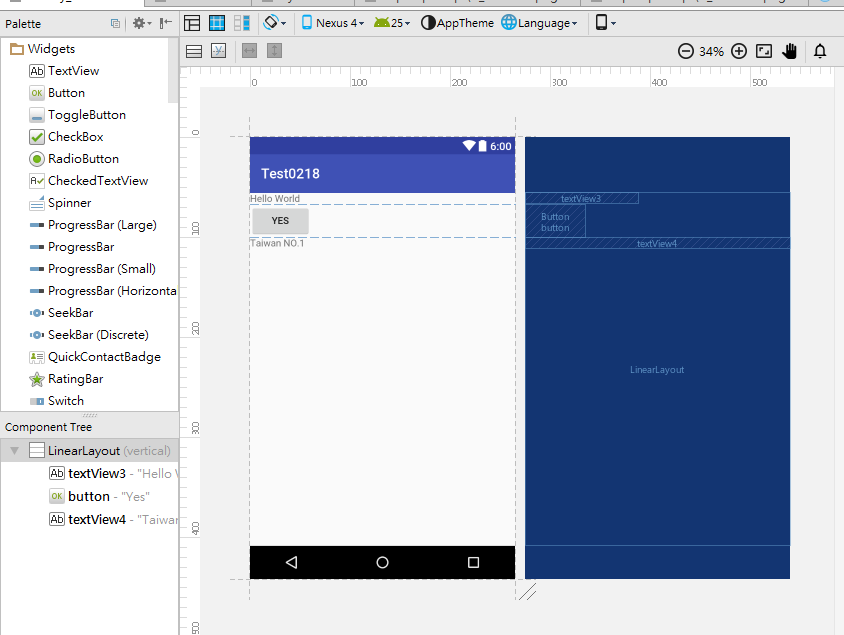
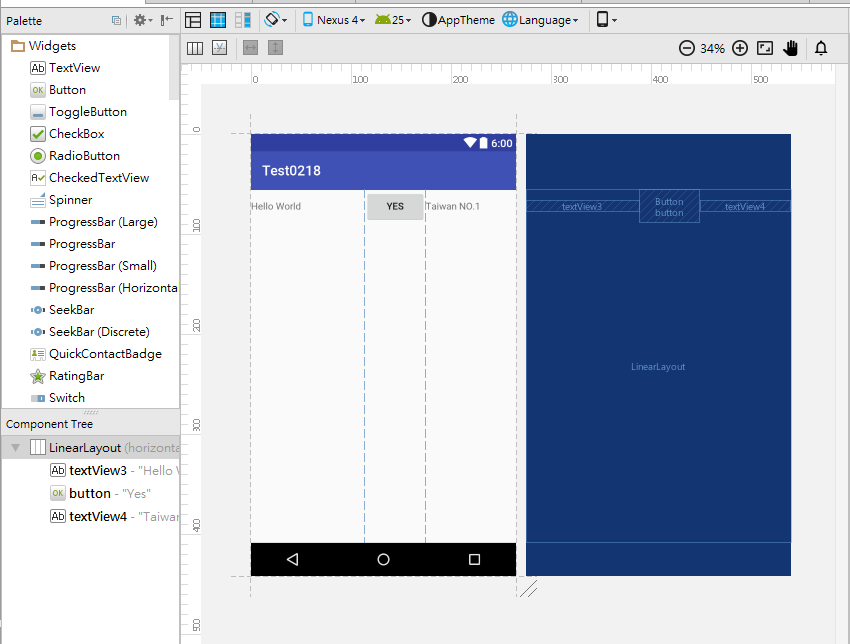
●Linear Layout(線性版面佈局):水平線或垂直線的排版設定。
android:orientation="垂直:vertical/水平:horizontal"
Orientation : 決定版面呈現水平或垂直。
垂直範例程式:
<?xml version="1.0" encoding="utf-8"?>
<LinearLayout
    xmlns:android="http://schemas.android.com/apk/res/android"
    xmlns:tools="http://schemas.android.com/tools"
    android:layout_width="match_parent"
    android:layout_height="match_parent"
    android:orientation="vertical">


    <TextView
        android:text="Hello World"
        android:layout_width="165dp"
        android:layout_height="wrap_content"
        android:id="@+id/textView3"
        tools:ignore="HardcodedText" />

    <Button
        android:text="Yes"
        android:layout_width="wrap_content"
        android:layout_height="wrap_content"
        android:id="@+id/button"
        tools:ignore="HardcodedText" />

    <TextView
        android:text="Taiwan NO.1"
        android:layout_width="match_parent"
        android:layout_height="wrap_content"
        android:id="@+id/textView4"
        tools:ignore="HardcodedText" />
</LinearLayout>
水平範例程式:
<?xml version="1.0" encoding="utf-8"?>
<LinearLayout
    xmlns:android="http://schemas.android.com/apk/res/android"
    xmlns:tools="http://schemas.android.com/tools"
    android:layout_width="match_parent"
    android:layout_height="match_parent"
    android:orientation="horizontal">


    <TextView
        android:text="Hello World"
        android:layout_width="165dp"
        android:layout_height="wrap_content"
        android:id="@+id/textView3"
        tools:ignore="HardcodedText" />

    <Button
        android:text="Yes"
        android:layout_width="wrap_content"
        android:layout_height="wrap_content"
        android:id="@+id/button"
        tools:ignore="HardcodedText" />

    <TextView
        android:text="Taiwan NO.1"
        android:layout_width="match_parent"
        android:layout_height="wrap_content"
        android:id="@+id/textView4"
        tools:ignore="HardcodedText" />
</LinearLayout>
●Relative Layout(相對位置版面佈局):使用元件的id來到指定的位子。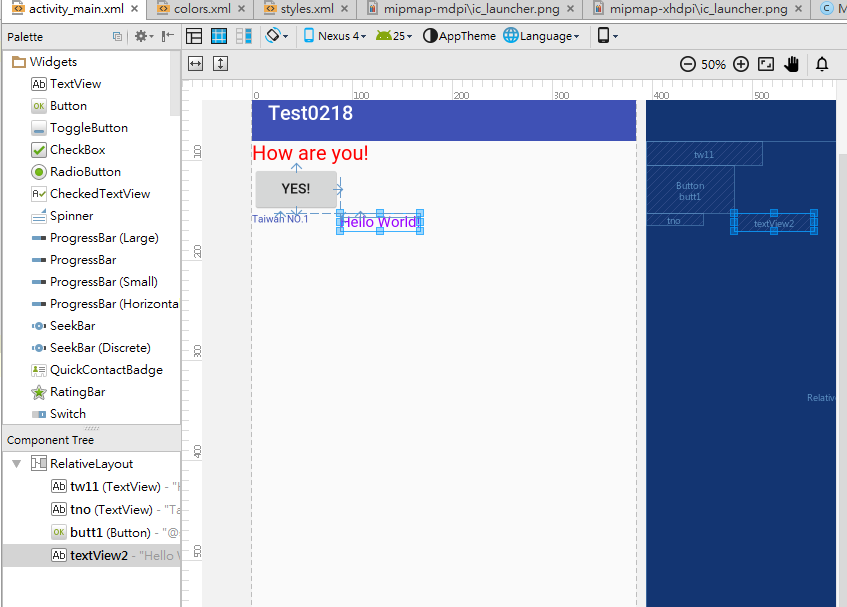
※android:layout_above="@+id/物件id名稱":代表在id物件名稱的上方
※android:layout_below="@+id/物件id名稱":代表在id物件名稱的下方
※android:layout_toRightOf="@+id/物件id名稱":代表在id物件名稱的左方
※android:layout_toLeftOf="@+id/物件id名稱":代表在id物件名稱的右方
還有很多可以到這邊來看~
<?xml version="1.0" encoding="utf-8"?>
<RelativeLayout
    xmlns:android="http://schemas.android.com/apk/res/android"
    xmlns:tools="http://schemas.android.com/tools"
    android:layout_width="match_parent"
    android:layout_height="match_parent"
    android:shrinkColumns="0" >


    <TextView
        android:layout_width="wrap_content"
        android:layout_height="wrap_content"
        android:text="How are you!"
        android:textColor="@color/red"
        android:textSize = "20sp"
        android:id="@+id/tw11"
        tools:ignore="HardcodedText" />


    <TextView
        android:layout_width="wrap_content"
        android:layout_height="wrap_content"
        android:id="@+id/tno"
        android:text="Taiwan NO.1"
        android:textColor="@color/colorPrimary"
        android:textSize = "10sp"
        android:layout_below="@+id/butt1"
        tools:ignore="HardcodedText,SmallSp" />

    <Button
            android:layout_width="wrap_content"
            android:layout_height="wrap_content"
            android:text="@string/yes"
            android:padding="10px"
            android:id="@+id/butt1"
            android:layout_below="@+id/tw11"
            tools:ignore="PxUsage" />

    <TextView
        android:layout_width="wrap_content"
        android:layout_height="wrap_content"
        android:textColor="@color/purple"
        android:textSize = "15sp"
        android:text="Hello World!"
        android:layout_below="@+id/butt1"
        android:layout_toEndOf="@+id/butt1" />


</RelativeLayout>
●TableLayout(表格欄位版面佈局):讓物件像表格一樣排列。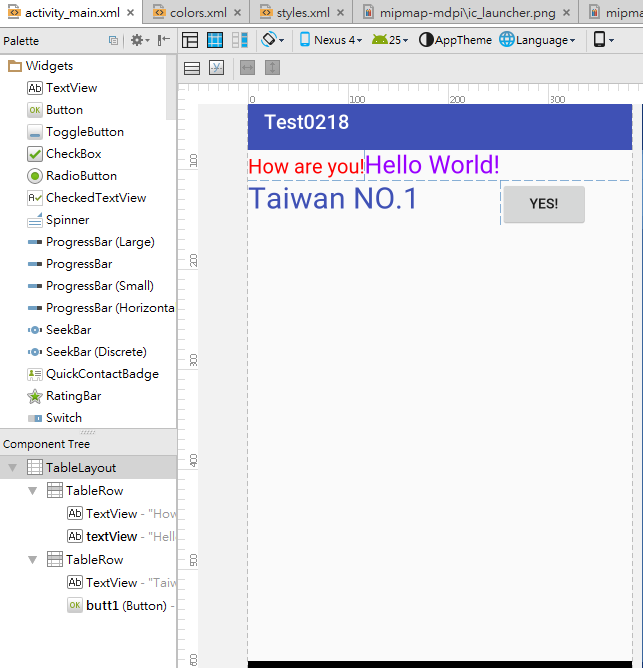
運用標籤 來分格表格
<?xml version="1.0" encoding="utf-8"?>
<TableLayout
    xmlns:android="http://schemas.android.com/apk/res/android"
    xmlns:tools="http://schemas.android.com/tools"
    android:layout_width="match_parent"
    android:layout_height="match_parent"
    android:collapseColumns="*" >

    <TableRow
        android:layout_width="match_parent"
        android:layout_height="match_parent"
        tools:ignore="UselessParent">
    <TextView
        android:layout_width="wrap_content"
        android:layout_height="wrap_content"
        android:text="How are you!"
        android:textColor="@color/red"
        android:layout_span="1"
        android:textSize = "20sp"
        tools:ignore="HardcodedText" />

        <TextView
            android:layout_width="wrap_content"
            android:layout_height="wrap_content"
            android:textColor="@color/purple"
            android:textSize = "25sp"
            android:layout_span="1"
            android:text="Hello World!"
            />
    </TableRow>

    <TableRow>
        <TextView
        android:layout_width="wrap_content"
        android:layout_height="wrap_content"
        android:text="Taiwan NO.1"
        android:textColor="@color/colorPrimary"
        android:layout_span="3"
        android:textSize = "30sp"
            tools:ignore="HardcodedText" />

        <Button
            android:layout_width="wrap_content"
            android:layout_height="wrap_content"
            android:text="@string/yes"
            android:padding="10px"
            android:id="@+id/butt1"
            tools:ignore="PxUsage" />
    </TableRow>


</TableLayout>
●AbsoluteLayout(絕對版面佈局):用X軸與Y軸來配置版面。
android:layout_x="X軸尺寸px"
android:layout_y="Y軸尺寸px"
範例語法如下:
<?xml version="1.0" encoding="utf-8"?>
<AbsoluteLayout xmlns:android=以下省略................">

    <TextView
        android:layout_width="wrap_content"
        android:layout_height="wrap_content"
        android:text="Hello World!"
        android:layout_x="200px"
        android:layout_y="10px"/>
</AbsoluteLayout>
設定前: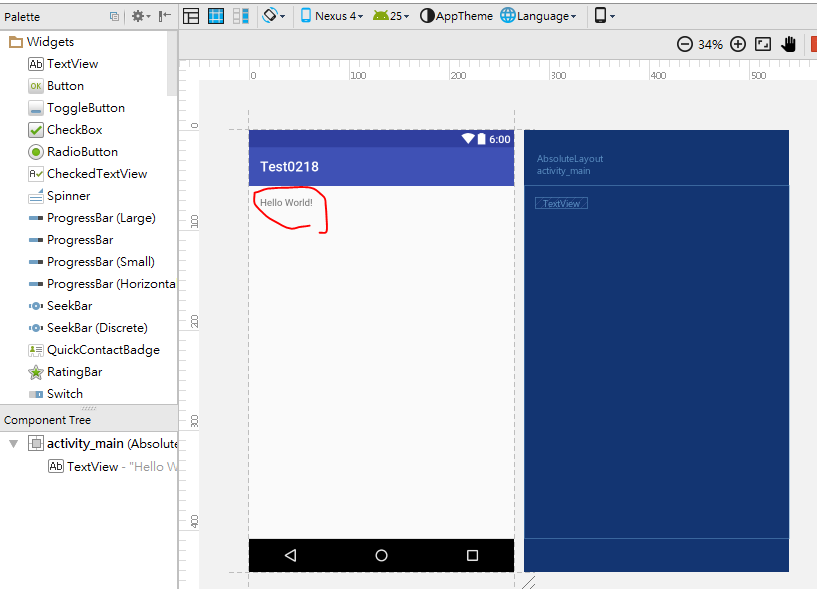
設定後: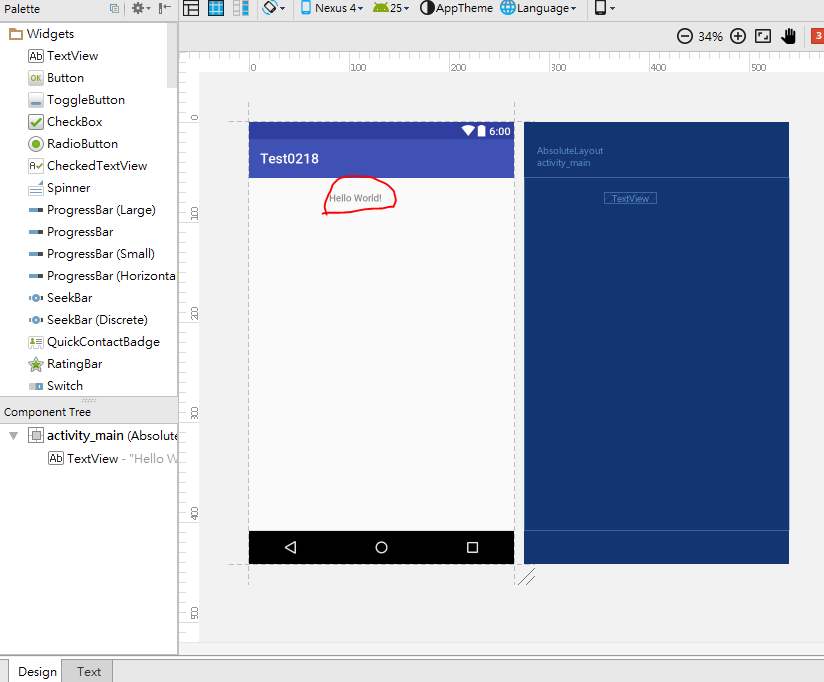
●FrameLayout(框架版面佈局):重疊顯示,語法最先下的會出現在最後面。
如圖中紅色的「How are you!」幾乎快看不見了,紫色的「Hello World!」還有一點明顯,
藍色的「Taiwan NO.1」就比較清楚。
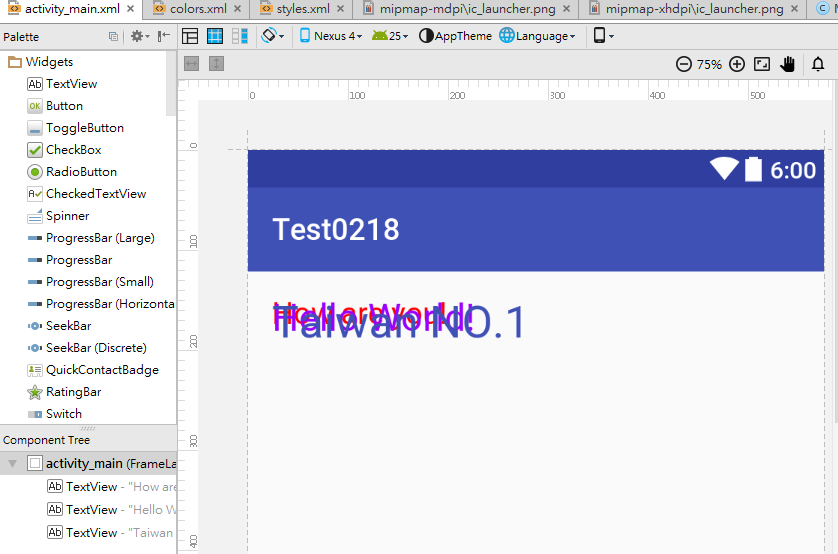
範例語法如下:
<?xml version="1.0" encoding="utf-8"?>
<FrameLayout xmlns:android=以下省略................">

    <TextView
        android:layout_width="wrap_content"
        android:layout_height="wrap_content"
        android:text="How are you!"
        android:textColor="@color/red"
        android:textSize = "20sp"
        tools:ignore="HardcodedText" />
    <TextView
        android:layout_width="wrap_content"
        android:layout_height="wrap_content"
        android:textColor="@color/purple"
        android:textSize = "25sp"
        android:text="Hello World!"
        />
    <TextView
        android:layout_width="wrap_content"
        android:layout_height="wrap_content"
        android:text="Taiwan NO.1"
        android:textColor="@color/colorPrimary"
        android:textSize = "30sp"
        tools:ignore="HardcodedText" />

</FrameLayout>
