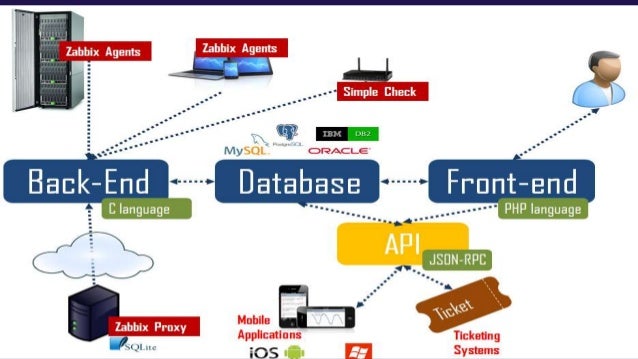
Zabbix CEO 簡報,架構如下,Client Server端裝Agent或者開啟Snmp收集資料
https://www.slideshare.net/pundir5/zabbix-51457845
Server架好後,開始收集Client的資訊
到Google Cloud Platform 架設一台Server
#下載安裝zabbix-agent
rpm -ivh http://repo.zabbix.com/zabbix/3.4/rhel/7/x86_64/zabbix-release-3.4-1.el7.centos.noarch.rpm
yum -y install zabbix-agent
vi /etc/zabbix/zabbix_agentd.conf
#zabbix_agentd.conf內修改ServerIP,後面填入自己之前建的Server外部IP
Server=<Server外部IP>
啟動agent
systemctl restart zabbix-agent
systemctl enable zabbix-agent
#如有firewall需開啟10050,10051
firewall-cmd --permanent --add-port=10050/tcp
firewall-cmd --permanent --add-port=10051/tcp
firewall-cmd --reload
systemctl restart firewalld
回到Zabbix Web,配置=>主機 =>創建主機

輸入主機名稱,群組名稱及Client IP

選擇模板

成功ZBX會亮綠燈

*Cloud注意事項兩端防火牆要記得開啟
Client 對外IP需開10050 (額外功能看需求10051)

Server端防火牆也需要開

====進階應用====
官方的Agent功能介紹
https://www.zabbix.com/zabbix_agent
zabbix_agentd.conf
#多台可以用逗號分開
Server=192.168.1.1,192.168.1.2
#主動式 Active Checks
ServerActive=192.168.1.1,192.168.1.2
#預設agent使用的port
ListenPort=10050
#log位置
LogFile=/var/log/zabbix/zabbix_agentd.log
#預設0不允許遠端指令,如需遠端啟動服務改為1 (例如偵測iis service down 做restart)
EnableRemoteCommands=0
Windows 安裝Agent
https://www.zabbix.com/documentation/2.4/manual/appendix/install/windows_agent?s[]=agent
官網下載 =>Zabbix pre-compiled agents => Windows (All)
解壓縮後兩個資料夾bin裡面有win32和win64,64位元選擇win64
將conf資料夾內的zabbix_agentd.win.conf複製到win64資料夾內
我自己方式將win64複製到C:\Program Files (x86)底下,並改名為zabbix
zabbix_agentd.win.conf與linux設定相同,LogFile路徑改成自己好用的地方
LogFile=C:\Program Files (x86)\zabbix\zabbix_agentd.log
管理員模式開啟CMD
指令意思
=>切換到資料夾
=>安裝zabbix agentd 到Services使用zabbix_agentd.win.conf設定檔
=>執行service
cd C:\Program Files (x86)\zabbix
zabbix_agentd.exe -c zabbix_agentd.win.conf -i
zabbix_agentd.exe -s
停止zabbix agent
zabbix_agentd.exe --stop
移除zabbix agent
zabbix_agentd.exe --uninstall
可以直接去Services內做操作
