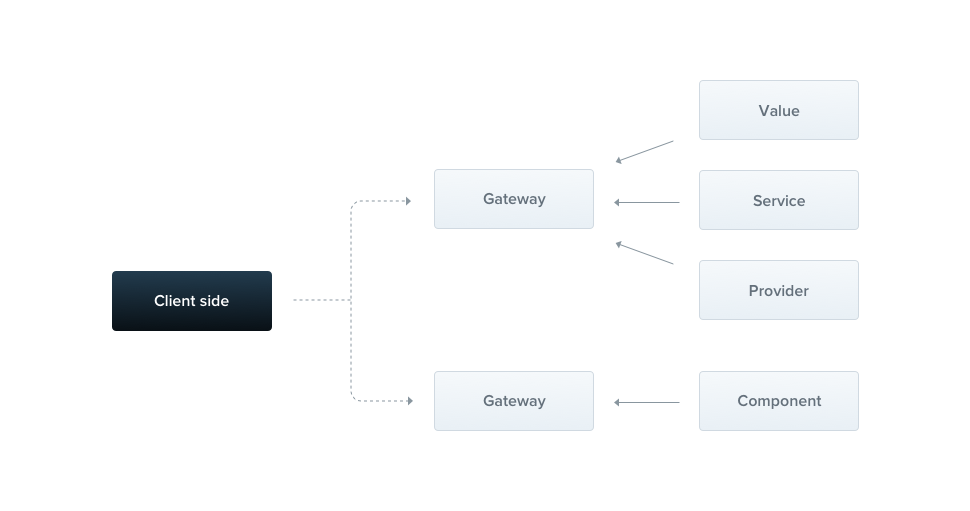
Gateway是一個帶有@WebSocketGateway()裝飾器的class,在day01提到的Socket.IO,Nestjs將其做了些封裝,我們只需要使用@WebSocketGateway()的API,就能操作Socket.IO與Client端做互動,整體操作上也蠻簡單明瞭。後續關於Nestjs的WebSocket介紹,其實核心都環繞在Nestjs的主要幾個API,所以後面的介紹會比較像在複習,為了增加點樂趣,我們先讓Nestjs有畫面。
1.安裝ejs模組,然後請在src資料夾底下創建views、assets資料夾(仿expressjs專案)。
cmd指令:
npm install ejs --save & cd src & mkdir views assets
import { NestFactory } from '@nestjs/core';
import { ApplicationModule } from './modules/app.module';
import { INestApplication } from '@nestjs/common/interfaces/nest-application.interface';
import * as express from 'express';//使用express模組
import * as path from 'path';

//創建express 實例
const instance = express();

// view使用ejs範本引擎
instance.set('views', path.join(__dirname, 'views'));
instance.set('view engine', 'ejs');

//NestFactory.create()接受一個模組引數,和一個可選的express實例引數,並返回Promise。
const app: Promise<INestApplication> = NestFactory.create(ApplicationModule, instance);

app
  //Promise傳入nest的實例引數。
  .then(nestInstance =>
    //nest實例具有listen方法,傳入port引數,和一個可選的callback function。
    nestInstance.listen(3000, () => {
      console.log('Application based on Express is listening on port 3000');
    })
  )
  .catch((err) => {
    console.error('Application configured to listen on port 3000 failed to start', err);
  });
import { Controller, Get, Request, Response, Next } from '@nestjs/common';

@Controller()
export class ChatController {

    constructor() { }

    @Get('chat')
    //使用Express的參數
    async chat( @Request() req, @Response() res, @Next() next) {
        //跟expressjs專案一樣,指定view路徑,後面帶變數可以直接render到view上
        res.render('./Chat/chat',{title:"聊天室"});
    }
}
src/modules/Chat/chat.module.ts
import { Module } from '@nestjs/common';
import { ChatController } from './chat.controller';
@Module({
    //傳入ChatController
    controllers: [ChatController]
})
export class ChatModule { }
@Module({
  modules: [UsersModule,ChatModule]
})
<!DOCTYPE html>
<html lang="en">
<head>
    <meta charset="UTF-8">
    <meta name="viewport" content="width=device-width, initial-scale=1.0">
    <meta http-equiv="X-UA-Compatible" content="ie=edge">
    <title>聊天囉</title>
</head>
<body>
    <%= title %>
</body>
</html>
<%= title %>會接受來自ChatController裏頭chat()render過來的title值。
npm start
網頁畫面如下
Nestjs不愧是base on Expressjs的框架,工程師可以用過往最熟悉的express render方式開發一個網站,不過我還是比較喜歡前後端分離的開發方式拉XDDD。
import { WebSocketGateway, SubscribeMessage, WsResponse, WebSocketServer, WsException } from '@nestjs/websockets';
import { Observable } from 'rxjs/Observable';
import 'rxjs/add/observable/from';
import 'rxjs/add/operator/map';

//WebSocket listen  port 81
@WebSocketGateway(81)
export class ChatGateway {
    @WebSocketServer() server;

    //訂閱事件名稱
    @SubscribeMessage('wannaChat')
    onEvent(client, message): WsResponse<string> {
        //要聽的事件
        const event = 'wannaChat';
        //接收來自client端傳過來的訊息。
        console.log(message);
        //準備一段回應client端的訊息。
        const response = `Hi,I'm Chat Server.`;
        /*WsResponse的interface結構
        export interface WsResponse<T> {
            event: string;
            data: T;
        }
        */
        //直接推向指定的event,data的值則是我們要推的訊息。
        //這樣做法,有點像是http post完後給一個response。
        return { event, data: response };
    }
}
import { Module } from '@nestjs/common';
import { ChatController } from './chat.controller';
import { ChatGateway } from './chat.gateway';
@Module({
    //傳入ChatController
    controllers: [ChatController],
    //傳入ChatGateway
    components:[ChatGateway]
})
export class ChatModule { }
<!DOCTYPE html>
<html lang="en">
<head>
    <meta charset="UTF-8">
    <meta name="viewport" content="width=device-width, initial-scale=1.0">
    <meta http-equiv="X-UA-Compatible" content="ie=edge">
    <script src="https://cdnjs.cloudflare.com/ajax/libs/socket.io/2.0.4/socket.io.js"></script>

    <title>聊天囉</title>
</head>
<body>
    <%= title %>
    <script>
        const socket = io('ws://localhost:81');
            socket.on('connect', function() {
                console.log('Connected');
                //推一個訊息到wannaChat事件。
                socket.emit('wannaChat', { data: "I'm from browser." });
            });
            socket.on('wannaChat', function(response) {
                console.log(response);
            });
            socket.on('exception', function(data) {
                console.log('wannaChat', data);
            });
            socket.on('disconnect', function() {
                console.log('Disconnected');
            });
    </script>
</body>
</html>

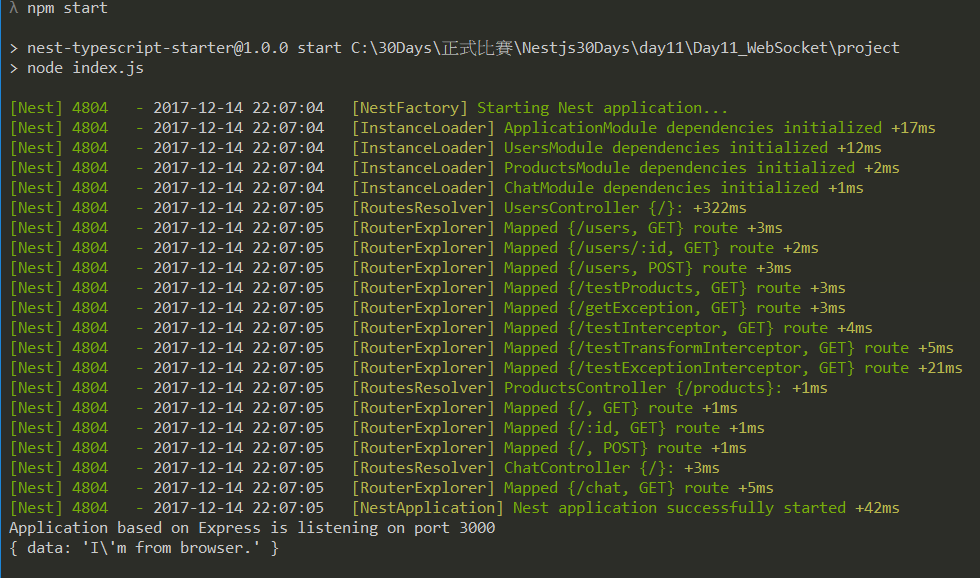
server 接收到來自client端傳的訊息後,回傳訊息給client端,明天來土炮一個真正的聊天室,今天到這。
程式碼都在github