因為網絡上對於影像處理沒有太多的資訊,
所以,就由我來做一些研究的報告
這一次研究的題目是:面對不同程度雜訊的影像,可以用怎麼方式來處理
在自動駕駛的發展趨勢影響下,所以影像會與馬路有關
因為行車途中所取得的影像,必定會有模糊、失針等問題
所以,我們才需要作影像處理。
我會先用smooth把影像模糊化,來重現不同程度雜訊
再用laplacian把模糊的影像細線化,並觀察結果。
=======================分格線=======================
我們來重溫一次smooth的程式
int effect(ImageData *img,ImageData *outimg)
{
    int fil[9]={
    	 1, 1, 1,
    	 1, 1, 1,
    	 1, 1, 1};
    int val;
    int x1,y1,x2,y2;
	int x,y;
	int xx,yy;
	int ff;
	int rr,gg,bb;
	Pixel pix;
	x1=0;
	y1=0;
	x2=img->width-1;
	y2=img->height-1;
	for(y=y1;y<=y2;y++) {
		for(x=x1;x<=x2;x++) {
			val=0;
			ff=0;
			rr=gg=bb=0;
			for(yy=-1;yy<=1;yy++) {
				for(xx=-1;xx<=1;xx++) {
	    			val = getPixel(img,x+xx,y+yy,&pix);
					rr += pix.r * fil[ff];
					gg += pix.g * fil[ff];
					bb += pix.b * fil[ff];
					ff++;
				    }   }
			pix.r=rr/9;
			pix.g=gg/9;
			pix.b=bb/9;
			setPixel(outimg,x,y,&pix);
		    }   }
	return 1;
    }
=======================分格線=======================
接下來,就是laplacian的程式
void laplacian(unsigned char image_in[480][640], unsigned char image_out[480][640], double amp, int type)
{
	int	i, j;
	int d;
	int c[3][9] = { 0, -1,  0, -1,  4, -1,  0, -1,  0,
				   -1, -1, -1, -1,  8, -1, -1, -1, -1,
				    1, -2,  1, -2,  4, -2,  1, -2,  1};
	type = type - 1;
	if (type < 0) type = 0;
	if (type > 2) type = 2;
	for (i = 1; i < 480-1; i++) {
		for (j = 1; j < 640-1; j++) {
			d = c[type][0] * image_in[i-1][j-1]
			  + c[type][1] * image_in[i-1][j  ]
			  + c[type][2] * image_in[i-1][j+1]
			  + c[type][3] * image_in[i  ][j-1]
			  + c[type][4] * image_in[i  ][j  ]
			  + c[type][5] * image_in[i  ][j+1]
			  + c[type][6] * image_in[i+1][j-1]
			  + c[type][7] * image_in[i+1][j  ]
			  + c[type][8] * image_in[i+1][j+1];
			d = (int)(d * amp) ;
			if (d <   0) d = 0;
			if (d > 255) d = 255;
			image_out[i][j] = (unsigned char)d;
		}
	}
}
如果對以上的程式還是很陌生,可以再次觀看我的文章
[影像處理系列] 影像模糊化[1] https://ithelp.ithome.com.tw/articles/10194448
[影像處理系列] Laplacian 1至2階微分法 (程式解說) https://ithelp.ithome.com.tw/articles/10192114
=======================分格線=======================
廢話不多說,看一下結果
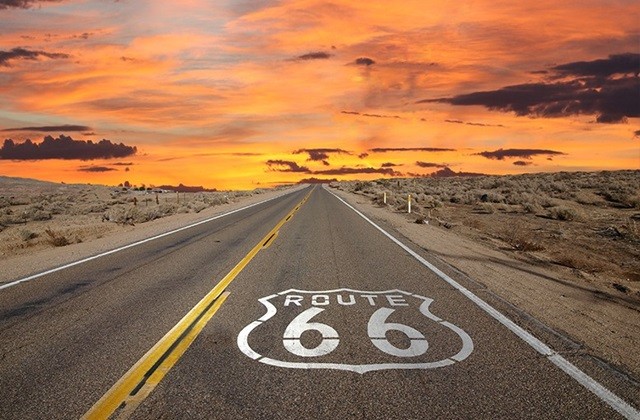
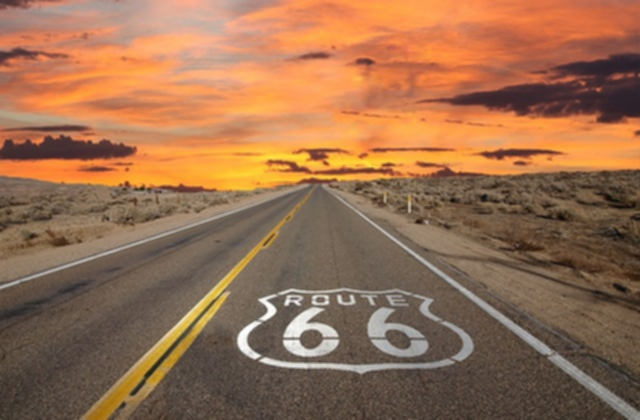
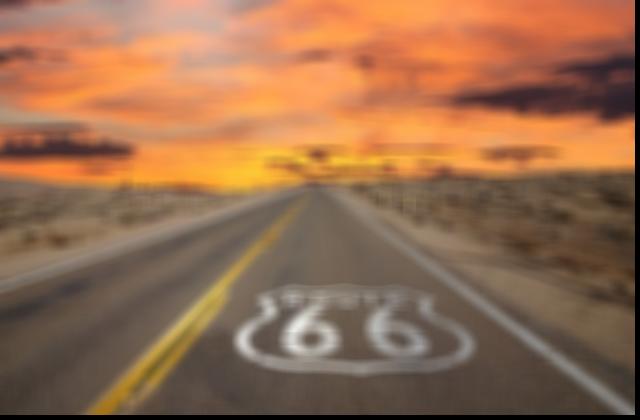
(圖1:原始影像)(影像取自網絡)

*(圖2:把檔案轉換成bmp之影像)
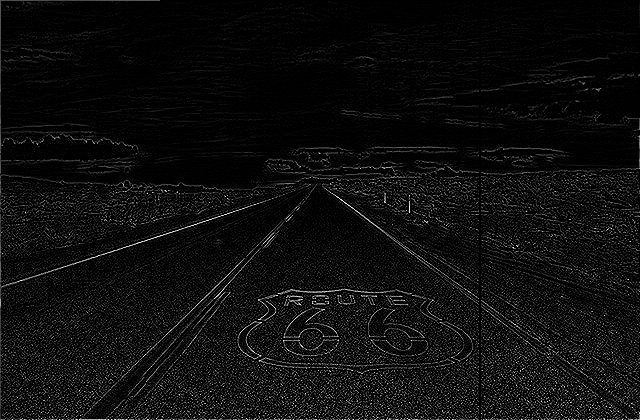
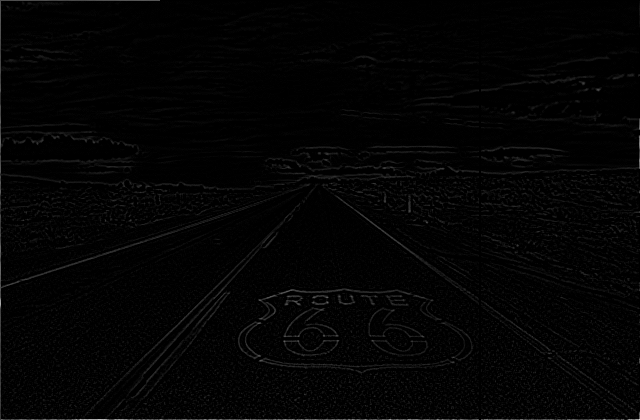
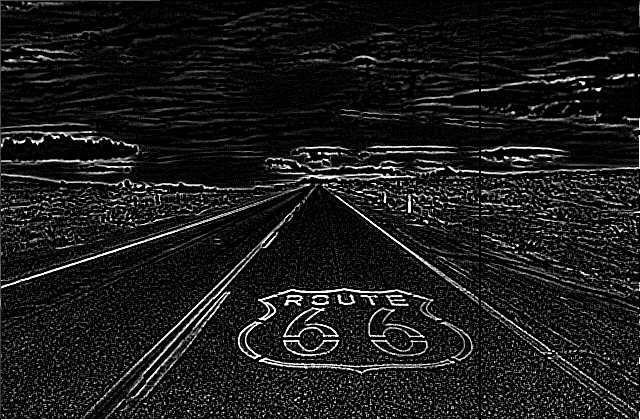
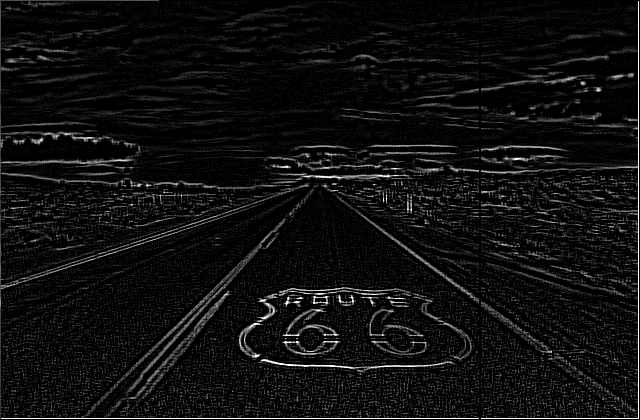
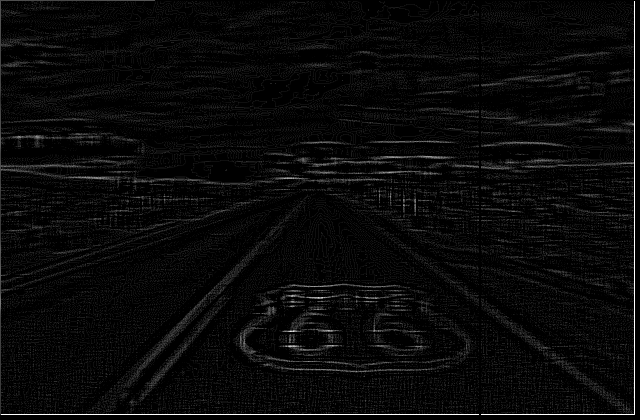
(圖3:把原始影像作1階laplacian處理、放大1.1倍後之影像)
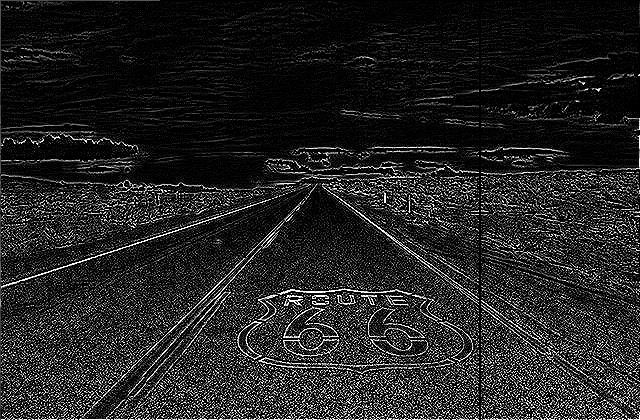
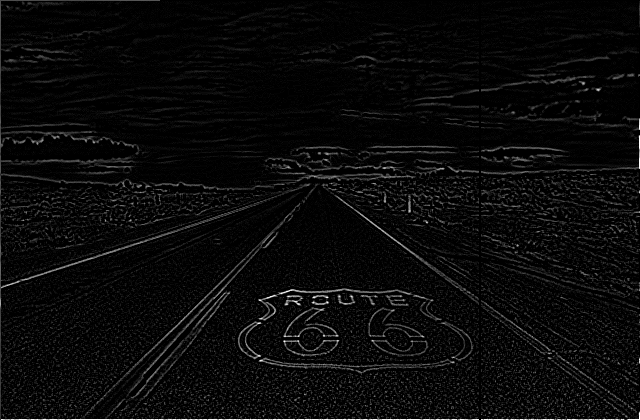
(圖4:把原始影像作1階laplacian處理、放大3.1倍後之影像)
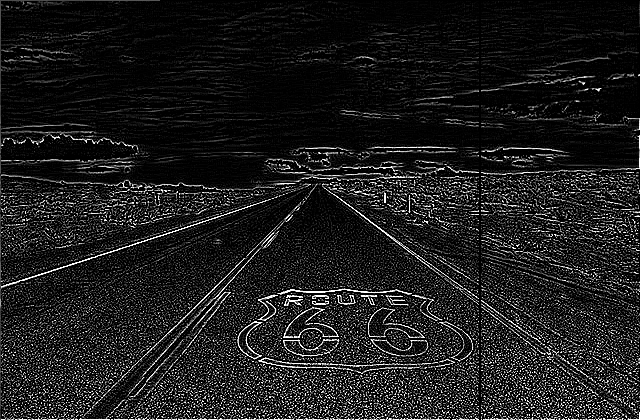
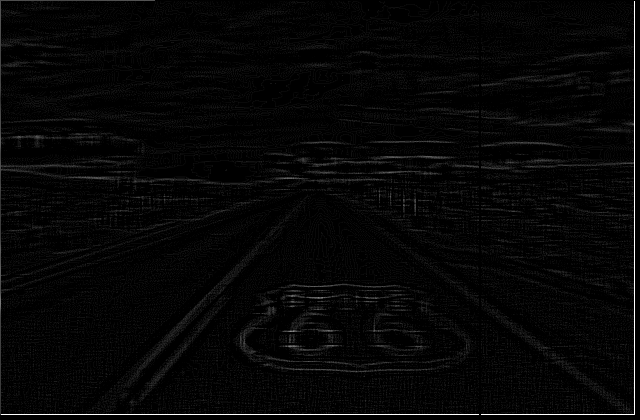
(圖5:把原始影像作2階laplacian處理、放大1.1倍後之影像)
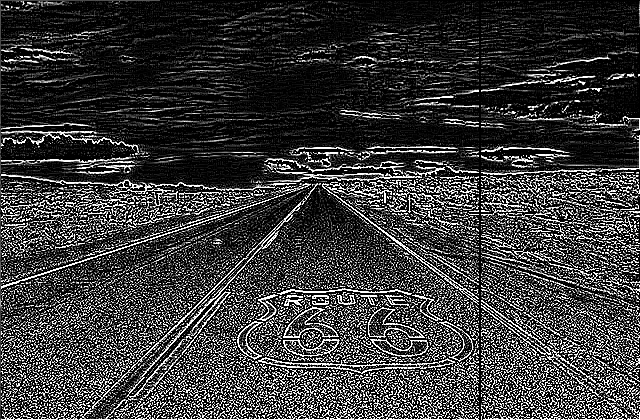
(圖6:把原始影像作2階laplacian處理、放大3.1倍後之影像)
=======================分格線=======================
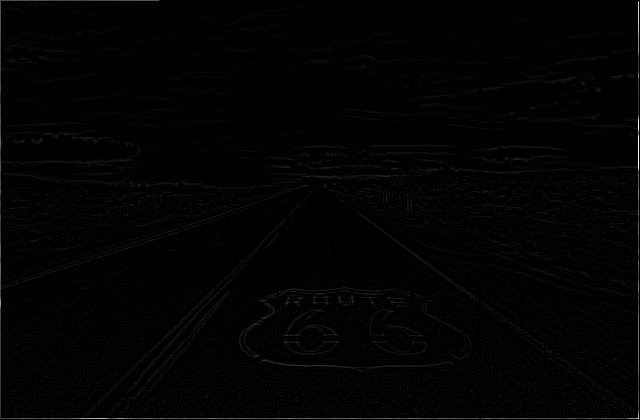
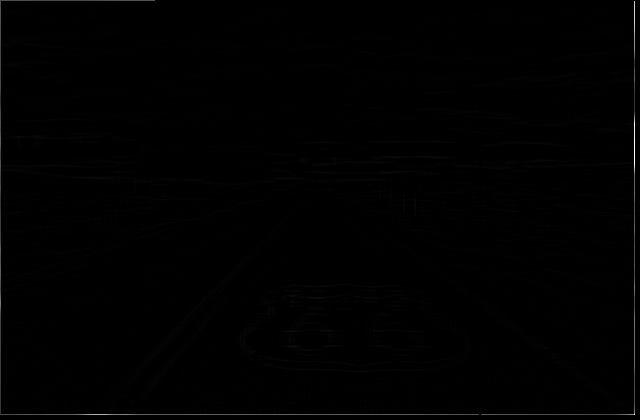
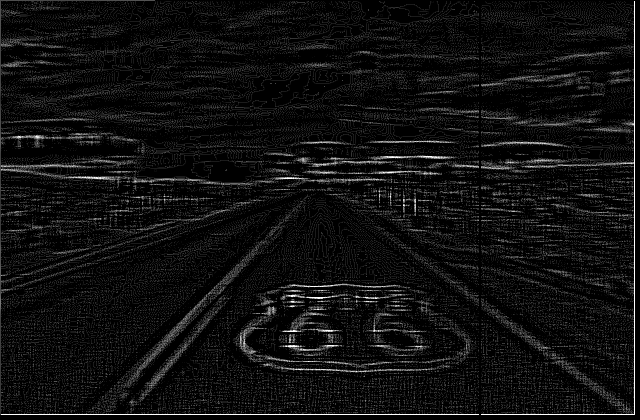
(圖7:利用3x3 smooth遮罩處理之影像)
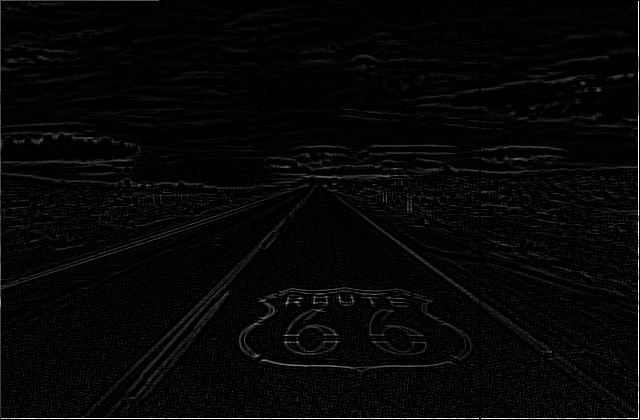
(圖8:把3x3 smooth遮罩處理之影像作1階laplacian處理、放大1.1倍後之影像)
(圖9:把3x3 smooth遮罩處理之影像作1階laplacian處理、放大3.1倍後之影像)

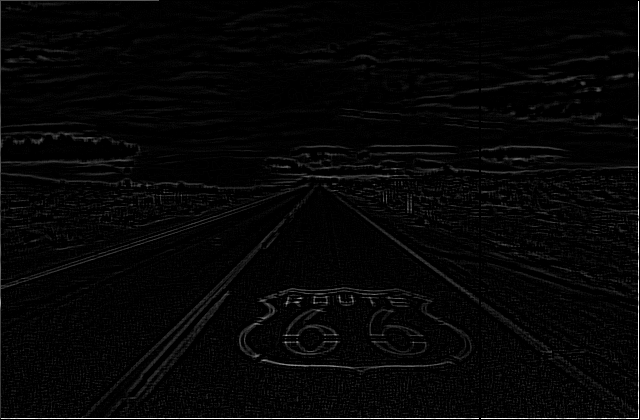
(圖10:把3x3 smooth遮罩處理之影像作2階laplacian處理、放大1.1倍後之影像)
(圖11:把3x3 smooth遮罩處理之影像作2階laplacian處理、放大3.1倍後之影像)
=======================分格線=======================

(圖12:利用5x5 smooth遮罩處理之影像)
(圖13:把5x5 smooth遮罩處理之影像作1階laplacian處理、放大1.1倍後之影像)
(圖14:把5x5 smooth遮罩處理之影像作1階laplacian處理、放大3.1倍後之影像)
(圖15:把5x5 smooth遮罩處理之影像作2階laplacian處理、放大1.1倍後之影像)
(圖16:把5x5 smooth遮罩處理之影像作2階laplacian處理、放大3.1倍後之影像)
=======================分格線=======================
(圖17:利用7x7 smooth遮罩處理之影像)
(圖18:把7x7 smooth遮罩處理之影像作1階laplacian處理、放大1.1倍後之影像)

(圖19:把7x7 smooth遮罩處理之影像作1階laplacian處理、放大3.1倍後之影像)

(圖20:把7x7 smooth遮罩處理之影像作2階laplacian處理、放大1.1倍後之影像)
(圖21:把7x7 smooth遮罩處理之影像作2階laplacian處理、放大3.1倍後之影像)
(圖22:把7x7 smooth遮罩處理之影像作2階laplacian處理、放大5.1倍後之影像)
(圖23:把7x7 smooth遮罩處理之影像作2階laplacian處理、放大9.1倍後之影像)
=======================結論=======================
smooth遮罩愈高,laplacian處理也需要更高的階,而且放大率也要更高
但對於7x7 smooth遮罩,或是更高smooth遮罩,直接使用laplacian處理也無法達到太明顯的細線化(較難看出66字眼及其英文)
而且7x7 smooth遮罩因為太模糊,讓laplacian難以判斷影像的邊緣,因此所輸出的細線化影像,也難以看得出明顯的差別。因此把放大倍率提高至9.1,令影像更明顯(見圖23)
=======================分格線=======================
此外,我們看到一個奇怪的現像
利用bmp原始圖(見圖2),直接使用laplacian細線化處理,因為影像過於真實,所以所輸出的影像,會有更多雜訊。
反而經過3x3 smooth遮罩把影像作初步模糊,再使用laplacian細線化處理,所輸出的影像,會更適合電腦作後續的處理。
雖然我們一般的思考角度,把原始影像直接作laplacian細線化處理,可以保留最原始影像的邊緣。
但是,從結果中我們可以得知,電腦對原始影像判斷邊緣時,會把許多不重要的細節,同時判斷為邊緣,因此輸出的影像有許多雜訊的邊緣。
而影像經過3x3 smooth模糊處理,把一些不重要的細節模糊化,再作laplacian細線化處理,讓電腦只針對重要的影像作細節化。
最後,看來利用不同影像處理的方式作不同的組合,比只使用一種處理方式,有更好的結果。


 iThome鐵人賽