tag不存在或已被下架!
Vue 的生命週期是一個相當重要的觀念, Vue 應用程式是從 Vue 建構式
( Vue constructor )建立根實體( Vue instance )開始,之後再將元件搭建上去。
使用 Vue 建構式建立 Vue instance。
new Vue({
  el: "#app",
  data: {},
});
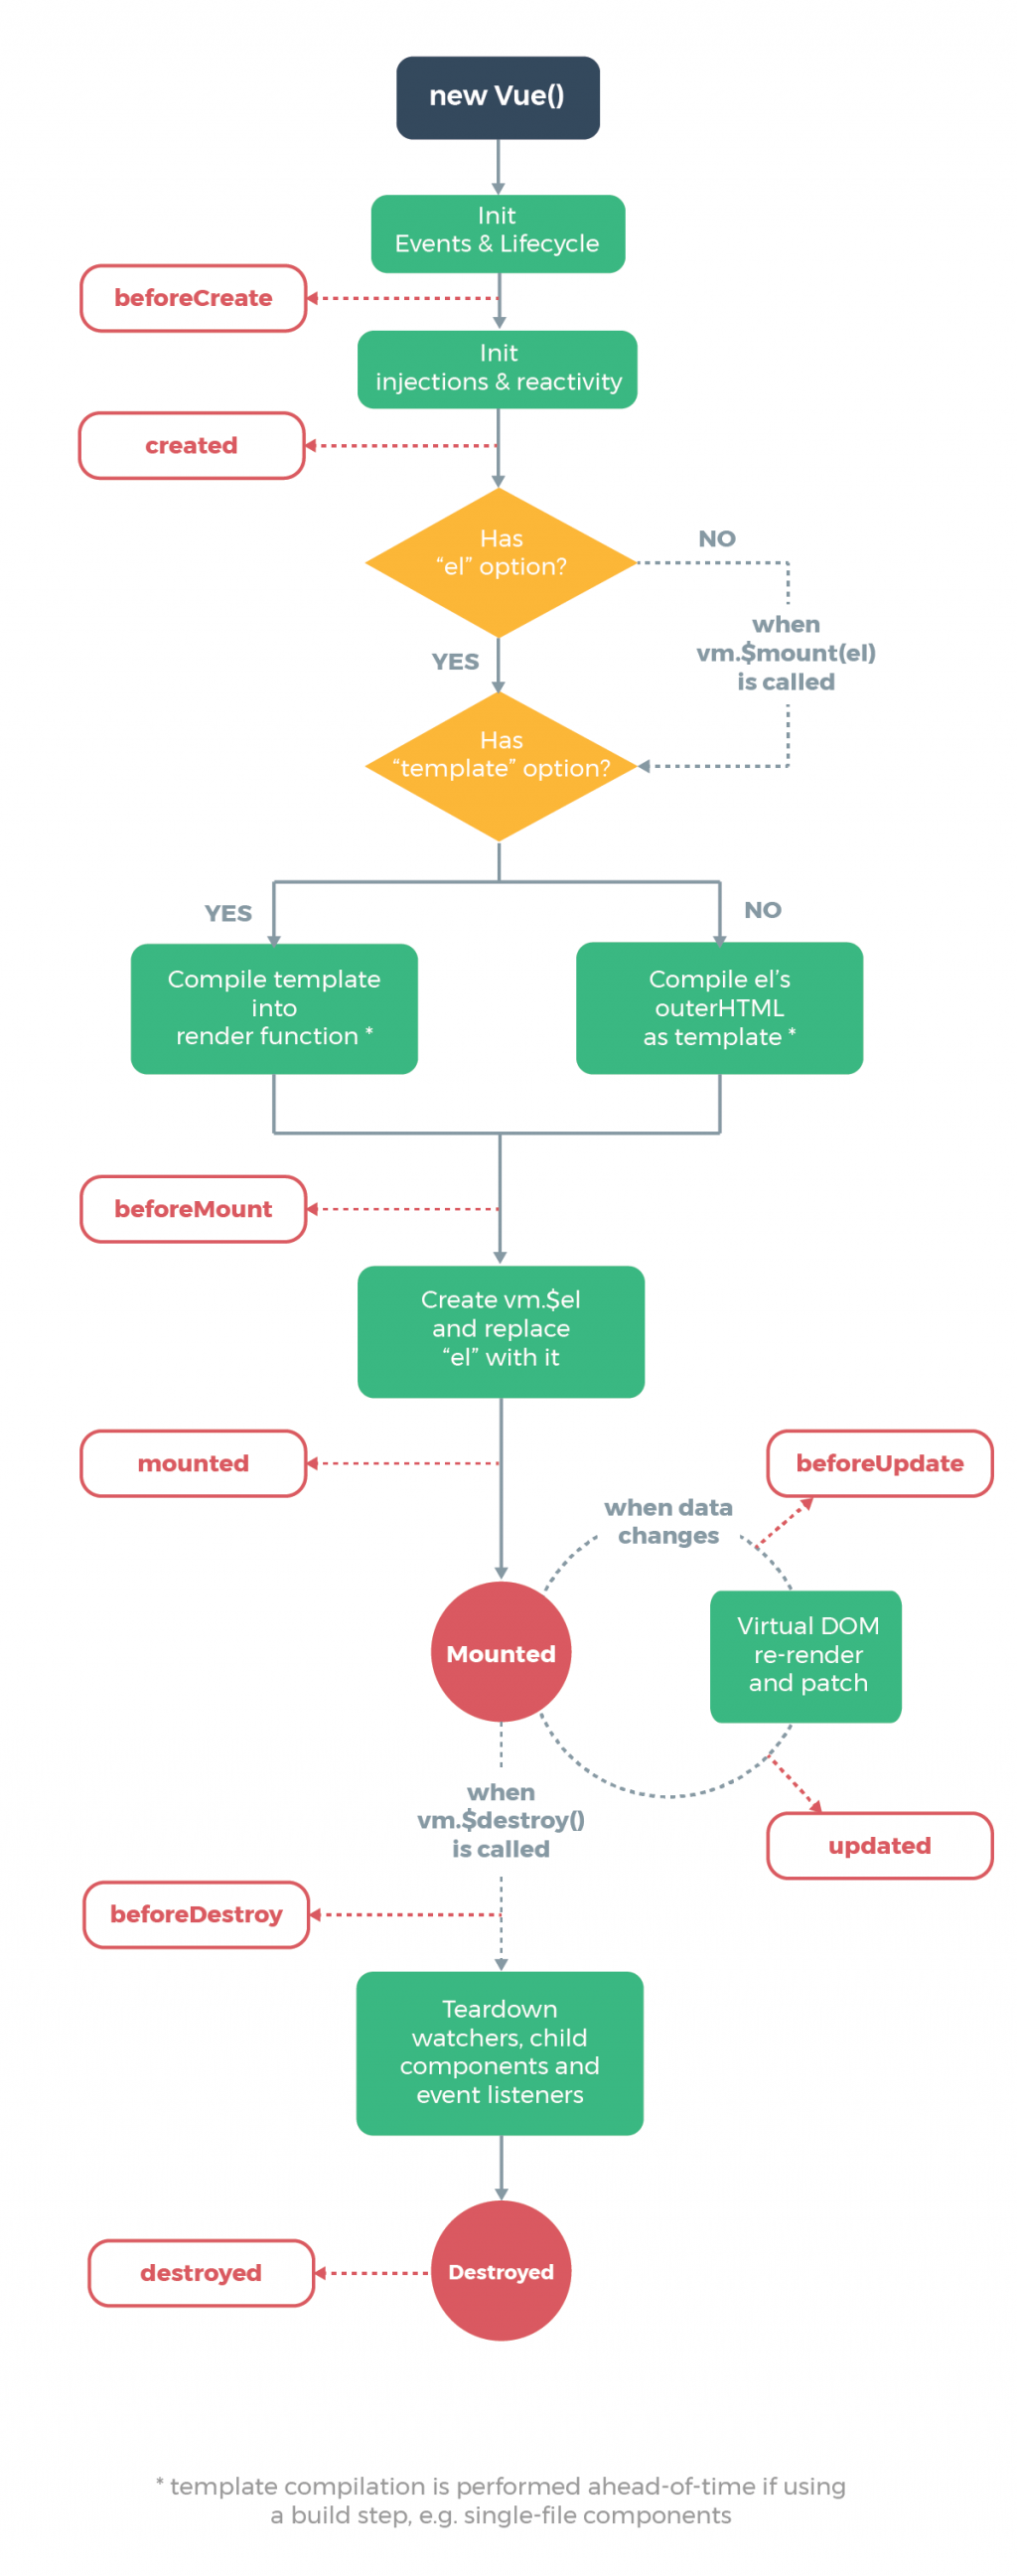
當生命週期到達特定的點時會觸發這些鉤子( hook ),在這裡我們只講解紅色的部份,
這裡我先用元件來介紹生命週期上面這些文謅謅的敘述到底是在說什麼,看不懂元件的內容沒關係之後會介紹,這裡只是要介紹生命週期而已。
//HTML
<div id="app">
  <button @click="toggle">toggle</button>
  <childcomponent v-if="isShow"></childcomponent>
</div>
<script type="text/x-template" id="childcomponent">
  <div>
    <h1>{{msg}}</h1>
    <input type="text" v-model="msg">
  </div>
</script>
<script>
  const childcomponent = {
    template: '#childcomponent',
    data() {
      return {
        msg: 'Hello Vue'
      }
    },
    beforeCreate() {
      console.log('beforeCreate', this.msg)
    },
    created() {
      console.log('Created', this.msg)
    },
    beforeMount() {
      console.log('beforeMount', this.msg)
    },
    mounted() {
      console.log('mounted', this.msg)
    },
    updated() {
      console.log('updated', this.msg)
    },
    activated() {
      console.log('activated', this.msg)
    },
    deactivated() {
      console.log('deactivated', this.msg)
    },
    beforeDestroy() {
      console.log('beforeDestroy', this.msg)
    },
    destroyed() {
      console.log('destroyed', this.msg)
    },
  }
</script>
var app = new Vue({
  el: '#app',
  data: {
    isShow: false
  },
  methods: {
    toggle() {
      this.isShow = !this.isShow
    }
  },
  components: {
    childcomponent: childcomponent
  }
})
上面我先建立一個元件,並在元件中加入各個 hook 要做的事情,接下來請打開 console 觀察,在按下 toggle 按鈕之後,元件會被掛載上去,但是在 beforeCreate 的階段,並沒有辦法取得 data 的資料,要到 created 的時候才能夠正確取得,所以當有需要用到 AJAX 取得資料的時候,至少要在 created 的時候才可以使用。
之後可以在 input 內輸入其他的內容,這時就會觸發 updated 的 hook,然後再按下 toggle 按鈕會發現元件消失了,而在這時雖然 console 有正確顯示資料內容,但是在 Vue 中這個元件已經被移除了。
如果再按一次 toggle 的按鈕,想當然爾元件會再次出現,但是資料的內容已經回到我初始的設定,如果希望資料能夠保留的話,這時就會需要用到 keep-alive 這個方法,該怎麼用呢,請看下面的範例:
<keep-alive>
  <childcomponent v-if="isShow"></childcomponent>
</keep-alive>
只要用 keep-alive 的標籤將元件包住就可以了,當元件顯示出來後更改內容,再按下 toggle 按鈕,這時 destroyed 的 hook 並不會觸發,而是觸發 deactivated 的 hook,再次按下 toggle 顯示元件會發現更改後的資料還在囉!
那麼,明天再見囉!


 iThome鐵人賽