最近朋友神Q超人決定隱退不再發文,從第一篇文章到鐵人賽都能看到對IT界的貢獻,雖然有些遺憾,但我相信有天他還會回來繼續發文,大家是否也會跟我一樣期待呢?
這次要介紹幾何變換,用一些技巧和數學公式來改變圖像尺寸或圖像位置轉換,而改變尺寸在影像處理當中也占了相當重要的位置,可以讓計算量減少許多,這次也一樣依照[1]依序實作。
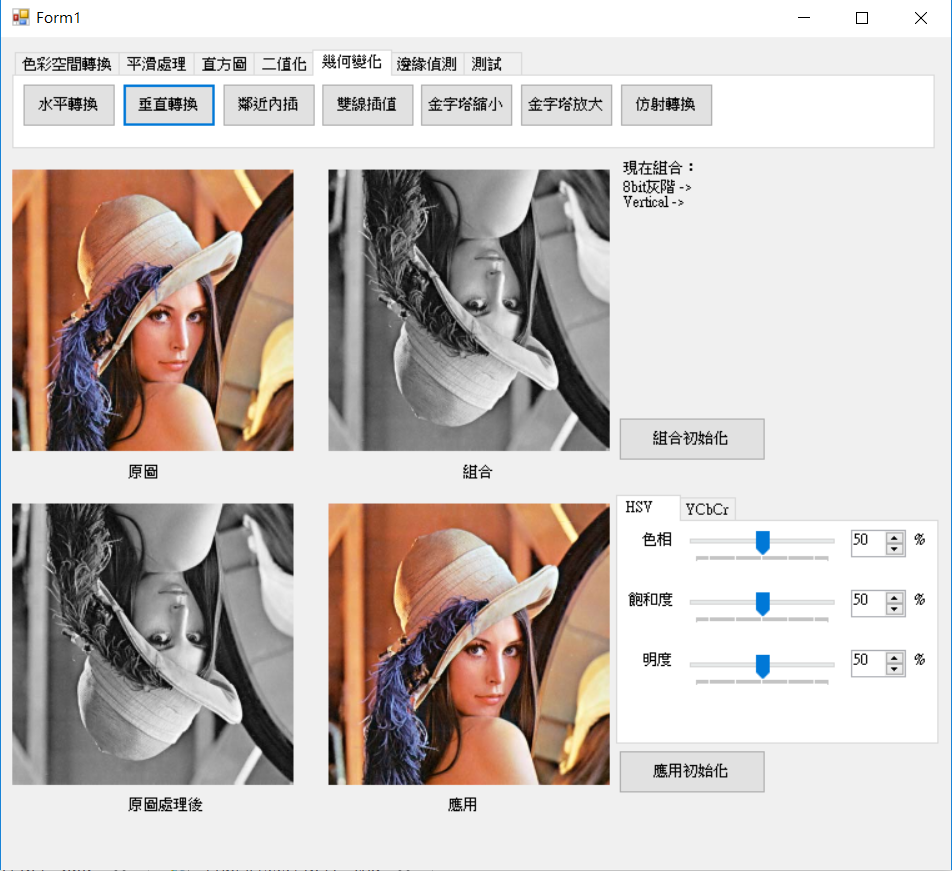
對於水平轉換可以快速想到左邊和右邊像素交換,而垂直轉換也可以快速想到上邊和下邊像素交換,這實現並不困難,但其實它們都是通過三角函數去作旋轉運算(公式如下圖),水平旋轉180度,垂直旋轉90度,但在這裡可以直接用簡易想法實現,除非有需要作特定角度轉換才需要代入此公式做計算。
註:旋轉還有分順時針和逆時針,這裡只實現順時針。

來源:[2]
general.h
	enum RotateType
	{
		HORIZONTAL,
		VERTICAL
	};
Library.h
	/*
		Rotate8bit Parameter:
		src			= source of image
		pur			= purpose of image
		width		= Image width
		height		= Image height
		type		= rotate type
	*/
	void Rotate8bit(C_UCHAE* src, UCHAE* pur
		, C_UINT32 width, C_UINT32 height
		, C_UINT32 type);
Library.cpp
void Library::Rotate8bit(C_UCHAE* src, UCHAE* pur
	, C_UINT32 width, C_UINT32 height
	, MNDT::RotateType type)
{
	switch (type)
	{
	case MNDT::RotateType::HORIZONTAL:
		RotateHorizontal8bit(src, pur
			, width, height);
		break;
	case MNDT::RotateType::VERTICAL:
		RotateVertical8bit(src, pur
			, width, height);
		break;
	}
}
1. 將右邊像素搬移到左邊
Library.h
	void RotateHorizontal8bit(C_UCHAE* src, UCHAE* pur
		, C_UINT32 width, C_UINT32 height);
Library.cpp
void Library::RotateHorizontal8bit(C_UCHAE* src, UCHAE* pur
	, C_UINT32 width, C_UINT32 height)
{
	Image srcImage(const_cast<UCHAE*>(src), width, height, MNDT::ImageType::GRAY_8BIT);
	Image purImage(pur, width, height, MNDT::ImageType::GRAY_8BIT);

	for (UINT32 row = 0; row < height; row++)
	{
		UINT32 purIndex = 0;

		for (int32_t col = width - 1; col >= 0; col--)
		{
			purImage.image[row][purIndex] = srcImage.image[row][col];
			purIndex++;
		}
	}
}

1. 將下邊像素搬移到上邊
Library.h
	void RotateVertical8bit(C_UCHAE* src, UCHAE* pur
		, C_UINT32 width, C_UINT32 height);
Library.cpp
void Library::RotateVertical8bit(C_UCHAE* src, UCHAE* pur
	, C_UINT32 width, C_UINT32 height)
{
	Image srcImage(const_cast<UCHAE*>(src), width, height, MNDT::ImageType::GRAY_8BIT);
	Image purImage(pur, width, height, MNDT::ImageType::GRAY_8BIT);
	C_UINT32 copySize = width * sizeof(UCHAE);
	UINT32 purIndex = 0;

	for (int32_t row = height - 1; row >= 0; row--)
	{
		memcpy(purImage.image[purIndex], srcImage.image[row], copySize);
		purIndex++;
	}
}
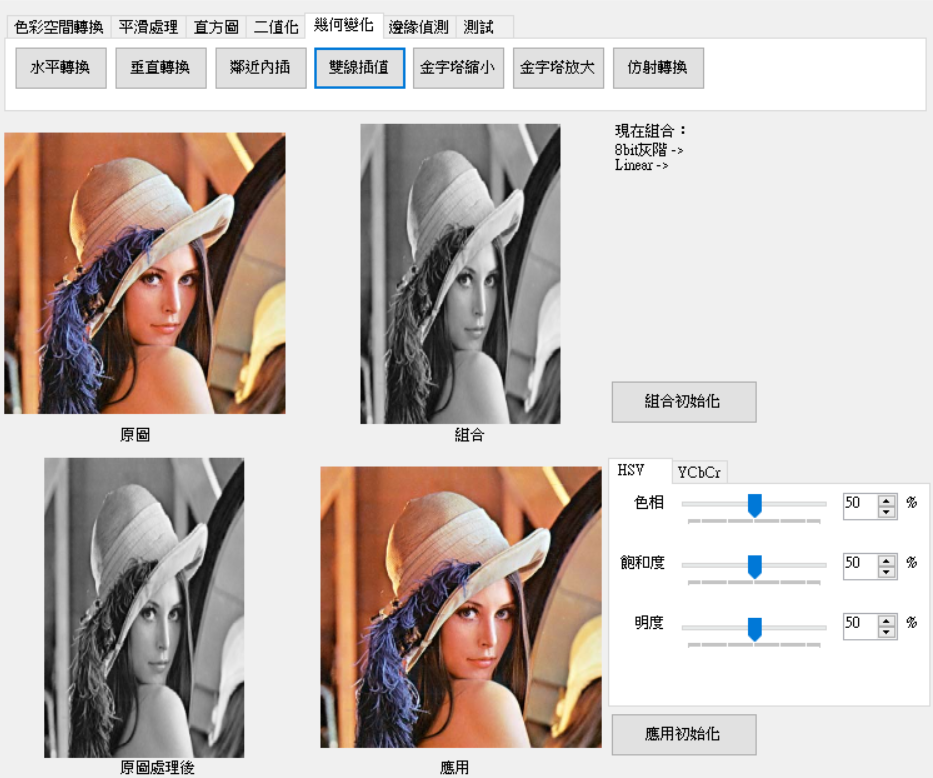
這裡介紹兩種尺寸轉換第一種鄰近內插法第二種雙線插值法,這兩種都是常用來做尺寸轉換。首先先加入轉換型態函數。
general.h
	enum RotateType
	{
		HORIZONTAL,
		VERTICAL
	};
Library.h
	/*
		Resize Parameter:
		src			= source of image
		pur			= purpose of image
		width		= Image's width
		height		= Image's height
		reWidth		= new width
		reHeight	= new height
		type		= resize type
	*/
	void Resize8bit(C_UCHAE* src, UCHAE* pur
		, C_UINT32 width, C_UINT32 height
		, C_UINT32 reWidth, C_UINT32 reHeight
		, C_UINT32 type);
Library.cpp
void Library::Resize8bit(C_UCHAE* src, UCHAE* pur
	, C_UINT32 width, C_UINT32 height
	, C_UINT32 reWidth, C_UINT32 reHeight
	, C_UINT32 type)
{
	switch (type)
	{
	case MNDT::ResizeType::NEAREST:
		NearestResize8bit(src, pur
			, width, height
			, reWidth, reHeight);
		break;
	case MNDT::ResizeType::LINEAR:
		LinearResize8bit(src, pur
			, width, height
			, reWidth, reHeight);
		break;
	}
}
主要計算縮放倍率取得原先像素索引位置。
1. 計算x索引和y索引的倍率。
2. 走訪reWidth * reHeight大小,取得原先像素的位置,位置為現在索引值乘上上述的倍率。
Library.h
	void NearestResize8bit(C_UCHAE* src, UCHAE* pur
		, C_UINT32 width, C_UINT32 height
		, C_UINT32 reWidth, C_UINT32 reHeight);
Library.cpp
void Library::NearestResize8bit(C_UCHAE* src, UCHAE* pur
	, C_UINT32 width, C_UINT32 height
	, C_UINT32 reWidth, C_UINT32 reHeight)
{
	Image srcImage(const_cast<UCHAE*>(src), width, height, MNDT::ImageType::GRAY_8BIT);
	Image purImage(pur, reWidth, reHeight, MNDT::ImageType::GRAY_8BIT);

	float xBase = static_cast<float>(width - 1) / static_cast<float>(reWidth - 1);
	float yBase = static_cast<float>(height - 1) / static_cast<float>(reHeight - 1);

	for (UINT32 row = 0; row < reHeight; row++)
	{
		C_UINT32 srcRow = static_cast<UINT32>(row * yBase);

		for (UINT32 col = 0; col < reWidth; col++)
		{
			C_UINT32 srcCol = static_cast<UINT32>(col * xBase);

			purImage.image[row][col] = srcImage.image[srcRow][srcCol];
		}
	}
}
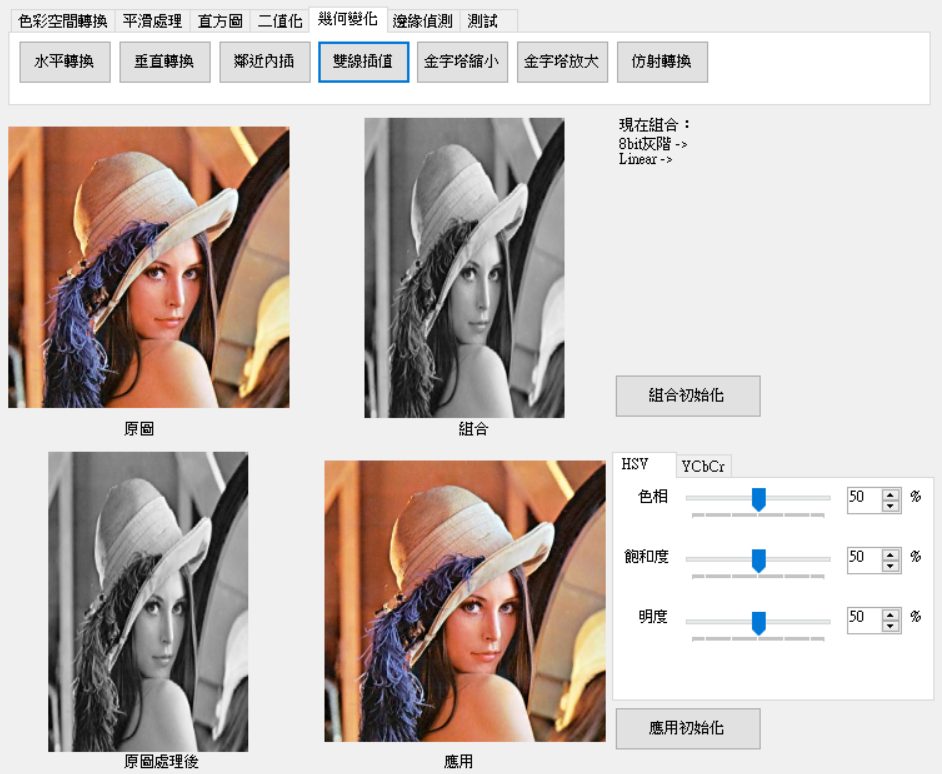
一開始與鄰近內插一樣取得倍率,不同的地方在於是乘上倍率的索引都必須要向上和向下取得索引,也就是說x和y計算出來都會有2個索引位置,組合起來為4個點,再依據算出來的縮放比例乘上像素(如下圖)即是結果。
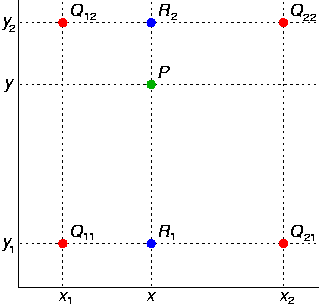
來源:[3]
雙線插值的概念即是距離越近影響越大,假設,k點計算出來的四個點為a、b、c和d。
上述例子可以知道距離和影響可知道,影響 = 1 - 距離。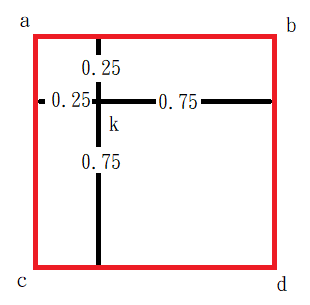
1. 計算倍率,取小數點第四位。
2. 計算縮放比例取得四個點權重。
3. 走訪reWidth * reHeight大小,取得四個原先像素的位置,位置為現在索引值乘上上述的倍率,最後在乘上權重。
Library.h
	void LinearResize8bit(C_UCHAE* src, UCHAE* pur
		, C_UINT32 width, C_UINT32 height
		, C_UINT32 reWidth, C_UINT32 reHeight);
Library.cpp
void Library::LinearResize8bit(C_UCHAE* src, UCHAE* pur
	, C_UINT32 width, C_UINT32 height
	, C_UINT32 reWidth, C_UINT32 reHeight)
{
	Image srcImage(const_cast<UCHAE*>(src), width, height, MNDT::ImageType::GRAY_8BIT);
	Image purImage(pur, reWidth, reHeight, MNDT::ImageType::GRAY_8BIT);

	C_FLOAT xBase = static_cast<int>(floor(static_cast<float>(width - 1) / static_cast<float>(reWidth - 1) * 1000.0f)) / 1000.0f;
	C_FLOAT yBase = static_cast<int>(floor(static_cast<float>(height - 1) / static_cast<float>(reHeight - 1) * 1000.0f)) / 1000.0f;

	C_FLOAT xProportion = static_cast<float>(reWidth) / static_cast<float>(width);
	C_FLOAT yProportion = static_cast<float>(reHeight) / static_cast<float>(height);
	C_FLOAT xOffset = xProportion - floor(xProportion); // 左邊權重比例
	C_FLOAT yOffset = yProportion - floor(yProportion); // 上邊權重比例

	//(0, 0), (0, 1), (1, 0), (1, 1)
	C_FLOAT w1 = (1.0f - xOffset) * (1.0f - yOffset);
	C_FLOAT w2 = xOffset * (1.0f - yOffset);
	C_FLOAT w3 = (1.0f - xOffset) * yOffset;
	C_FLOAT w4 = xOffset * yOffset;

	for (UINT32 row = 0; row < reHeight; row++)
	{
		float y = row * yBase;
		C_UINT32 y1 = static_cast<UINT32>(floor(y));
		C_UINT32 y2 = static_cast<UINT32>(ceil(y));

		for (UINT32 col = 0; col < reWidth; col++)
		{
			float x = col * xBase;
			C_UINT32 x1 = static_cast<UINT32>(floor(x));
			C_UINT32 x2 = static_cast<UINT32>(ceil(x));
			float pix = static_cast<float>(srcImage.image[y1][x1]) * w1
				+ static_cast<float>(srcImage.image[y1][x2]) * w2
				+ static_cast<float>(srcImage.image[y2][x1]) * w3
				+ static_cast<float>(srcImage.image[y2][x2]) * w4;

			purImage.image[row][col] = static_cast<UINT32>(pix);
		}
	}
}
金字塔也是拿來做影像轉換,只不過它轉換方式較為單純,主要將影像放大或縮小2倍。
[1]的做法為先將它用高斯模糊,取得偶數行列。
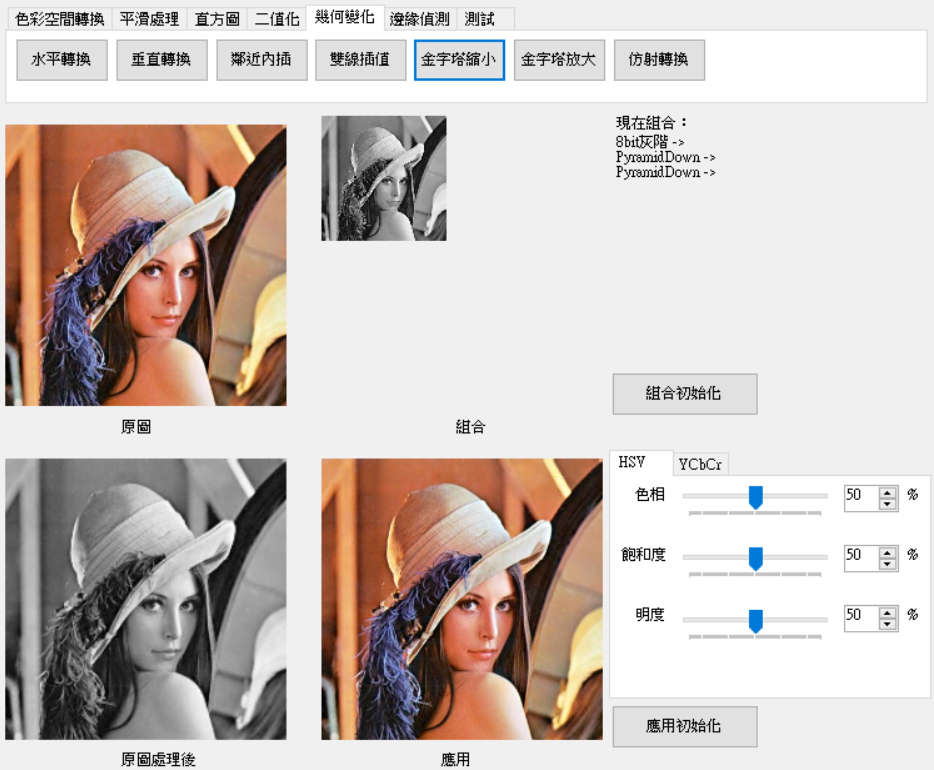
1. 高斯模糊。
2. 走訪改為+2即可縮小。
Library.h
	/*
		PyramidDown8bit Parameter:
		src			= source of image
		pur			= purpose of image
		width		= Image's width
		height		= Image's height
	*/
	void PyramidDown8bit(C_UCHAE* src, UCHAE* pur
		, C_UINT32 width, C_UINT32 height);
Library.cpp
void Library::PyramidDown8bit(C_UCHAE* src, UCHAE* pur
	, C_UINT32 width, C_UINT32 height)
{
	UCHAE* data = new UCHAE[width * height];

	BlurGauss8bit(src, data
		, width, height
		, 5, 1.0f);

	Image srcImage(const_cast<UCHAE*>(src), width, height, MNDT::ImageType::GRAY_8BIT);

	for (UINT32 srcRow = 0; srcRow < height; srcRow += 2)
	{
		for (UINT32 srcCol = 0; srcCol < width; srcCol += 2)
		{
			*pur = srcImage.image[srcRow][srcCol];
			pur++;
		}
	}

	delete[] data;
	data = nullptr;
}
[1]的做法為行列都間隔一個像素0,在做高斯模糊。但這邊測試結果只需要將間隔填入相同的像素即可(可在做一次高斯模糊)。

1. 計算放大後的大小。
2. 走訪改為+2,並將間隔元素也設置相同像素。
Library.h
	/*
		PyramidUp8bit Parameter:
		src			= source of image
		pur			= purpose of image
		width		= Image's width
		height		= Image's height
	*/
	void PyramidUp8bit(C_UCHAE* src, UCHAE* pur
		, C_UINT32 width, C_UINT32 height);
Library.cpp
void Library::PyramidUp8bit(C_UCHAE* src, UCHAE* pur
	, C_UINT32 width, C_UINT32 height)
{
	C_UINT32 purWidth = width << 1;
	C_UINT32 purHeight = height << 1;
	Image dataImage(pur, purWidth, purHeight, MNDT::ImageType::GRAY_8BIT);

	for (UINT32 purRow = 0; purRow < purHeight; purRow += 2)
	{
		for (UINT32 purCol = 0; purCol < purWidth; purCol += 2)
		{
			dataImage.image[purRow][purCol] = *src;
			dataImage.image[purRow + 1][purCol] = *src;
			dataImage.image[purRow][purCol + 1] = *src;
			dataImage.image[purRow + 1][purCol + 1] = *src;
			src++;
		}
	}
}
[1]提到主要是取得三個點取得公式去做轉換,公式其實就是要求出方程式的係數。假設點(x, y)要轉換為(x', y),則公式為ax + by + c = x',然而有三個點,這時候就有三個方程式,這邊使用高斯消去法求a、b和c。最後再將原始圖像的索引值代入求出的方程式即是訪設變換。
註:對高斯消去法有興趣可以去網路上看相關原理,這裡略過。
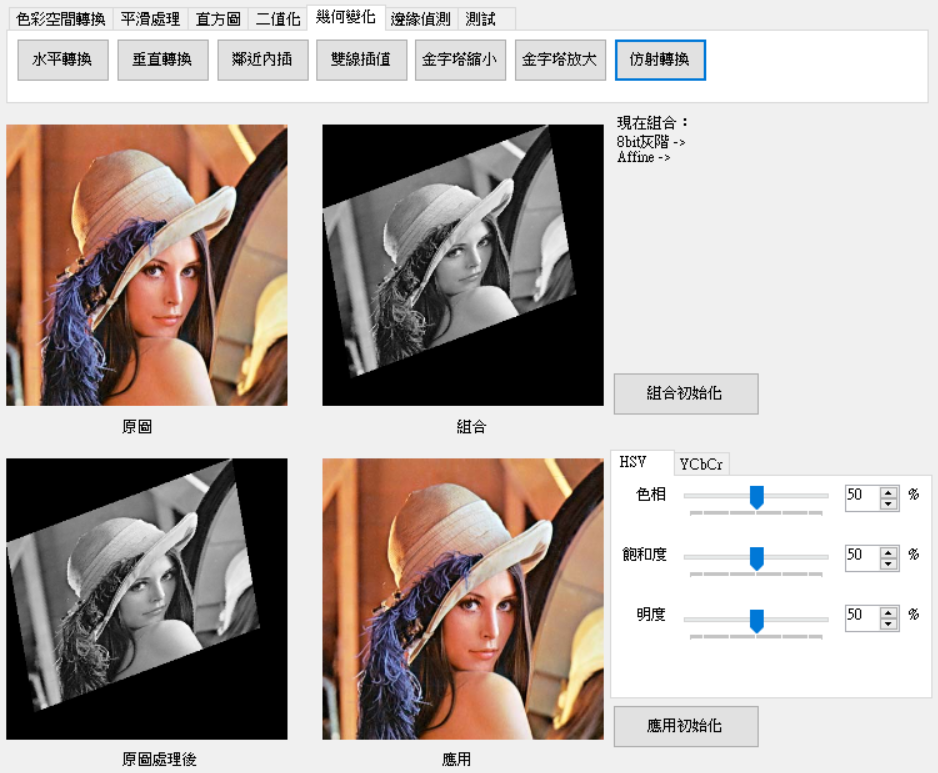
affine為3 * 5的陣列,每一水平列資料為[x, y, 1(b係數都是1), 'x, 'y]。
1. 計算高斯消去法。
2. 將結果指派給x和y的係數。
Library.h
	/*
		SetAffineTransform Parameter:
		affine		= point input and output
		baseX		= ouput x base(a.b.c)
		baseY		= ouput y base(a.b.c)
		row			= row size
		col			= col size
	*/
	void SetAffineTransform(float** affine
		, float* baseX, float* baseY
		, C_UINT32 row, C_UINT32 col);
Library.cpp
void Library::SetAffineTransform(float** affine
	, float* baseX, float* baseY
	, C_UINT32 row, C_UINT32 col)
{
	GaussianElimination gauss(affine, row, col);

	gauss.Compute();

	for (UINT32 index = 0; index < row; index++)
	{
		baseX[index] = affine[index][col - 2];
		baseY[index] = affine[index][col - 1];
	}
}
1. 走訪,代入x和y的方程式計算索引值。
Library.h
	/*
		Affine8bit Parameter:
		src			= source of image
		pur			= purpose of image
		width		= Image's width
		height		= Image's height
		baseX		= ouput x base(a.b.c)
		baseY		= ouput y base(a.b.c)
	*/
	void Affine8bit(C_UCHAE* src, UCHAE* pur
		, C_UINT32 width, C_UINT32 height
		, C_FLOAT* baseX, C_FLOAT* baseY);
Library.cpp
void Library::Affine8bit(C_UCHAE* src, UCHAE* pur
	, C_UINT32 width, C_UINT32 height
	, C_FLOAT* baseX, C_FLOAT* baseY)
{
	Image srcImage(const_cast<UCHAE*>(src), width, height, MNDT::ImageType::GRAY_8BIT);
	Image purImage(pur, width, height, MNDT::ImageType::GRAY_8BIT);

	for (UINT32 row = 0; row < height; row++)
	{
		for (UINT32 col = 0; col < width; col++)
		{
			C_UINT32 newRow = static_cast<UINT32>(col * baseY[0] + row * baseY[1] + baseY[2]);
			C_UINT32 newCol = static_cast<UINT32>(col * baseX[0] + row * baseX[1] + baseX[2]);
			if (newRow >= 0 && newRow < height && newCol >= 0 && newCol < width)
			{
				purImage.image[newRow][newCol] = srcImage.image[row][col];
			}
		}
	}
}
這次寫的這函數庫幾乎都在處理8位元,沒有把24位元加進去,對於24位元只有另外提出來,主要是怕混淆,再加上會多判斷影響到效能,但主要還是知道原理才是最重要的,若有問題或有觀念錯誤歡迎提問糾正。
[1]阿洲(2015). OpenCV教學 | 阿洲的程式教學 from: http://monkeycoding.com/?page_id=12 (2018.11.10).
[2]維基百科(2018). 旋轉矩陣 from: https://zh.wikipedia.org/wiki/%E6%97%8B%E8%BD%AC%E7%9F%A9%E9%98%B5#%E4%BA%8C%E7%BB%B4%E7%A9%BA%E9%97%B4 (2018.11.10).
[3]維基百科(2018). 雙線性插值 from: https://zh.wikipedia.org/wiki/%E5%8F%8C%E7%BA%BF%E6%80%A7%E6%8F%92%E5%80%BC (2018.11.10).
 Kevin
Kevin
