我們今天的目的是以其他語言作為基礎,加以比較智能合約程式碼的特色。如果你想嘗試學習與開發智能合約,目前Ethereumm上最主流的語言是Solidity,開發智能合約的過程與一般程式類似,都需要經過撰寫程式→編譯的過程,差別就在智能合約最後會把經過編譯的原始碼(Bytecode)以一般交易的形式送上區塊鏈儲存,並等待其他人觸發。
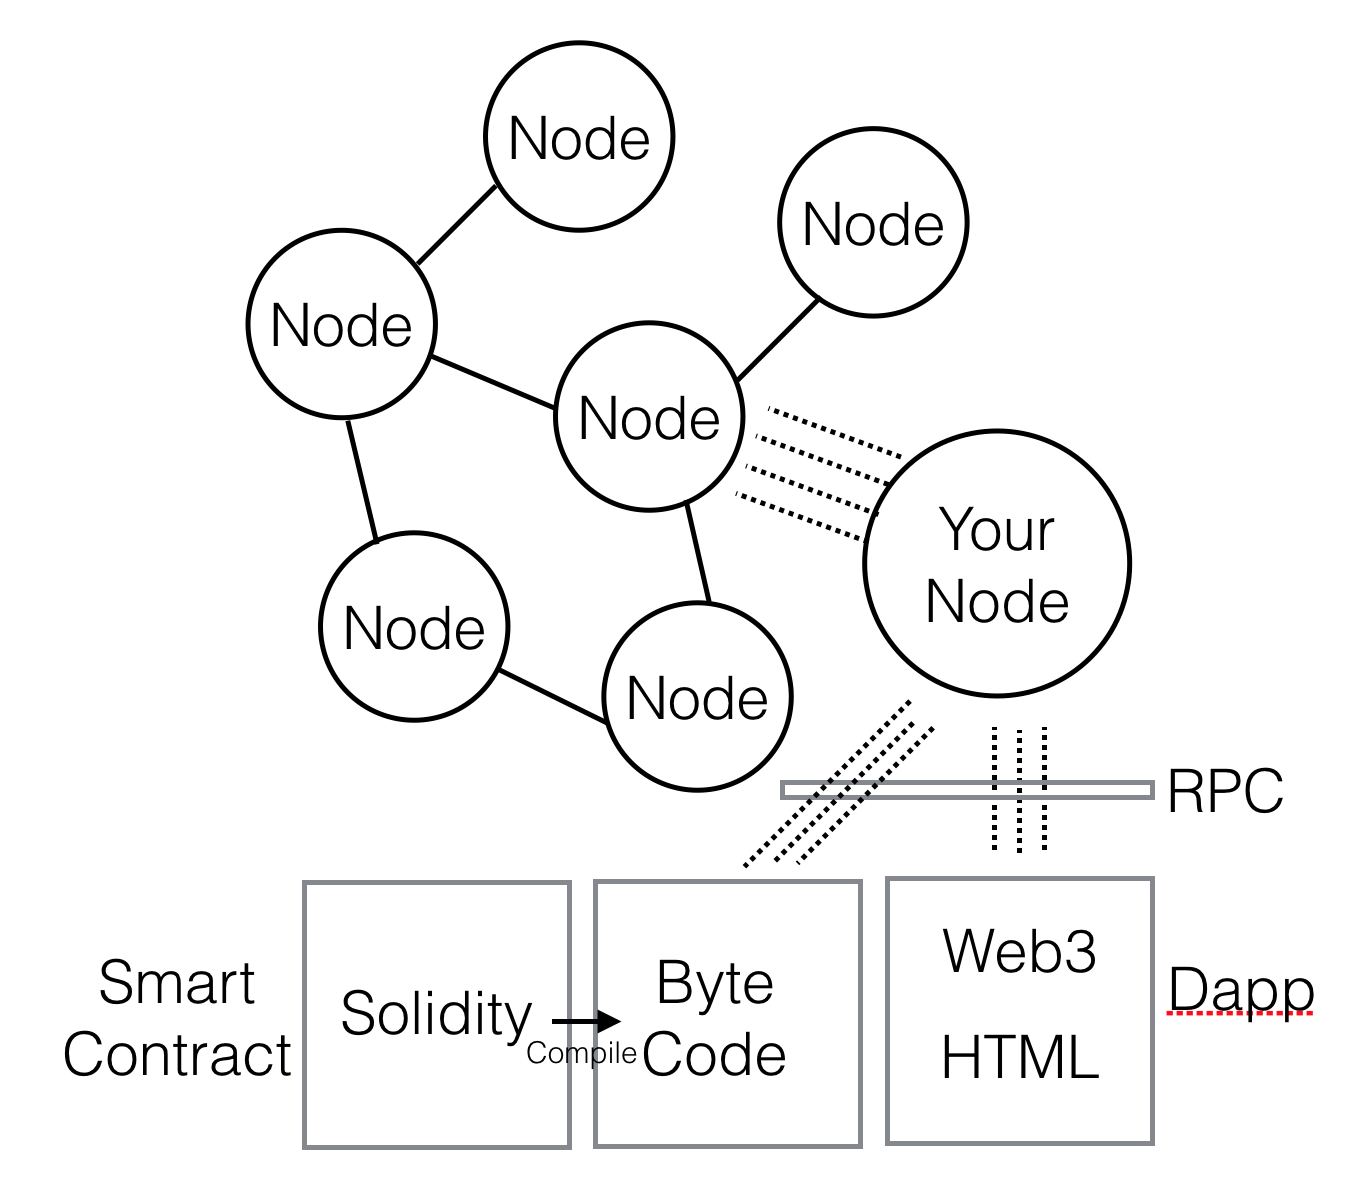
圖片來源: Ethereum 開發筆記 2–1:Ethereum 開發整體脈絡
Solidity目前最容易入手的整合開發環境(IDE)是由乙太坊基金會所開法與維護的Remix,Remix的優點跟強項是全部網頁化,撰寫智能合約你並不需要安裝任何軟體,只需要點開瀏覽器的網址就可以開始了。

圖片擷取自: Remix
其他知名與主流的IDE還有Truffle與Ganache,Truffle主要負責智能合約的開發與撰寫,提供了一個類似Django的migration功能,大部分的指令都需要依靠command line進行,而Ganache也是由Truffle團隊開發,提供了圖形化介面方便使用者實際測試。如果你有興趣學習這兩種IDE的話可以參考這裡的教學。
如果你完全沒經驗的話,Solidity不該是你的第一門語言,你應該去學Javascript或C/C++之類的語言後才來學習Solidity。另外因為我對C/C++比較熟悉,大部分人應該也都學習過C/C++,所以等等類比或舉例時都會以C/C++為主。
Solidity自5.0後進行了大幅度的改版,所以如果你過去有撰寫過Solidity的經驗,記得先去查閱語法的變動。也因為目前Solidity還處在一個迅速發展與更動的狀態,才不建議以Solidity作為你的第一門程式語言。下面是我整理的常用Solidity基本語法,你可以當作cheat sheet來使用,先對基本的語法有些概念後,我們就可以來讀一讀幾個經典的智能合約了。
首先來談合約架構,在一個地址底下的合約通常會有這三個部分:
在合約的一開始請記得指定編義器的版本,如果你要指定成0.5.3的話可以這樣寫
pragma solidity ^0.5.3
或是想指定特定的編譯器版本範圍的話你也可以這樣寫
pragma solidity >=0.4.0 <0.5.0;
Solidity的基本單位是contract,contract間可以彼此呼叫與使用,一個基本contract寫法會包含變數與函式,如下:
contract ContractDemo {
    variable variable_name_1;
    variable variable_name_2;
    variable variable_name_3;

    function function_name(variable parameter_name, ...) Visibility  {
        codes of this function...
    }

    function function_name(variable parameter_name, ...) Visibility  {
        codes of this function...
    }

    function function_name(variable parameter_name, ...) Visibility  {
        codes of this function...
    }
}
Library可以視作是函式庫,宣告方式也跟Contract一樣,Library被部署在鏈上後也有一個專屬的address,可以被任何人呼叫,但Library使用上不能儲存Ether與任何資料,裡面只能有函式,所以把它當函式庫來看比較適當。
library Demo {
    function DemoFunction() returns (type) {
        return value_to_return;
    }
}
寫完library後,可以用using...for的方式在contract中被使用
using library for another_name;
Solidity主要的變數型別有以下幾種
bool:布林變數,有true/false兩種
int/uint:int是一般的整數、而uint是unsigned int的縮寫(全正的正整數),後面加個數字代表所使用的bit空間,宣告的範圍可以從uint8到uint256,如果沒特別寫的話就是指uint256
bytes:位元組,可以從bytes1~bytes32指定長度,如果只寫byte則代表bytes
string:字串
address: 錢包地址
array: 陣列,跟C++相似的是可以使用new來開出一個新陣列
uint[] Array = new uint[](16)
mapping:映射,映射是在智能合約裡非常常用的型態,可以用來儲存或查詢使用者的資料,最常見的宣告mapping形式就是查詢使用者的餘額,所以輸入值是一個地址、輸出值是一個uint256(因為餘額不會有負的)。
mapping(address => uint256) public balance;
實際使用上很像python裡頭dictionary的用法!
balances[address] = new_balance;
最重要的是因為尾數運算總會有誤差的關係,在solidity裏頭沒有float或double這兩種資料型別!
Solidity支援的常見運算子如下:
uint x = uint(y);
函式的撰寫需要以function開頭,寫法如下:
function (variable) {visibility} {pure|view|payable} returns (type)
根據合約內的函式是否可被內部呼叫、繼承或外部使用可以區分成四個visibility:internal、external、public、private
|\|internal|external|public|private|
|---|---|---|---|---|
|合約內使用|O|X|O|O|
|可繼承|O|X|O|X|
|外部呼叫|X|O|O|X|
可以發現external就是專門給外界用的,比方說讓外界購買ICO的函式,而internal則跟external完全相反,除了外界外在合約內可以使用、同時也可以被繼承,適合拿來做內部運算的函式,比方說ICO匯率的換算等。而public則是通通都可以、private則限制最嚴格,僅能在目前合約內使用。
區塊鏈上的儲存空間非常珍貴,如果函式只有讀取的需求的化為了避免耗費資源可以宣告成pure或‵view,pure的是該函示不涉及任何合約上變數的讀取,比方說是
function Demo(uint input) extern pure returns (uint output) { return input * 2; }
view的意思則是會讀取合約內的變數,但不會改變合約內的值:
contract Demo {
   uint variable;
   function Demo(uint input) extern pure returns (uint output) {
       return input * variable;
   }
}
因為只需要讀取區塊鏈上的資料,所以pure跟view都不需要耗費手續費喔!
至於payable則代表這個函式可以接受ETH的匯款!
modifier通常拿來做函式執行前的檢查,通常會檢查使用者的權限或餘額是否足夠,為了方便可以統一寫成modifier,像是為了確認交易發起人是否為合約持有者,我們可以這樣寫:
modifier onlyOwner {
    require(msg.sender == owner, "You are not authorized.");
    _;
}
使用時也只需要在函式的大括號前面加上modifier就好了!
function Demo() public onlyOwner {
    // Do something.
}
與C/C++一樣,Solidity也支援了enum與struct的語法。
enum Demo{
    Demo_1,
    Demo_2,
    Demo_3
}
struct Demo {
        address payable Demo;
        uint Demo_uint;
}
要繼承另外的合約繼續擴充的話,也只需要寫is就可以了!
contract child_contract is parent_contract {
    // Do something......
}
我列舉了幾個常用的關鍵字,但如果想要知道全部的話可以參考官方文件。
msg.sender: 這筆交易發起者的錢包地址msg.data (bytes): 這筆交易完整的input datamsg.value (uint): 跟這筆交易一起被送出的eth數目(單位:wei)block.coinbase: 挖掘出目前區塊的礦工block.difficulty (uint): 目前區塊的難度block.gaslimit (uint): 目前區塊的gas容量上限block.number (uint): 現在是第幾個區塊block.timestamp (uint): 目前區塊的時間戳在solidity的函式內如果要宣告變數,有兩種宣告方式storage與memory:
storage:永久儲存在區塊鏈上,如果沒被初始化就會指向合約本身memory:執行完畢則清空,相當於只存在記憶體裡頭簡而言之storage就是所有觸發合約的交易共用的參數,而memory則是指有這筆交易能夠使用。至於何時該用storage、何時開用memory?你可以參考這篇文章。
如果發生錯誤,要立刻中止合約執行的方法有: require、assert、revert,假設我們要判別使用者的權限,如果權限不足就立刻中止合約執行的話下面這三種寫法
require
require(msg.sender == owner);
revert
if(msg.sender != owner) { revert(); }
assert
assert(msg.sender == owner);
require與revert類似,在合約終止後都會退還剩餘手續費用的,但asser就帶有點懲罰的意味,一旦交易失敗,剩餘的手續費是不會被退還的!
合約內部的確可以儲存使用者的狀態,但在合約內儲存資料的成本非常高,所以如果只是想要儲存交易的結果的話,那麼可以使用較為便宜的event儲存,event的寫法跟函式一樣相當容易,呼叫時也只需要把引數傳入就可以把這些資料記錄在鏈上了。
event event_demo(address user, uint256 amount);
function function() payable {
    event_demo(msg.sender, msg.value);
}
但便宜是有代價的,event的資料並不能被智能合約本身讀取喔!通常都是由使用者端的Web3.js(明天會再說明)讀取交易的結果與紀錄之用。
要import其他地址中的contract/library首先你需要先取得該合約底下函式或變數的介面
contract demo_interface {
  function demo(address _address,uint256 _amonut) external pure returns (bool);
}
想要使用該合約的話需要先實體化該合約
demo_interface public demo_obj;
實體化之後記得把該合約所位於的地址匯入
demo_obj = demo_interface(contract_ddress);
智能合約中最常被使用到的contract/library有兩個: Safemath與Ownable。
Safemath主要是在協助簡單的四則運算避免出錯,你可以在Github看到原始碼,我把它節錄在下面,你應該可以發現Safemath主要是為了處理整數運算後溢位的情形。
library SafeMath {
    function add(uint256 a, uint256 b) internal pure returns (uint256) {
        uint256 c = a + b;
        require(c >= a, "SafeMath: addition overflow");
        return c;
    }

    function sub(uint256 a, uint256 b) internal pure returns (uint256) {
        return sub(a, b, "SafeMath: subtraction overflow");
    }

    function sub(uint256 a, uint256 b, string memory errorMessage) internal pure returns (uint256) {
        require(b <= a, errorMessage);
        uint256 c = a - b;
        return c;
    }
    function mul(uint256 a, uint256 b) internal pure returns (uint256) {
        if (a == 0) {
            return 0;
        }
        uint256 c = a * b;
        require(c / a == b, "SafeMath: multiplication overflow");
        return c;
    }
    function div(uint256 a, uint256 b) internal pure returns (uint256) {
        return div(a, b, "SafeMath: division by zero");
    }

    function div(uint256 a, uint256 b, string memory errorMessage) internal pure returns (uint256) {
        require(b > 0, errorMessage);
        uint256 c = a / b;
        return c;
    }
    function mod(uint256 a, uint256 b) internal pure returns (uint256) {
        return mod(a, b, "SafeMath: modulo by zero");
    }
    function mod(uint256 a, uint256 b, string memory errorMessage) internal pure returns (uint256) {
        require(b != 0, errorMessage);
        return a % b;
    }
}
Ownable則是讓合約持有者擁有某些特殊的權限,我這裡也從Github摘錄了部分程式碼在下,透過Ownable地協助可以讓你自己發出去的合約擁有辨識身分或持有者是誰的能力。
ontract Ownable is Context {
    address private _owner;
    event OwnershipTransferred(address indexed previousOwner, address indexed newOwner);
    constructor () internal {
        address msgSender = _msgSender();
        _owner = msgSender;
        emit OwnershipTransferred(address(0), msgSender);
    }
    function owner() public view returns (address) {
        return _owner;
    }
    modifier onlyOwner() {
        require(isOwner(), "Ownable: caller is not the owner");
        _;
    }
    function isOwner() public view returns (bool) {
        return _msgSender() == _owner;
    }
    function renounceOwnership() public onlyOwner {
        emit OwnershipTransferred(_owner, address(0));
        _owner = address(0);
    }
    function transferOwnership(address newOwner) public onlyOwner {
        _transferOwnership(newOwner);
    }
    function _transferOwnership(address newOwner) internal {
        require(newOwner != address(0), "Ownable: new owner is the zero address");
        emit OwnershipTransferred(_owner, newOwner);
        _owner = newOwner;
    }
}
上面的語法讀完你就可以讀懂八成以上的智能合約了!今天的最後我們來看一下最知名的ERC20-USDT。你在Etherscan上可以看到USDT的合約原始碼。
合約的一開始你就可以看到我們剛剛提過的Safemath,接下來你可以看到ERC20Basic的介面定義了USDT的流通量、餘額的查詢、匯款的函式,同時匯款完畢後也會用event記錄下這筆交易的結果。
contract ERC20Basic {
    uint public _totalSupply;
    function totalSupply() public constant returns (uint);
    function balanceOf(address who) public constant returns (uint);
    function transfer(address to, uint value) public;
    event Transfer(address indexed from, address indexed to, uint value);
}
其中的餘額你可以發現就是用mapping在做儲存的喔。
function balanceOf(address _owner) public constant returns (uint balance) {
    return balances[_owner];
}
接著ERC20繼承了ERC20Basic並且實作出了授權提款的介面。
contract ERC20 is ERC20Basic {
    function allowance(address owner, address spender) public constant returns (uint);
    function transferFrom(address from, address to, uint value) public;
    function approve(address spender, uint value) public;
    event Approval(address indexed owner, address indexed spender, uint value);
}
最後你還可以發現USDT有默默做了黑名單的功能,甚至可以把黑名單持有的USDT直接銷毀!
contract BlackList is Ownable, BasicToken {
    function getBlackListStatus(address _maker) external constant returns (bool) {
        return isBlackListed[_maker];
    }
    function getOwner() external constant returns (address) {
        return owner;
    }
    mapping (address => bool) public isBlackListed;
    function addBlackList (address _evilUser) public onlyOwner {
        isBlackListed[_evilUser] = true;
        AddedBlackList(_evilUser);
    }
    function removeBlackList (address _clearedUser) public onlyOwner {
        isBlackListed[_clearedUser] = false;
        RemovedBlackList(_clearedUser);
    }
    function destroyBlackFunds (address _blackListedUser) public onlyOwner {
        require(isBlackListed[_blackListedUser]);
        uint dirtyFunds = balanceOf(_blackListedUser);
        balances[_blackListedUser] = 0;
        _totalSupply -= dirtyFunds;
        DestroyedBlackFunds(_blackListedUser, dirtyFunds);
    }
    event DestroyedBlackFunds(address _blackListedUser, uint _balance);
    event AddedBlackList(address _user);
    event RemovedBlackList(address _user);
}
到目前為止的文章都會放置在Github上,至於USDT的程式碼則放在這裡。


 iThome鐵人賽