GUI 是圖形使用者界面的縮寫,GUI 開發模組是 tkinter,它提供了跨平台的 GUI 控制項。事實上,開發 GUI 應用並不是 Python 最擅長的工作,如果需要使用 Python 開發 GUI 應用,wxPython、PyQt、PyGTK 等模組都是不錯的選擇。
基本上使用 tkinter 來開發 GUI 應用需要以下 5 個步驟:
import tkinter
import tkinter.messagebox
def main():
flag = True
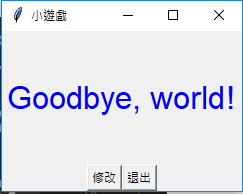
def change_label_text(): # 修改標籤上的文字
nonlocal flag # nonlocal 區域變數
flag = not flag
color, msg = ('red', 'Hello, world!')\
if flag else ('blue', 'Goodbye, world!')
label.config(text = msg, fg = color)
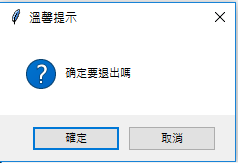
def confirm_to_quit(): # 確認退出
if tkinter.messagebox.askokcancel('溫馨提示', '确定要退出嗎'):
top.quit()
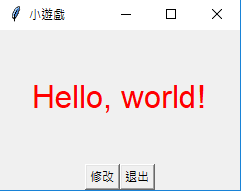
top = tkinter.Tk() # 創建視窗
top.geometry('240x160') # 視窗大小
top.title('小遊戲') # 視窗標題
# 創建標籤並添加到視窗
label = tkinter.Label(top, text = 'Hello, world!', font = 'Arial -32', fg = 'red')
# pack() 函數用來對主控制元件裡面的小控制元件來進行佈局分佈
label.pack(expand = 1)
# Frame 是螢幕上的一快矩形區域,多是用來作為容器(container)布局。
panel = tkinter.Frame(top)
# 創建按鈕物件,指定添加到哪個容器中,透過 command 參數绑定調用函數
button1 = tkinter.Button(panel, text = '修改', command = change_label_text)
button1.pack(side = 'left')
button2 = tkinter.Button(panel, text = '退出', command = confirm_to_quit)
button2.pack(side = 'right')
panel.pack(side = 'bottom')
# 主程式循環
tkinter.mainloop()
if __name__ == '__main__':
main()
GUI 應用通常是事件驅動式的,之所以要進入主程式循環就是要偵測鼠標、鍵盤等各種事件的發生並執行對應的程式碼對事件進行處理。
Tk 為元件的擺放提供了三種佈局管理器,透過佈局管理器可以對元件進行定位。分別是:Placer(開發者提供元件的大小和擺放位置)、Packer(自動將元件填充到合適的位置)和 Grid(基於網格坐標來擺放元件)。
Pygame 專門用於多媒體應用的開發,其中包含對圖像、聲音、視頻、事件、碰撞等。Pygame 建立在 SDL 的基礎上,SDL 是一套跨平台的多媒體開發庫,用 C 語言實現,被廣泛的應用於遊戲、模擬器、播放器等的開發。
下載 python,有些模組是沒有的,可以透過在 cmd 中輸入 pip install pygame,將 pygame 安裝進去。
創建遊戲視窗並在視窗繪圖
可以透過 pygame 中 draw 模組的函數在視窗中繪圖,包括:線條、矩形、多邊形、圓、橢圓、圓弧等。
螢幕左上角設置為坐標原點 (0, 0),向右是 x 軸的正向,向下是 y 軸的正向,在表示位置或設置大小的時候,默認的單位都是像素。pygame 中表示顏色用的是色光三原色表示法,即通過一個元組或列表來指定顏色的 RGB 值,每個值都在 0 ~ 25 5之間,每種原色都用一個 8 位元 (bit) 的值來表示,三種顏色一共由 24 位元構成。
import pygame
def main():
pygame.init() # 初始化導入 pygame 的模組
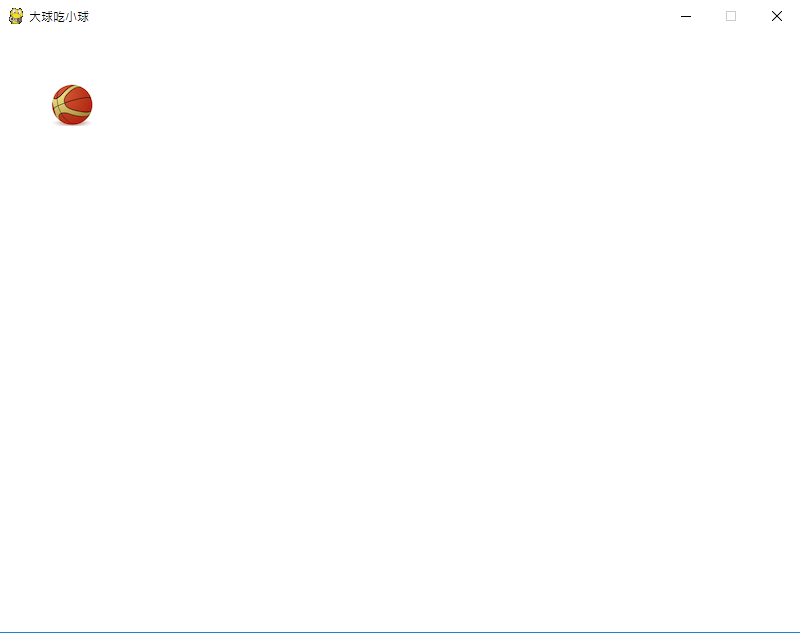
screen = pygame.display.set_mode((800, 600)) # 顯示的視窗並設置視窗大小
pygame.display.set_caption('大球吃小球') # 設置視窗標題
screen.fill((242, 242, 242)) # 設置視窗背景顏色
# 繪製圓(參數為:框架, 顏色, 圓心位置, 半徑, 0 表示填滿)
pygame.draw.circle(screen, (255, 0, 0,), (100, 100), 30, 0)
# 刷新視窗
pygame.display.flip()
running = True
while running: # 開啟一個事件循環處理發生的事件
for event in pygame.event.get(): # 獲取事件並進行處理
if event.type == pygame.QUIT:
running = False
if __name__ == '__main__':
main()

上傳圖檔
可以使用 pygame 中 image 模組的函數來上傳圖檔。圖檔和 python 執行檔存放在同一樣的資料夾,只需打檔名就可以直接使用(如下面的程式碼),若不同,則需要列出圖檔存放位置。
import pygame

def main():
    pygame.init()   # 初始化導入 pygame 的模組
    screen = pygame.display.set_mode((800, 600)) # 顯示的視窗並設置視窗大小
    pygame.display.set_caption('大球吃小球')   # 設置視窗標題
    screen.fill((255, 255, 255))    # 設置視窗背景顏色
    ball_image = pygame.image.load('ball.png')    # 透過指定的文件名上傳圖檔
    screen.blit(ball_image, (50, 50))   # 在視窗上展示圖像
    # 刷新視窗
    pygame.display.flip()
    running = True
    while running:  # 開啟一個事件循環處理發生的事件
        for event in pygame.event.get():    # 獲取事件並進行處理
            if event.type == pygame.QUIT:
                running = False

if __name__ == '__main__':
    main()
實現動畫效果
將不連續的圖片連續的播放,只要每秒鐘達到了一定的幀數,那麼就可以做出比較流暢的動畫效果。
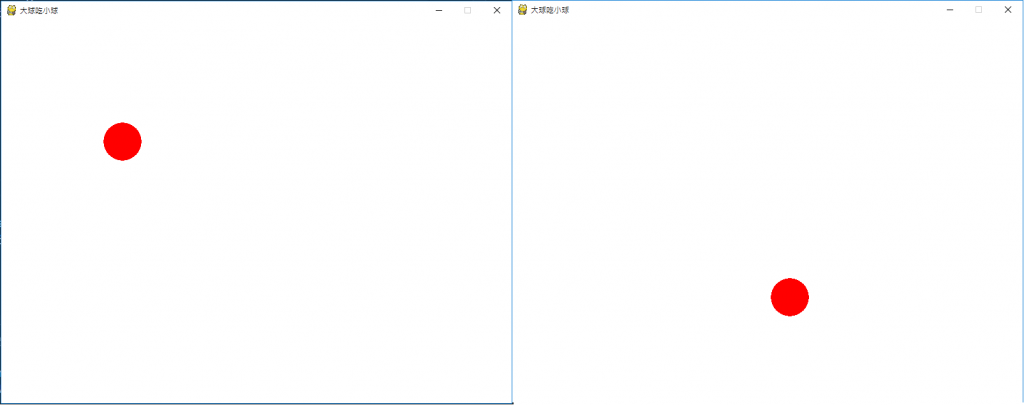
如果要讓小球動起來,可以將小球的位置用變量來表示,並在循環中修改小球的位置再刷新整個視窗即可。
import pygame

def main():
    pygame.init()   # 初始化導入 pygame 的模組
    screen = pygame.display.set_mode((800, 600)) # 顯示的視窗並設置視窗大小
    pygame.display.set_caption('大球吃小球')   # 設置視窗標題
    x, y = 50, 50   # 定義變數表示小球在視窗上的位置
    running = True
    while running:  # 開啟一個事件循環處理發生的事件
        for event in pygame.event.get():    # 獲取事件並進行處理
            if event.type == pygame.QUIT:
                running = False
        screen.fill((255, 255, 255))    # 設置視窗背景顏色
        # 繪製圓(參數為:框架, 顏色, 圓心位置, 半徑, 0 表示填滿)
        pygame.draw.circle(screen, (255, 0, 0,), (x, y), 30, 0)
        # 每隔50毫秒就改變小球的位置再刷新窗口
        pygame.display.flip()
        pygame.time.delay(50)
        x, y = x + 5, y + 5

if __name__ == '__main__':
    main()
碰撞檢測和事件處理
碰撞檢測在絕大多數的遊戲中都是一個必須得處理的問題,pygame 的 sprite(動畫精靈)模組就提供了對碰撞檢測的支持。
但要檢測兩個小球碰撞其實非常簡單,只需檢查球心的距離有沒有小於兩個球的半徑之和。為了製造出更多的小球,透過對鼠標事件的處理,在點擊鼠標的位置創建顏色、大小和移動速度都隨機的小球。
可以在事件循環中對鼠標事件進行處理,通過事件對象的 type 屬性可以判定事件類型,再通過 pos 屬性就可以獲得鼠標點擊的位置。如果要處理鍵盤事件做法與處理鼠標事件類似。
from enum import Enum, unique   # 該模組可以用於定義名稱和值
from math import sqrt
from random import randint

import pygame
 # 名稱不可重複,值可以重複
 # 使用 @unique 限制值不能重複
@unique
class Color(Enum):          # 顏色

    RED = (255, 0, 0)
    GREEN = (0, 255, 0)
    BLUE = (0, 0, 255)
    BLACK = (0, 0, 0)
    WHITE = (255, 255, 255)
    GRAY = (242, 242, 242)

    @staticmethod
    def random_color():     # 獲取隨機顏色
        r = randint(0, 255)
        g = randint(0, 255)
        b = randint(0, 255)
        return (r, g, b)

class Ball(object):        # 球

    def __init__(self, x, y, radius, sx, sy, color = Color.RED): # 初始化
        self.x = x
        self.y = y
        self.radius = radius
        self.sx = sx
        self.sy = sy
        self.color = color
        self.alive = True

    def move(self, screen): # 移動
        self.x += self.sx
        self.y += self.sy
        if self.x - self.radius <= 0 or \
                self.x + self.radius >= screen.get_width():
            self.sx = -self.sx
        if self.y - self.radius <= 0 or \
                self.y + self.radius >= screen.get_height():
            self.sy = -self.sy

    def eat(self, other):   # 吃其他球
        if self.alive and other.alive and self != other:
            dx, dy = self.x - other.x, self.y - other.y
            distance = sqrt(dx ** 2 + dy ** 2)
            if distance < self.radius + other.radius \
                    and self.radius > other.radius:
                other.alive = False
                self.radius = self.radius + int(other.radius * 0.146)

    def draw(self, screen): # 繪製球
        pygame.draw.circle(screen, self.color,
                           (self.x, self.y), self.radius, 0)
def main():
    balls = []  # 定義裝所有球的容器
    pygame.init()   # 初始化導入 pygame 的模組
    screen = pygame.display.set_mode((800, 600))  # 顯示的視窗並設置視窗大小
    pygame.display.set_caption('大球吃小球')    # 設置視窗標題
    running = True
    while running:  # 開啟一個事件循環處理發生的事件
        for event in pygame.event.get():    # 獲取事件並進行處理
            if event.type == pygame.QUIT:
                running = False
            # 處理鼠標事件
            if event.type == pygame.MOUSEBUTTONDOWN and event.button == 1:
                x, y = event.pos    # 獲得點擊鼠標的位置
                radius = randint(10, 100)
                sx, sy = randint(-15, 15), randint(-15, 15)
                color = Color.random_color()
                # 在點擊鼠標的位置創建球(大小、速度和顏色隨機)
                ball = Ball(x, y, radius, sx, sy, color)
                balls.append(ball)  # 將球添加到列表容器中
        screen.fill((255, 255, 255))    # 設置視窗背景顏色
        # 取出容器中的球,如果没被吃掉就會繪出,被吃掉就會移除
        for ball in balls:
            if ball.alive:
                ball.draw(screen)
            else:
                balls.remove(ball)
        # 每隔50毫秒就改變球的位置再刷新窗口
        pygame.display.flip()
        pygame.time.delay(50)
        for ball in balls:
            ball.move(screen)
            # 檢查球有没有吃到其他的球
            for other in balls:
                ball.eat(other)


if __name__ == '__main__':
    main()
想要知道執行結果,可以複製程式碼自己試驗,也能體會其中的小樂趣。

 iThome鐵人賽