接著的幾篇會介紹在 PixiJS、three.js 裡寫 Shader 的方法
PixiJS 寫 Shader,主要是透過 filters 的方式
首先是最重要的部分:
不同版本 PixiJS filters 的 寫法與特性不同:
- In PixiJS v3, a filter was always applied to whole screen.
- In PixiJS v4, a filter can be applied only part of the screen. Developers had to create a set of uniforms to deal with coordinates.
- In PixiJS v5 combines both approaches. Developers can use normal coordinates of v3 and then allow filter to use partial Framebuffers, bringing those extra uniforms into account.
由於不同版本的濾鏡實作有些差異,
如果已經使用 PixiJS v4 開發並使用濾鏡的專案,
更新到 v5 時,可能要檢查濾鏡是否正常
官方範例頁同時有 v4 與 v5 兩個版本 - PixiJS Examples:
寫法上略有差異外,v5 的範例皆改用 ES6 寫
new Filter(vertShader, fragShader, myUniforms);
剛開始在 PixiJS 玩 Shader 時,可先不考慮 Vertex Shader,
只玩 Fragment Shader 的部分
PixiJS Examples 裡也有只使用 Fragment Shader 的範例:
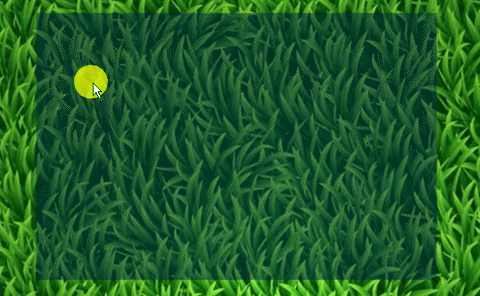
來看看 Mouse Blending 的 Fragment Shader:
// NOTE: this shader wont work on old devices where mediump precision is forced in fragment shader
// because v5 default vertex shader uses `inputSize` in it. Same uniform in fragment and vertex shader
// cant have different precision :(

precision highp float;

varying vec2 vTextureCoord;

uniform vec2 mouse;
uniform vec4 inputSize;
uniform vec4 outputFrame;
uniform float time;

void main() {
  vec2 screenPos = vTextureCoord * inputSize.xy + outputFrame.xy;
  if (length(mouse - screenPos) < 25.0) {
      gl_FragColor = vec4(1.0, 1.0, 0.0, 1.0) * 0.7; //yellow circle, alpha=0.7
  } else {
      gl_FragColor = vec4( sin(time), (mouse.xy - outputFrame.xy) / outputFrame.zw, 1.0) * 0.5; // blend with underlying image, alpha=0.5
  }
}
分各項解說:
precision highp float;
精度設定,照著說明設置就好
varying vec2 vTextureCoord;
vTextureCoord 是 varying 的 Storage Qualifiers 變數,
表示這是從 Vertex Shader 傳過來的值
既然是 uniform ,表示這些值是透過 js 帶入 Shader
// fragment shader
uniform vec2 mouse;
// js
filter.uniforms.mouse.copyFrom(app.renderer.plugins.interaction.mouse.global);
JS 透過 uniforms 把滑鼠座標帶給 fragment shader 的 mouse
uniform float time;
time 這個值在 Demo 裡似乎沒有實際作用
(不是 Built-in Uniforms,也沒有透過 JS 更新值)
如同 Shadertoy,PixiJS 也內建了一些變數:
uniform vec4 inputSize;
inputSize.xy is the size of filter area in pixels.
uniform vec4 outputFrame;
The outputFrame holds the rectangle where filter is applied in screen (CSS) coordinates. It's the same as renderer.screen for a fullscreen filter.
inputSize 與 outputFrame 是內建的 Uniforms
官方說明與其他變數:PIXI.Filter
vec2 screenPos = vTextureCoord * inputSize.xy + outputFrame.xy;
由於座標有再乘上範圍,因此在做邏輯判斷的時候,使用的單位是 Pixel,
而非將整個範圍的寬高定為 1
濾鏡效果內,在滑鼠座標半徑25內的圓 填上75%透明黃色,
滑鼠座標半徑25外的範圍則根據滑鼠座標填上其他顏色
if (length(mouse - screenPos) < 25.0) {
    gl_FragColor = vec4(1.0, 1.0, 0.0, 1.0) * 0.7; //yellow circle, alpha=0.7
} else {
    gl_FragColor = vec4( sin(time), (mouse.xy - outputFrame.xy) / outputFrame.zw, 1.0) * 0.5; // blend with underlying image, alpha=0.5
}
在先前的文章有提到過:
在寫 Shader 時,須以整個面來思考
length(mouse - screenPos) 是滑鼠座標與濾鏡效果內每個點的距離
vec4 gl_FragColor,前三個值是 RGB,範圍0.0~1.0,第四個值是 1.0
1.0, 1.0, 0.0, 1.0) 是 #ffff00 黃色,後面 *0.7 是 alpha
G 與 B 變化、透明度為 0.5 的顏色好像看得懂了?