這個系列到目前為止我們完成了透過 command cli 呼叫 python 並且用 actix 的 web framework 實作了 restful 的 api。
那麼今天就是要繼續未完成的 CRUD 教學,我們在上一篇已經可以透過 Rust 建立連線到 postgresql 的 Database 了接著就讓我們新增一些資料到 DB 上面吧!
首先我們在新增一個 model,
use super::schema::posts;

#[derive(Insertable)]
#[table_name="posts"]
pub struct NewPost<'a> {
    pub title: &'a str,
    pub body: &'a str,
}
接著寫一個新增 post 的 function,
use self::models::{Post, NewPost};

pub fn create_post<'a>(conn: &PgConnection, title: &'a str, body: &'a str) -> Post {
    use schema::posts;

    let new_post = NewPost {
        title: title,
        body: body,
    };

    diesel::insert_into(posts::table)
        .values(&new_post)
        .get_result(conn)
        .expect("Error saving new post")
}
基本的已經完成那麼我們就可以來寫支程式新增資料,
extern crate actixweb;
extern crate diesel;

use self::actixweb::*;
use std::io::{stdin, Read};

fn main() {
    let connection = establish_connection();

    println!("What would you like your title to be?");
    let mut title = String::new();
    stdin().read_line(&mut title).unwrap();
    let title = &title[..(title.len() - 1)]; // Drop the newline character
    println!("\nOk! Let's write {} (Press {} when finished)\n", title, EOF);
    let mut body = String::new();
    stdin().read_to_string(&mut body).unwrap();

    let post = create_post(&connection, title, &body);
    println!("\nSaved draft {} with id {}", title, post.id);
}

#[cfg(not(windows))]
const EOF: &'static str = "CTRL+D";

#[cfg(windows)]
const EOF: &'static str = "CTRL+Z";
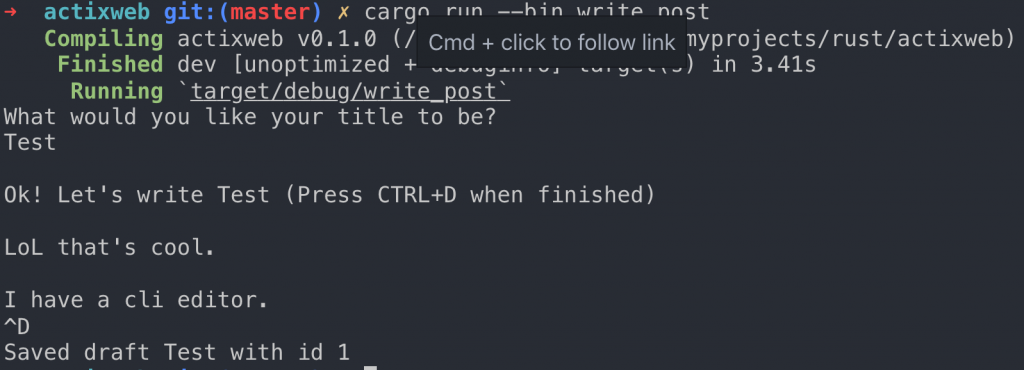
接著執行,
$ cargo run --bin write_post
下面就是執行成功的結果,
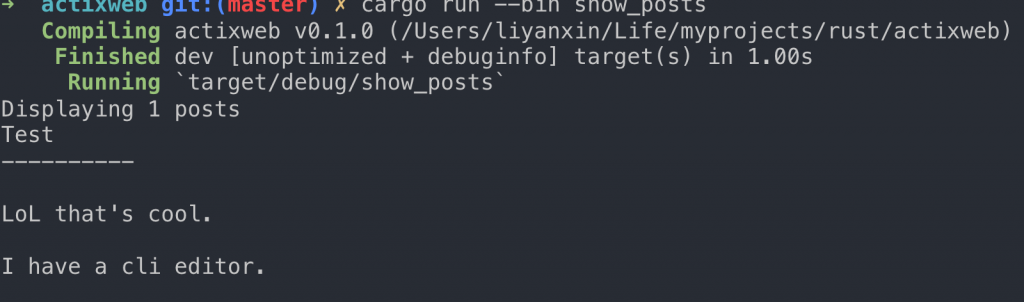
然後我們在下一次查詢看看是不是資料真的有被寫進 DB 裡面了,
$ cargo run --bin show_posts
結果還是沒有! (第二次下這指令還是空的,我怎麼有被整的感覺
好在這是正常的現象因為我們在 show_posts 裡面如果是草稿就會被這句程式篩選掉,
let results = posts.filter(published.eq(true))
        .limit(5)
        .load::<Post>(&connection)
        .expect("Error loading posts");
若是我們拿掉限制應該就可以了吧?
let results = posts
        .limit(5)
        .load::<Post>(&connection)
        .expect("Error loading posts");
沒錯這樣就會撈到資料囉,
不過記得要把它改回來,因為待會我們會用修改資料庫的方式讓他顯示。
那麼我們來繼續寫更新 publish 狀態的程式,
extern crate actixweb;
extern crate diesel;

use self::diesel::prelude::*;
use self::actixweb::*;
use self::models::Post;
use std::env::args;

fn main() {
    use actixweb::schema::posts::dsl::{posts, published};

    let id = args().nth(1).expect("publish_post requires a post id")
        .parse::<i32>().expect("Invalid ID");
    let connection = establish_connection();

    let post = diesel::update(posts.find(id))
        .set(published.eq(true))
        .get_result::<Post>(&connection)
        .expect(&format!("Unable to find post {}", id));
    println!("Published post {}", post.title);
}
這樣就完成了馬上來試試,
$ cargo run --bin publish_post 1
執行結果,

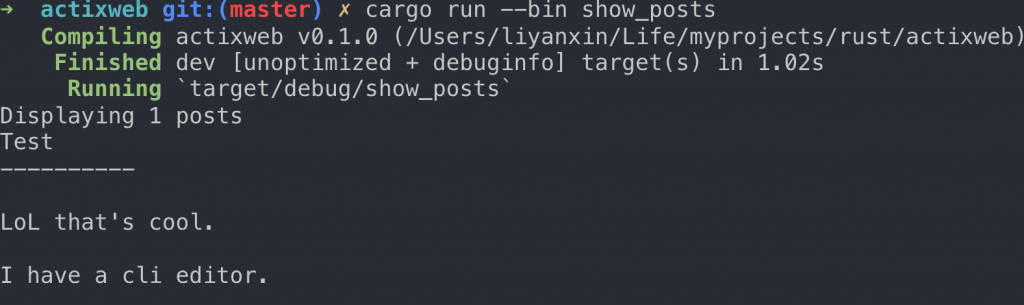
那麼我們在下一次 show 的指令,
$ cargo run --bin show_posts
現在也一樣會顯示資料了,
最後就是刪除文章,
extern crate actixweb;
extern crate diesel;

use self::diesel::prelude::*;
use self::actixweb::*;
use std::env::args;

fn main() {
    use actixweb::schema::posts::dsl::*;

    let target = args().nth(1).expect("Expected a target to match against");
    let pattern = format!("%{}%", target);

    let connection = establish_connection();
    let num_deleted = diesel::delete(posts.filter(title.like(pattern)))
        .execute(&connection)
        .expect("Error deleting posts");

    println!("Deleted {} posts", num_deleted);
}
然後刪除我們剛剛新增的文章,
cargo run --bin delete_post Test
完成!

今天用很快的速度把 CRUD 介紹完了不過還沒有提到要怎麼跟 Actix 這個 framework 整合,因此下一篇我們就會來試試看把 Diesel 整合進我們的 Api service。