第四天要帶大家聊解元件(有人說元件有人說是組件),首先來介紹元件的註冊
元件註冊全局註冊與局部註冊
1.元件全局註冊在Vue根實例( new Vue)之前,注意全局註冊名稱不能重複
vue.component('name',{ /*….*/ })
   nw Vue({el: '#app' })
2.我們亦可以局部註冊,透過引入component
   import ComponentName from '@/xxx'
   //code..
   export default {
     components: {
       ComponentName
     }
   }
元件的Prop:
Props是指從父元件傳入子元件之屬性,我們可以在子元件定義它的型態(必要定義)、設定其默認值、是否為必須值、撰寫驗證函數,然而在官網有特別提到,我們應該避免直接修改Props裡面的變數,因為Object、Array都是call by reference,直接修改子元件Props會影響父元件狀態。
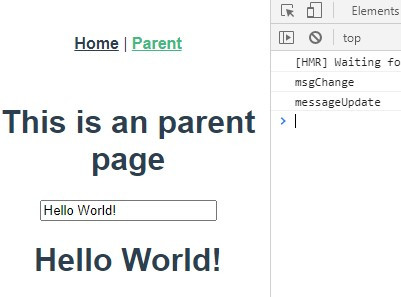
然而這是父元件對子元件溝通,那麼子元件是怎麼跟父元件溝通呢?是透過事件的方式,透過$emit事件,發射回去給父元件處理,如下圖示,這邊是不是有一點點Angular的味道,沒錯!
子元件:
<template>
  <div class="child">
    <main>
      <input v-model="msgText" @input="msgChange" />
      <h1>{{ msg }}</h1>
    </main>
  </div>
</template>

<script>
export default {
  name: 'ChildComponent',
  data () {
    return {
      msgText: this.msg,
      watchNow: Date.now()
    }
  },
  props: {
    msg: {
      type: String,
      default: null
    }
  },
  methods: {
    msgChange () {
      console.log('msgChange')
      this.$emit('msgChange',
        this.msgText)
    }
  }
}
</script>
父元件:
<template>
  <div class="parent">
    <h1>This is an parent page</h1>
    <ChildComponent :msg="message" @msgChange="messageUpdate">
    </ChildComponent>
  </div>
</template>

<script>
import ChildComponent from '@/components/ChildComponent.vue'

export default {
  name: 'ParentComponent',
  data () {
    return {
      message: 'Hello World'
    }
  },
  components: {
    ChildComponent
  },
  methods: {
    messageUpdate (text) {
      console.log('messageUpdate')
      this.message = text
    }
  }
}
</script>
在Props屬性定義msg,子元件在事件onInput觸發時呼叫msgChange()函數,透過$emit發射msgText回去給父元件處理,而我們看到父元件使用messageUpdate()函數來接,順勢地在父元件更新了message,這樣就完成了雙向綁定。
眼尖的讀者會發現v-model,這個往後會講到。
有任何問題歡迎下方留言,如果喜歡我的文章別忘了按讚、訂閱追蹤加分享唷!!
---我是分隔線-----------------------------------------------------------
PollyPO技術-前端設計轉前端工程師-JS踩坑雜記 30 天
喬依司-實作經典 JavaScript 30
五百億-Vue CLI + Firebase 雲端資料庫 30天打造簡易部落格及後臺管理
eien_zheng-前端小嘍嘍的Golang學習旅程_The journey of learning Golang
