上一篇對各位看官來說就是一片小蛋糕,這篇頂多就是從一片小蛋糕變成三片小蛋糕而已~
客製化Validation 必須要有兩樣東西
客製化驗證用法有兩種
首先,先到src目錄下建立一個Validator資料夾,裡面放的通通都是各式各樣的客製化驗證
在Validator資料夾裡建立一個Class,拿來註冊成annotation class ,
記得要繼承 Constraint , Contraint這個Class裡面放了些驗證會用到的常數及方法
<?php


namespace App\Validator;


use Symfony\Component\Validator\Constraint;


/**
 * @Annotation
 */
class TestCheck extends  Constraint
{


    public $dateMessage = 'Today should greater than the {{ string }} date.';
    public $message = 'Name should not be little ding dong.';

    public function validatedBy()
    {
        return \get_class($this) . 'Validator';
    }

    public function getTargets()
    {
        return self::CLASS_CONSTRAINT;
    }

}
看到那個@Annotation了嗎!! 那就是將class註冊成annotation的關鍵 ~
dateMessage變數及message變數,待會在Validator Class的時候使用 ,
雙括號內的string 是可以傳入的變數,等一下在Validator的時候會再詳細說明
function validatedBy 是指要用哪一個Validator來驗證 ,
get_class 映射 $this (自己) 後面接上validator這個字串
function getTargets 是用來回傳自己這個annotation class 當作驗證的目標
映射就不在這裡多作解釋,因為對小菜鳥我來說,難度可能要花個整整一篇來解釋....
建立好annotation class後,咱們要來寫真正的Validation了
一樣在Validator資料夾下建立一個Class ,
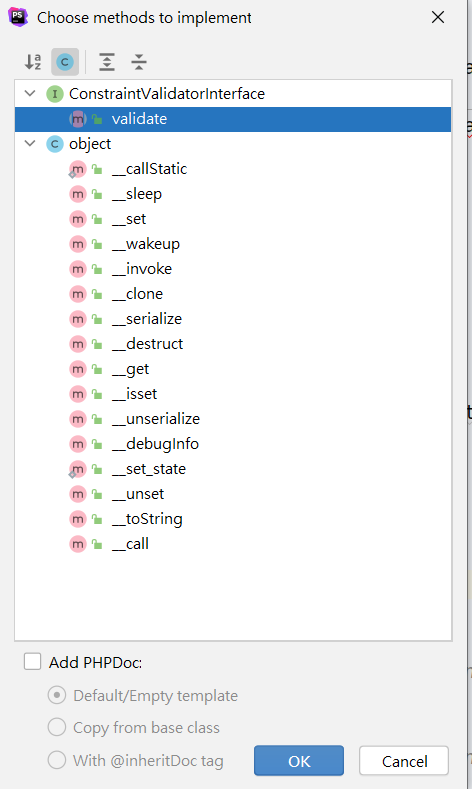
需要繼承ContraintValidator,當我們繼承這個class後,會被要求實作一個validate function ,
這時候按下alt+insert 選取 implement Methods ,選擇裡面的validate function就好
1.使用在整個實體類上的Validator寫法
<?php


namespace App\Validator;

use Symfony\Component\Validator\Constraint;
use Symfony\Component\Validator\ConstraintValidator;

class TestCheckkValidator extends ConstraintValidator
{

    public function validate($value, Constraint $constraint)
    {


        //生日不可大於今天
        $today = date("YMD");

        if (trim($value->getbirthday()) && $value->$value->getbirthday() > $today){
            $this->context
                ->buildViolation($constraint->dateMessage)
                ->setParameter( "{{ string }}", "生日")
                ->atPath('birthday')
                ->addViolation();
        }


}
如果是使用在整個實體類上的話, 這邊傳入的參數 $value 可以假透過get拿到這個實體類所有的property,
但如果是使用在單一欄位上的話,$value指的就是那個property,就不用再透過get取值了,
上述判斷生日不可以大於今天, 若生日欄位不為空且大於今天的話, 在生日的這個欄位上顯示驗證錯誤的訊息
context 是要顯示驗證訊息
buildViolation 是要顯示的驗證訊息
setParameter是設定雙括號內參數的值 , 前面擺的是要設定的參數,後面擺的是要設定的值
atPath 是驗證訊息所要顯示的地方(欄位)
addViolation 有確定驗證的意思
假設我今天不想只驗證日期,我還想驗證名字不可以為特定字串
<?php


namespace App\Validator;

use Symfony\Component\Validator\Constraint;
use Symfony\Component\Validator\ConstraintValidator;

class TestCheckkValidator extends ConstraintValidator
{

    public function validate($value, Constraint $constraint)
    {


        //生日不可大於今天
        $today = date("YMD");

        if (trim($value->getbirthday()) && $value->$value->getbirthday() > $today){
            $this->context
                ->buildViolation($constraint->dateMessage)
                ->setParameter( "{{ string }}", "生日")
                ->atPath('birthday')
                ->addViolation();
        }


        if(trim($value->getName()) && $value->getName()=="小叮噹"){
        	$this->context
        		->buildViolation($contraint->message)
        		->atPath('name')
        		->addViolation();

        }


}
然後記得將message 和 dateMessage丟進翻譯檔裡面 ,因為我們需要翻譯蒟蒻,不然會開天窗R ~

最後我們要在實體類上使用Validator
首先,打開我們的實體類,接著在class上頭,用註解式寫上我們剛剛annotation class 的名稱
namespace App\Entity;


use Doctrine\ORM\Mapping as ORM;
use Symfony\Component\Validator\Constraints as Assert;
use App\validator\TestCheck;

/**
 * @ORM\Entity
 * @ORM\Table(name="test_entity")
 * @TestCheck()
 */
class TestEntity
{

    /**
     * @var int
     * @ORM\Id
     * @ORM\GeneratedValue(strategy="IDENTITY")
     * @ORM\Column(name="id", type="integer")
     */
    private $id;


    /**
     * @ORM\Column(name="name",type="string",length=20,nullable=true)
     * @Assert\NotBlank()
     * @Assert\Length(max="20",min="5",maxMessage="長度不可超過20字",minMessage="長度不可低於5個字")
     */
    private $name;


    /**
     * @ORM\Column(name="email",type="string",length=50,nullable=true)
     * @Assert\Email()
     */
    private $email;

    /**
     * @return int
     */
    public function getId(): int
    {
        return $this->id;
    }

    /**
     * @param int $id
     */
    public function setId(int $id): void
    {
        $this->id = $id;
    }

    /**
     * @return mixed
     */
    public function getName()
    {
        return $this->name;
    }

    /**
     * @param mixed $name
     */
    public function setName($name): void
    {
        $this->name = $name;
    }


}
以上是用在整個實體類上的作法
如果是用在單一欄位,就直接將annotation放置property上就好
到這邊我們已經會symfony 基本的驗證跟客製化一個驗證囉!!!
hen棒hen棒~ 因為下一篇開始,就差不多要進入api platform的部份了,
下一篇會先介紹一下http的基礎 , 但這基礎已經可以足足佔滿一篇了...
因為說基礎,其實對小菜鳥來說,一開始要理解也是有些微難度的...
介紹完http後,就要來講api platform了,hen方便hen好用