updateChildren將會是我們目前看過最複雜的函數,不論是國內外都找不到深入剖析它的文件。所以趕快來成為全世界少數真正瞭解它的運作方式的人吧!誰知道呢?搞不好你還能想出更好更簡潔的演算法,就可以去發PR了。
首先來看看我們今天的範例APP:
class ColorTile extends StatefulWidget {
  ColorTile({Key key}) : super(key: key);

  @override
  _ColorTileState createState() => _ColorTileState();
}

class _ColorTileState extends State<ColorTile> {
  Color color = Color(0xFF000000 + Random().nextInt(1 << 24));

  @override
  Widget build(BuildContext context) {
    return Container(color: color, height: 80);
  }
}
我們先建立一個ColorTile類別,這是一個StatefulWidget,裡面有一個隨機產生的State color,再用一個Container把color顯示出來。
void main() {
  runApp(App());
}

class App extends StatefulWidget {
  @override
  _AppState createState() => _AppState();
}

class _AppState extends State<App> {
  final tiles = [
    ColorTile(),
    ColorTile(),
    ColorTile(),
    ColorTile(),
    ColorTile(),
    ColorTile(),
    ColorTile(),
  ];

  @override
  Widget build(BuildContext context) {
    return MaterialApp(
      home: Scaffold(
        body: Column(children: tiles),
        floatingActionButton: FloatingActionButton(
          child: Icon(Icons.arrow_forward),
          onPressed: () {
            setState(() {
              final tile4 = tiles.removeAt(4);
              final tile2 = tiles.removeAt(2);
              tiles.insert(2, tile4);
              tiles.insert(4, tile2);
            });
          },
        ),
      ),
    );
  }
}
這裡我們用Column來顯示7個隨機顏色的ColorTile,當我們按下FloatingActionButton時把ColorTile2和ColorTile4交換。不過如果我們直接拿這段程式碼去跑的話,會發現怎麼按都沒有反應:
如果你有看上一篇,或官方介紹影片的話,聰明的你應該已經知道這是因為我們沒有設key的關係了。於是我們給ColorTile2,4加上UniqueKey:
  final tiles = [
    ColorTile(),
    ColorTile(),
    ColorTile(key: UniqueKey()),
    ColorTile(),
    ColorTile(key: UniqueKey()),
    ColorTile(),
    ColorTile(),
  ];
再來跑跑看吧:
這次我們發現ColorTile2,4順利交換了。可是等一下,為什麼中間那個ColorTile3顏色一直變?如果說是key造成的,但0,1,5,6同樣沒有key,為什麼只有3在變?
要解釋為什麼會發生這個奇怪的現象,我們終究還是必須瞭解updateChildren究竟是怎麼運作的。如果你這次也想在source code下中斷點,用debug mode逐步執行看看的話,可以這樣做: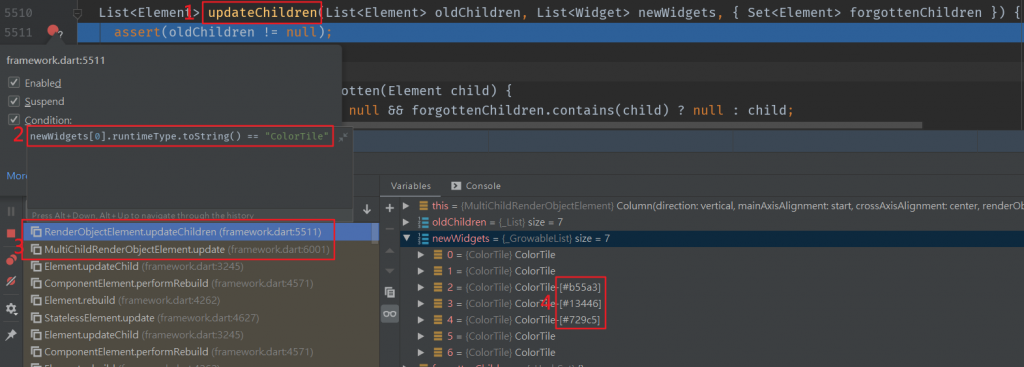
然後讓我們來看看updateChildren函數本身的註解:
  /// Updates the children of this element to use new widgets.
  ///
  /// Attempts to update the given old children list using the given new
  /// widgets, removing obsolete elements and introducing new ones as necessary,
  /// and then returns the new child list.
整個函數的目的是,從Parent Element舊有的children(List<Element>),根據新進的Widgets(List<Widget>),產生出新的children(List<Element>)。首先我們當然希望盡可能重複使用原有的Element。如果Widgets有所增減了,Elements就要跟著增減。如果Widgets有key,Element就要根據key正確地改變順序並連接Widget。如何以超高的效率做到這些事,就是這個函數複雜的地方。
接下來我們稍微瞄一眼函數內部長長的註解,這裡不用詳細看,因為我懷疑它跟實際的程式碼有些出入。我們只要知道先知道整個updateChildren分成六大步驟,每個步驟都是一個迴圈就好了: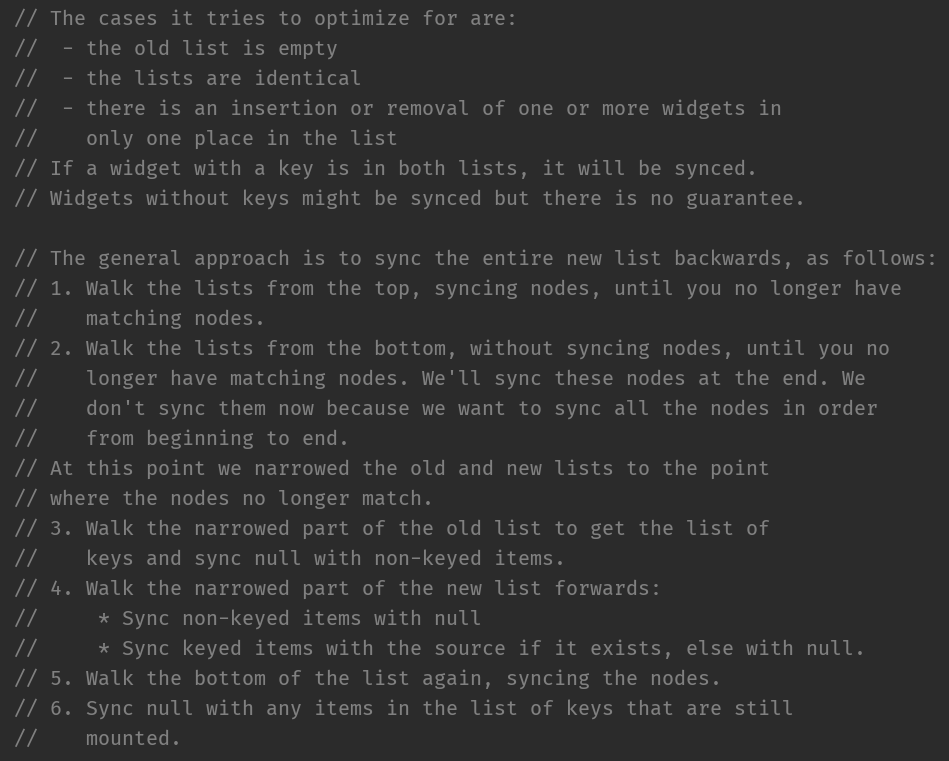
注意,註解裡的sync(同步)指的是執行updateChild,matching(匹配)指的是判斷canUpdate==true,如果忘記這兩個函數在做什麼的話,可以複習一下之前的篇章再繼續。我們接下來也會以"同步"和"匹配"來代表這兩個動作。
好來看實際的程式碼吧!首先是一些初始化:
int newChildrenTop = 0;
int oldChildrenTop = 0;
int newChildrenBottom = newWidgets.length - 1;
int oldChildrenBottom = oldChildren.length - 1;

final List<Element> newChildren = oldChildren.length == newWidgets.length ?
    oldChildren : List<Element>(newWidgets.length);
這裡有四個指針分別代表新/舊Element List的上/下指針。然後如果newWidgets和oldChildren長度一樣,直接用oldChildren作為newChildren,否則以newWidgets的長度建立一個Element List作為newChildren。
以我們的範例APP而言,會初始化成這樣:
newChildrenTop == 0
oldChildrenTop == 0
newChildrenBottom == 6
oldChildrenBottom == 6

newChildren == oldChildren
然後是第一個迴圈:
// Update the top of the list.
while ((oldChildrenTop <= oldChildrenBottom) && (newChildrenTop <= newChildrenBottom)) { // 5.
  final Element oldChild = replaceWithNullIfForgotten(oldChildren[oldChildrenTop]);
  final Widget newWidget = newWidgets[newChildrenTop];
  assert(oldChild == null || oldChild._debugLifecycleState == _ElementLifecycle.active);
  if (oldChild == null || !Widget.canUpdate(oldChild.widget, newWidget)) // 2.
    break;
  final Element newChild = updateChild(oldChild, newWidget, IndexedSlot<Element>(newChildrenTop, previousChild)); // 3.
  assert(newChild._debugLifecycleState == _ElementLifecycle.active);
  newChildren[newChildrenTop] = newChild; // 4.
  previousChild = newChild;
  newChildrenTop += 1; // 1.
  oldChildrenTop += 1; // 1.
}
以我們的範例APP而言,ColorTile0,1會是匹配的,到了ColorTile2不匹配,因此最後指針會是:
newChildrenTop == 2
oldChildrenTop == 2
newChildrenBottom == 6
oldChildrenBottom == 6
迴圈二:
// Scan the bottom of the list.
while ((oldChildrenTop <= oldChildrenBottom) && (newChildrenTop <= newChildrenBottom)) { // 3.
  final Element oldChild = replaceWithNullIfForgotten(oldChildren[oldChildrenBottom]);
  final Widget newWidget = newWidgets[newChildrenBottom];
  assert(oldChild == null || oldChild._debugLifecycleState == _ElementLifecycle.active);
  if (oldChild == null || !Widget.canUpdate(oldChild.widget, newWidget)) // 2.
    break;
  oldChildrenBottom -= 1; // 1.
  newChildrenBottom -= 1; // 1.
}
以我們的APP而言,最後指針會是:
newChildrenTop == 2
oldChildrenTop == 2
newChildrenBottom == 4
oldChildrenBottom == 4
迴圈三:
// Scan the old children in the middle of the list.
final bool haveOldChildren = oldChildrenTop <= oldChildrenBottom;
Map<Key, Element> oldKeyedChildren;
if (haveOldChildren) {
  oldKeyedChildren = <Key, Element>{};
  while (oldChildrenTop <= oldChildrenBottom) { // 2.
    final Element oldChild = replaceWithNullIfForgotten(oldChildren[oldChildrenTop]);
    assert(oldChild == null || oldChild._debugLifecycleState == _ElementLifecycle.active);
    if (oldChild != null) {
      if (oldChild.widget.key != null)
        oldKeyedChildren[oldChild.widget.key] = oldChild; // 3.
      else
        deactivateChild(oldChild);
    }
    oldChildrenTop += 1; // 1.
  }
}
以我們的APP而言,會走過ColorTile2,3,4,其中2,4有key被收集起來,3則被停用了。最後指針會是:
newChildrenTop == 2
oldChildrenTop == 4
newChildrenBottom == 4
oldChildrenBottom == 4
迴圈四:
// Update the middle of the list.
while (newChildrenTop <= newChildrenBottom) { // 2.
  Element oldChild;  // 3.
  final Widget newWidget = newWidgets[newChildrenTop];
  if (haveOldChildren) {
    final Key key = newWidget.key;
    if (key != null) { // 6.
      oldChild = oldKeyedChildren[key];
      if (oldChild != null) { // 7.
        if (Widget.canUpdate(oldChild.widget, newWidget)) {  // 8.
          // we found a match!
          // remove it from oldKeyedChildren so we don't unsync it later
          oldKeyedChildren.remove(key);
        } else { // 9.
          // Not a match, let's pretend we didn't see it for now.
          oldChild = null;
        }
      }
    }
  }
  assert(oldChild == null || Widget.canUpdate(oldChild.widget, newWidget));
  final Element newChild = updateChild(oldChild, newWidget, IndexedSlot<Element>(newChildrenTop, previousChild)); // 4.
  assert(newChild._debugLifecycleState == _ElementLifecycle.active);
  assert(oldChild == newChild || oldChild == null || oldChild._debugLifecycleState != _ElementLifecycle.active);
  newChildren[newChildrenTop] = newChild; // 5.
  previousChild = newChild;
  newChildrenTop += 1;  // 1.
}
呼!最複雜的函數中最複雜的區塊就是它了。
這裡的8.就是我們會在官方介紹影片中看到,那個Widget交換對應的Element,實際發生的地方。
另外6.就是為什麼我們的範例會出現ColorTile3顏色不斷變化的現象,因為它沒有key,因此在產生新Element和State時,也隨機產生了新的顏色。
一切的謎團終於解開了!
這時候,我們APP的指針是:
newChildrenTop == 4
oldChildrenTop == 4
newChildrenBottom == 4
oldChildrenBottom == 4
迴圈五:
// We've scanned the whole list.
assert(oldChildrenTop == oldChildrenBottom + 1);
assert(newChildrenTop == newChildrenBottom + 1);
assert(newWidgets.length - newChildrenTop == oldChildren.length - oldChildrenTop);
newChildrenBottom = newWidgets.length - 1; // 1.
oldChildrenBottom = oldChildren.length - 1; // 1.

// Update the bottom of the list.
while ((oldChildrenTop <= oldChildrenBottom) && (newChildrenTop <= newChildrenBottom)) { // 4.
  final Element oldChild = oldChildren[oldChildrenTop];
  assert(replaceWithNullIfForgotten(oldChild) != null);
  assert(oldChild._debugLifecycleState == _ElementLifecycle.active);
  final Widget newWidget = newWidgets[newChildrenTop];
  assert(Widget.canUpdate(oldChild.widget, newWidget));
  final Element newChild = updateChild(oldChild, newWidget, IndexedSlot<Element>(newChildrenTop, previousChild)); // 3.
  assert(newChild._debugLifecycleState == _ElementLifecycle.active);
  assert(oldChild == newChild || oldChild == null || oldChild._debugLifecycleState != _ElementLifecycle.active);
  newChildren[newChildrenTop] = newChild; // 3.
  previousChild = newChild;
  newChildrenTop += 1; // 2.
  oldChildrenTop += 1; // 2.
}
到這裡整個newChildren的更新就全部完成了。這時的指針:
newChildrenTop == 6
oldChildrenTop == 6
newChildrenBottom == 6
oldChildrenBottom == 6
迴圈六:
// Clean up any of the remaining middle nodes from the old list.
if (haveOldChildren && oldKeyedChildren.isNotEmpty) {
  for (final Element oldChild in oldKeyedChildren.values) {
    if (forgottenChildren == null || !forgottenChildren.contains(oldChild))
      deactivateChild(oldChild);
  }
}

return newChildren;
最後只剩下一些清理工作,還記得我們剛剛收集了有key的oldChild,然後又把有被newWidget匹配到的移除了嗎?剩下沒被匹配的就把它停用吧。
最後再次總結一下六大步驟:
大功告成啦!!其實有點耐心一步一步走下來的話,也不是真的那麼複雜,而且其實還挺有趣的不是嗎?同時我們也不得不敬佩Flutter團隊,為了盡可能的幫我們壓榨出多一點的效能,付出了多大的努力。如果你完全弄懂了這部份,下一步或許就可以思考看看,有沒有什麼可以再改進的地方,例如更多的效能,或是更簡潔的寫法。如果你成功的發了一個PR被merge,到時候所有人都要叫你Flutter大神了!想一想是不是很吸引人呢?


 iThome鐵人賽