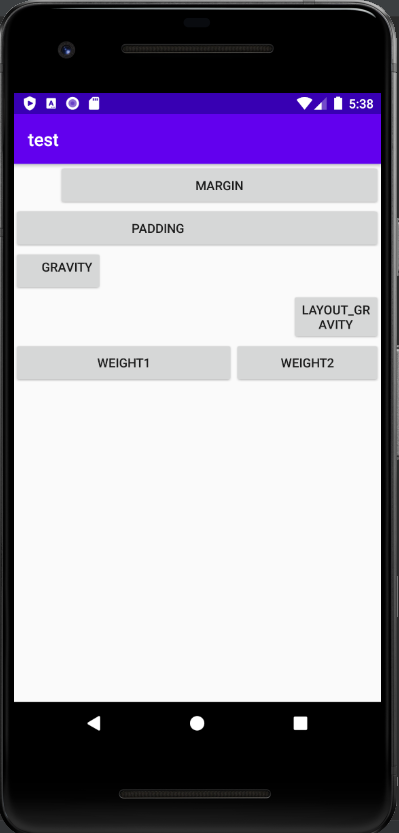
首先,先介紹比較常用的layout,現在很多人都習慣使用ConstraintLayout,但我因為平常不太使用,所以這邊所以這邊我要介紹自己比較常使用的layout-linearlayout。
<?xml version="1.0" encoding="utf-8"?>
<LinearLayout
    xmlns:android="http://schemas.android.com/apk/res/android"
    xmlns:tools="http://schemas.android.com/tools"
    android:layout_width="match_parent"
    android:layout_height="match_parent"
    tools:context=".MainActivity"
    android:orientation="vertical"> //這邊是垂直對其。
    <Button
        android:layout_width="match_parent"
        android:layout_height="wrap_content"
        android:text="margin"
        android:layout_marginLeft="50dp"/> //margin過後整個button跟左邊的間距隔了50dp。
    <Button
        android:layout_width="match_parent"
        android:layout_height="wrap_content"
        android:text="padding"
        android:paddingRight="100dp"/> //padding過後button裡面的字與button的右邊邊界的間距多隔了100dp。
    <Button
        android:layout_width="100dp"
        android:layout_height="wrap_content"
        android:text="gravity"
        android:gravity="right"/> //因為是對於子元件(button)對其,所以是整個字體向右對其。
    <Button
        android:layout_width="100dp"
        android:layout_height="wrap_content"
        android:text="layout_gravity"
        android:layout_gravity="right"/> //因為是對於父元件(layout)對其,所以是整個button向右對其。
    <LinearLayout
        android:layout_width="match_parent"
        android:layout_height="wrap_content"
        android:orientation="horizontal"> //這邊使用水平對其。
        //剩下的這兩個Button使用weight來決定他們分別在這個layout所佔的比例,我個人習慣是讓他加起來的值等於1,當然也可以用6/4之類的,依個人喜好決定。
        <Button
            android:layout_width="0dp"
            android:layout_height="wrap_content"
            android:layout_weight="0.6"
            android:text="weight1"/>
        <Button
            android:layout_width="0dp"
            android:layout_height="wrap_content"
            android:text="weight2"
            android:layout_weight="0.4"/>
    </LinearLayout>

</LinearLayout>

