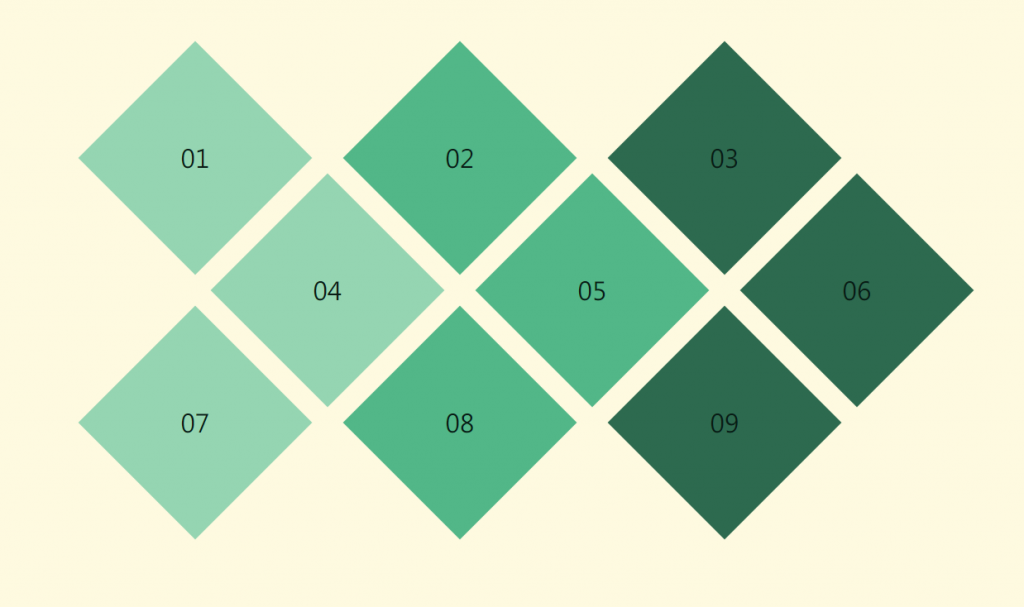
今天來練習金魚切版吧。
練習用的影片:金魚都能懂的網頁切版 : 旋轉拼接方塊
先在HTML上設定ul , li
	<div class="wrap">
        <ul>
            <li class="box boxA">01</li>
            <li class="box boxB">02</li>
            <li class="box boxC">03</li>
            <li class="box boxA">04</li>
            <li class="box boxB">05</li>
            <li class="box boxC">06</li>
            <li class="box boxA">07</li>
            <li class="box boxB">08</li>
            <li class="box boxC">09</li>
        </ul>
    </div>
放置基本的 reset 和設定
@import 'reset';
@import url('https://fonts.googleapis.com/css2?family=Noto+Sans+TC&display=swap');
$fa :"Microsoft JhengHei","Noto Sans TC";
.wrap{
    max-width: 1000px;
    margin: 10px auto;
    font-family: $fa;
}
開始排列
ul {
    padding: 100px 0;
    display: flex;
    flex-wrap: wrap;//換行才能出現排列
    li {
        width: 200px;
        height: 200px;
        text-align: center;
        line-height: 200px;
        border: 1px solid green;
    }
}
為了最大寬度下每3個方塊一行排列,使用margin推擠
li {
        width: 200px;
        height: 200px;
        text-align: center;
        line-height: 200px;
        border: 1px solid green;
        margin: 0 60px 30px;//快速鍵m0-60-30
    }
li加上::before偽元素,設定後會呈現以下畫面
li {
     (略)
        position: relative;
        &::before{
            content: '';//注意無論如何都要有content,偽元素才能正確顯示
            position: absolute;
            width: 100%;
            height: 100%;
            border: 1px solid red;
        }
    }
讓 li 和 ::before 偽元素重疊,設定絕對定位的值。可以看到畫面上的兩種外框線重合
			&::before{
            content: '';//注意無論如何都要有content,偽元素才能正確顯示
            position: absolute;
            width: 100%;
            height: 100%;
            top: 0;
            left: 0;
            border: 1px solid red;
        }
旋轉
		&::before{
						(略)
            transform: rotate(45deg);
        }
偏移,使用偽類選取器 :nth-child(n) 選取特定順序項目
		li{(略)
		&:nth-child(n + 4) {
            left: 160px; //數字可以用開發者工具(F12)看
        }
        &:nth-child(n + 7) {
            left: 0;
        }
			}
回到上方 li 調整 margin 讓排列更緊密
li {
        width: 200px;
        height: 200px;
        text-align: center;
        line-height: 200px;
        border: 1px solid green;
        margin: 0 60px -40px; //快速鍵 m0-60-30
        position: relative;
}
消除 li 的框線
li {
        width: 200px;
        height: 200px;
        text-align: center;
        line-height: 200px;
       // border: 1px solid green;
        margin: 0 60px -40px; //快速鍵 m0-60-30
        position: relative;
				font-size: 30px;
}
加上背景色,注意一樣是 ::before 的用法
.boxA {
    &::before {
        background-color: #95d5b2;
    }
}
.boxB {
    &::before {
        background-color: #52b788;
    }
}
.boxC {
    &::before {
        background-color: #2d6a4f;
    }
}
發現文字不見了,要設定 z-index 才會出現
#z-index:-1 是為了讓 ::before放到原本的 li 之下,避免覆蓋原始內容
#如果設定在 .boxC::before 則只有此部分文字可以顯示
			li{
			(略)
					&::before {
            content: ''; //注意無論如何都要有content,偽元素才能正確顯示
            position: absolute;
            width: 100%;
            height: 100%;
            top: 0;
            left: 0;
            // border: 1px solid red;
            transform: rotate(45deg);
            z-index: -1;
						}
					}
:hover 效果
		li{
			(略)
				&:hover{
            color: #fff ;//換文字顏色
            &::before{
                background-color: #1b4332;//換背景顏色
            }
        }
		}
如果不想要全部 hover 同樣顏色,一樣可以放在 class 內
.boxA {
    &::before {
        background-color: #95d5b2;
    }
    &:hover {
        color: #fff;
        &::before {
            background-color: #1b4332;
        }
    }
}
完整的code
@import 'reset';

@import url('https://fonts.googleapis.com/css2?family=Noto+Sans+TC&display=swap');
$fa: 'Microsoft JhengHei', 'Noto Sans TC';

body{
  background-color: #fefae0;
  color:#081c15;
}

.wrap {
    width: 1000px;
    margin: 10px auto;
    font-family: $fa;
}

ul {
    padding: 100px 0;
    display: flex;
    flex-wrap: wrap; //換行才能出現排列
    li {
        width: 200px;
        height: 200px;
        text-align: center;
        line-height: 200px;
        // border: 1px solid green;
        margin: 0 60px -40px; //快速鍵 m0-60-30
        position: relative;
        font-size: 30px;
        &::before {
            content: ''; //注意無論如何都要有content,偽元素才能正確顯示
            position: absolute;
            width: 100%;
            height: 100%;
            top: 0;
            left: 0;
            // border: 1px solid red;
            transform: rotate(45deg);
            z-index: -1;
        }
        &:nth-child(n + 4) {
            left: 160px;
        }
        &:nth-child(n + 7) {
            left: 0;
        }
        &:hover {
            color: #fff; //換文字顏色
            &::before {
                background-color: #1b4332;
            }
        }
    }
}

.boxA {
    &::before {
        background-color: #95d5b2;
    }
    // &:hover {
    //     color: #fff; //換文字顏色
    //     &::before {
    //         background-color: #1b4332;
    //     }
    // }
}
.boxB {
    &::before {
        background-color: #52b788;
        // z-index: -1;
    }
}
.boxC {
    &::before {
        background-color: #2d6a4f;
    }
}

