今天的內容為導覽列顯示之觸發,當滑鼠移入導覽列,會顯示對應內容。
<body>
<h2>Cool</h2>
<nav class="top">
<div class="dropdownBackground">
<span class="arrow"></span>
</div>
<ul class="cool">
<li>
<a href="#">About Me</a>
<div class="dropdown dropdown1">
<div class="bio">
<img src="https://logo.clearbit.com/wesbos.com">
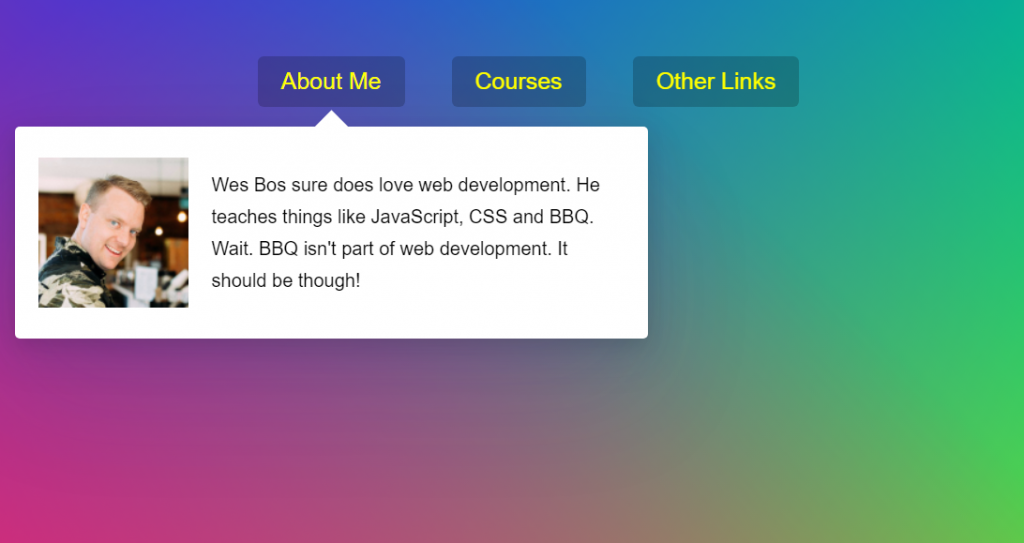
<p>Wes Bos sure does love web development. He teaches things like JavaScript, CSS and BBQ. Wait. BBQ isn't
part of web development. It should be though!</p>
</div>
</div>
</li>
<li>...</li>
<li>...</li>
</ul>
</nav>
.trigger-enter .dropdown {
display: block;
}
.trigger-enter-active .dropdown {
opacity: 1;
}
首先獲取我們所需的元素。
    // 獲取所有的導覽
    const menus = document.querySelectorAll('.cool > li');

    // 利用此dom作為顯示各導覽細項的基底
    const dropdownBackground = document.querySelector('.dropdownBackground');
    const nav = document.querySelector('.top');
將所有li也就是我們,各導覽項增聽事件。
    menus.forEach(menu => {
      menu.addEventListener('mouseenter', enterHandler);
      menu.addEventListener('mouseleave', leaveHandler);
    });
在鼠標移入的函數當中,首先如果我們直接將樣式利用classList.add加上去的話,視覺效果會很差不流暢,故我們利用setTimeout製造delay效果,當導覽項目之內容背景顯示出來後,內容才會跟著顯示。
      //  如果將樣式同時加上去動畫效果會不好
      // this.classList.add('trigger-enter');
      // this.classList.add('trigger-enter-active');

      //  加入互動樣式(dis block以獲取座標)
      this.classList.add('trigger-enter');
      // 在第二個樣式加上delay
      setTimeout(() => {
        this.classList.contains('trigger-enter') && this.classList.add('trigger-enter-active');
      }, 100);
而我們的導覽列樣式其實都是利用一個元素做為基底套下去的,故我們要獲取對應導覽列內容要顯示的位置,此處利用getBoundingClientRect來獲取元素相關之座標。
      const dropdown = this.querySelector('.dropdown');
      // 獲取其元素之座標DOMRect {x: 0, y: 0, width: 0, height: 0, top: 0, …} 一開始都獲得0是因為他初始樣式設置display:none
      const rect = dropdown.getBoundingClientRect();
但利用getBoundingClientRect獲取之座標皆是最外層獲取,故我們要扣除掉在nav上方多出來的距離。
      // 獲取多出來的距離
      const [navTop, navLeft] = [nav.offsetTop, nav.offsetLeft];
      console.log(rect);

      const menuRect = {
        width: rect.width,
        height: rect.height,
        top: rect.top,
        left: rect.left
      }
      dropdownBackground.classList.add('open');
      dropdownBackground.style.width = rect.width + "px";
      dropdownBackground.style.height = rect.height + "px";
      // 因為座標top是由整個畫面開始,所以我們要扣掉多出來的(nav至頂端的距離)
      dropdownBackground.style.top = (rect.top - navTop) + "px";
      dropdownBackground.style.left = (rect.left - navLeft) + "px";
    }
鼠標離開時,樣式也跟著移除。
    function leaveHandler(e) {
      e.stopPropagation();
      this.classList.remove('trigger-enter');
      // 在第二個樣式加上delay
      this.classList.remove('trigger-enter-active');
      dropdownBackground.classList.remove('open');
    }
 no027843

 iThome鐵人賽