TorchServe 是 PyTorch 提供給開發者部署 models 的工具(實驗階段)。也就是說開發者不用再寫 HTTP 服務去部署,直接使用TorchServe 工具就可以了!
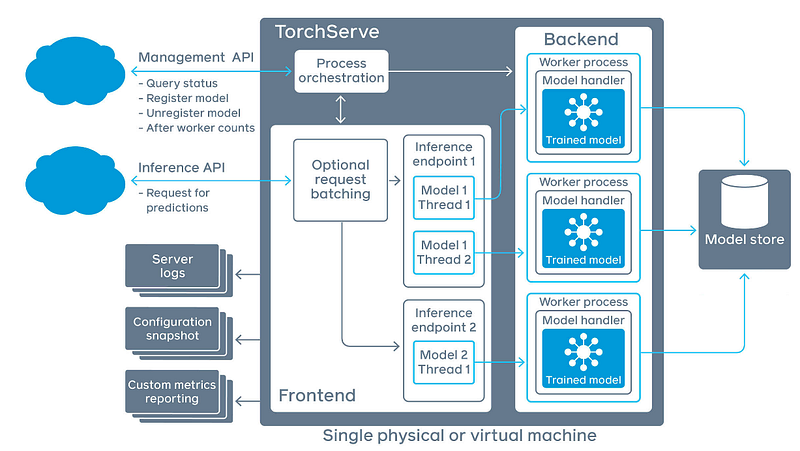
TorchServe 主要提供兩個 API:Management API 是用來設定 TorchServe 服務,如註冊新的 Model 服務、卸載 Model 服務,監看 TorchServe 的狀態;Inference API 用來取得辨識結果。

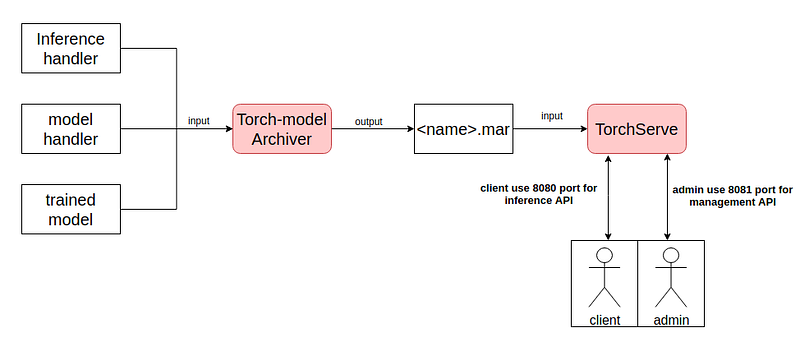
使用 TorchServe 需要準備三個檔案:Trained Model、Inference handler 、model Handler,將這三個東西使用 TorchServe Archiver 將其壓縮成 .mar 檔案。最後將 .mar 檔放入 TorchServe 裡,註冊後就佈署!
TorchServe 預設 8080 port 用於 inference ; 8081 port 用於管理 TorchServe 如下圖:

指令如下:
pip install torchserve torch-model-archiver       # 安裝必要套件
git clone https://github.com/pytorch/serve.git    # clone example
cd serve/examples/image_classifier/               # 進入image_classifier example
cp index_to_name.json densenet_161/               #
cd densenet_161/
 # 若無預設輸出資料夾,則創建一個
if [ ! -d "model-store" ]; then
    echo "creates new folder: " $export_path
    mkdir $export_path
fi
#下載trained model
wget https://download.pytorch.org/models/densenet161-8d451a50.pth
#壓縮densenet161範例 -> densenet161.mar
torch-model-archiver --model-name densenet161 --version 1.0 --model-file model.py \
                    --serialized-file densenet161-8d451a50.pth --handler image_classifier \
                    --extra-files index_to_name.json --export-path="model-store"
torchserve --start --model-store model-store/ --models densenet161.mar  # 註冊densenet1611並啟動torchserve
可以使用 curl 進行驗證是否抓到 densenet161 model,並試著傳一張圖看看是否有成功運行。
example:查看TorchServe 的狀態、並傳送一張圖片取得結果。 如下程式碼:
curl 127.0.0.1:8081/models
curl http://127.0.0.1:8080/predictions/densenet161 -T kitten.jpg
執行結果:

TorchServe 是一個非常新的部署工具,debug 不知道如何 debug,用起來真的很崩潰。其實一開始壓縮的 .mar 檔,TorchServe 抓到之後會將其解壓縮至 /tmp 中。如下圖:

densenet161資料夾下,具有TorchServe中需要的檔案:
因此當想要進行 debug 的時候,要切到 /tmp 資料夾中使用 python3 指令執行,如果沒問題,理論上 TorchServe 就能夠成功運作。
在這邊分享一些過去部署TorchServe常用用的一些API,首先在註冊的時候會不知道目前到底有沒有抓到Trained model?這時候可以使用List models API
example: 列出所有運行中的models,如下程式碼
curl "http://localhost:8081/models"
執行結果:
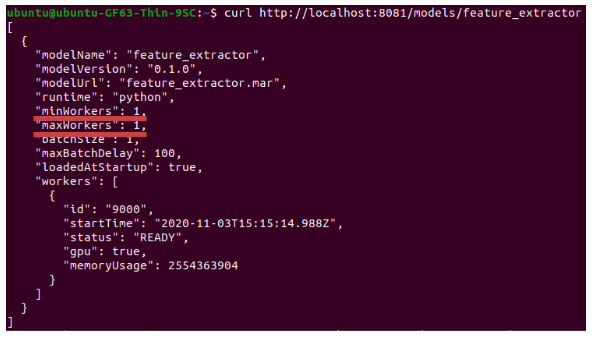
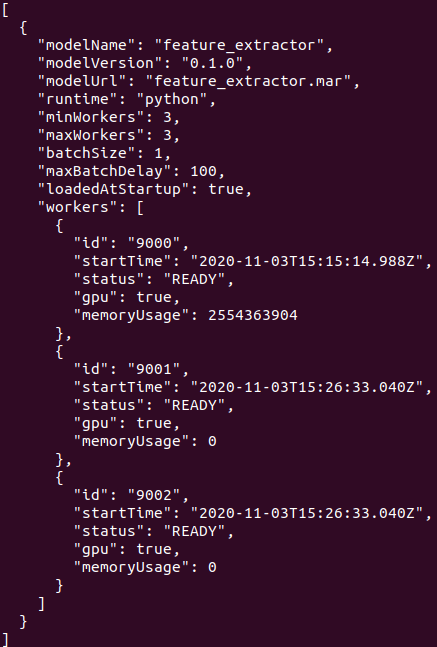
此外就是考慮到效能面的話,或許有需要修改某一個model的Worker Process數量這種需求,也可利用PUT對某一個model修改Worker Process的數量。example: 將worker 數量設定為3個,如下程式碼:
curl -v -X PUT "http://localhost:8081/models/<modelname>?min_worker=3"
就已feature_extractor這個model為例:

# 進行修改之後
curl -v -X PUT “http://localhost:8081/models/feature_extractor?min_worker=3"

inference handler文件相當的簡潔,在撰寫handler的時候可參考下面程式碼,大致上每個區塊的function要杜撰什麼都記載註解上。此外撰寫完,註冊進去TorchServe後要能夠在/tmp中找到,同時是可直接執行的狀態,若不是則需要繼續debug。
Debug有雷請小心:
class ModelHandler(BaseHandler):

    def __init__(self):
        self._context = None
        self.initialized = False

    # 用於load trained model 的地方,以及其他設定檔
    def initialize(self, context):
        self._context = context
        self.initialized = True
        #  load the model, refer 'custom handler class' above for details

    # 用於predictions的時候,接收http post request的function: 預設接收key為data的資料
    def preprocess(self, data):
        # Take the input data and make it inference ready
        preprocessed_data = data[0].get("data")
        if preprocessed_data is None:
            preprocessed_data = data[0].get("body")

        return preprocessed_data

    # 用來進行運算的function,最後的結果會交由postprocess()後處理
    def inference(self, model_input):

        # Do some inference call to engine here and return output
        model_output = self.model.forward(model_input)
        return model_output

    # 指的是發送post:inference()之後的結果
    def postprocess(self, inference_output):
        postprocess_output = inference_output
        return postprocess_output

    def handle(self, data, context):

        model_input = self.preprocess(data)
        model_output = self.inference(model_input)
        return self.postprocess(model_output)
雖然預設輸出是JSON,打request進去的資料格式沒有規定喔,可利用像是protocol buffers這種技術進行傳遞是沒有問題的!
batchsize 修改方法:
curl -v -X PUT "http://localhost:8081/models/?batch_size="
