這篇會稍微從前幾篇的內容抽離出來,因為中秋節連假家人來找,只能先做點簡單的事情...
Android Jetpack是Google在2018年時發佈的一系列的Android Library,其中不少Library在現今開發時通常都會導入。我自己最常用到的就是Navigation了,它能很方便的管理App內各個Fragment的畫面流,並且也能很直觀的進行設定。有時回想起Navigation問世前使用Fragment的經歷都會默默落下兩行淚(?)
使用上首先是dependency的部分
dependencies {
    def nav_version = "2.3.5"
    implementation "androidx.navigation:navigation-fragment-ktx:$nav_version"
    implementation "androidx.navigation:navigation-ui-ktx:$nav_version"
}
因為目前來說我的App很簡單,各頁面間還沒有太多的資料需要傳輸,所以引入基本的內容即可。
接下來是幾個初步的動作
<?xml version="1.0" encoding="utf-8"?>
<navigation xmlns:android="http://schemas.android.com/apk/res/android"
    xmlns:app="http://schemas.android.com/apk/res-auto"
    xmlns:tools="http://schemas.android.com/tools"
    android:id="@+id/nav_main">
</navigation>
<?xml version="1.0" encoding="utf-8"?>
<androidx.constraintlayout.widget.ConstraintLayout
    xmlns:android="http://schemas.android.com/apk/res/android"
    xmlns:app="http://schemas.android.com/apk/res-auto"
    xmlns:tools="http://schemas.android.com/tools"
    android:layout_width="match_parent"
    android:layout_height="match_parent"
    tools:context=".MainActivity">

    <androidx.fragment.app.FragmentContainerView
        android:id="@+id/nav_host_fragment"
        android:name="androidx.navigation.fragment.NavHostFragment"
        android:layout_width="0dp"
        android:layout_height="0dp"
        app:defaultNavHost="true"
        app:layout_constraintBottom_toBottomOf="parent"
        app:layout_constraintLeft_toLeftOf="parent"
        app:layout_constraintRight_toRightOf="parent"
        app:layout_constraintTop_toTopOf="parent"
        app:navGraph="@navigation/nav_main" />

</androidx.constraintlayout.widget.ConstraintLayout>
<?xml version="1.0" encoding="utf-8"?>
<navigation xmlns:android="http://schemas.android.com/apk/res/android"
    xmlns:app="http://schemas.android.com/apk/res-auto"
    xmlns:tools="http://schemas.android.com/tools"
    android:id="@+id/nav_main"
    app:startDestination="@id/welcomeFragment">

    <fragment
        android:id="@+id/welcomeFragment"
        android:name="pet.ca.ptttweetsobserver.WelcomeFragment"
        android:label="fragment_welcome"
        tools:layout="@layout/fragment_welcome">
        <action
            android:id="@+id/action_welcomeFragment_to_loginFragment"
            app:destination="@id/loginFragment"
            app:popExitAnim="@id/welcomeFragment"
            app:popUpToInclusive="true" />
    </fragment>
    <fragment
        android:id="@+id/loginFragment"
        android:name="pet.ca.ptttweetsobserver.LoginFragment"
        android:label="fragment_login"
        tools:layout="@layout/fragment_login" />
</navigation>
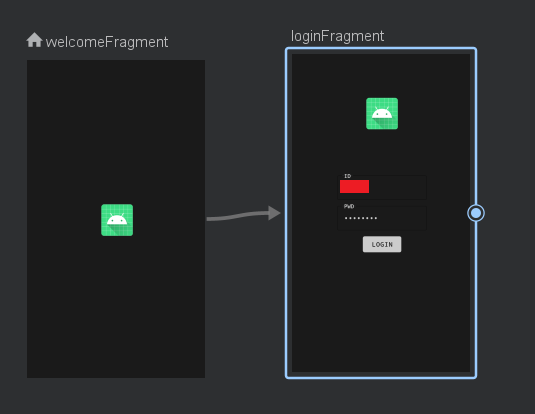
這部分以程式碼較不直觀,以預覽圖來說會像這樣:
最後在WelcomeFragment裡面,需要往下一頁前進時只需呼叫如下:
// 在這邊的this為Fragment
NavHostFragment.findNavController(this)
    .navigate(R.id.action_welcomeFragment_to_loginFragment)
就能直接進到LoginFragment了。
