Helm是尋找、分享和使用軟體建構Kubernetes最佳的方案前面幾篇文章都會看到都是透過yaml檔進行部署,如下方的語法所示
kubectl apply -f myfile.yaml
企業中不可能只有幾個pod需要部署,微服務的架構底下,一個cluster裡面上百個pod是很稀鬆平常的事情,
如果都是透過yaml進行部署,我想負責的同仁應該會很崩潰
為了解決這種太多人工重複行為的 aka 科技始終來自於惰性(?)
helm使用chart來建構部署你的服務,chart的資料架構如下
your_app
├── Chart.yaml
├── charts # 裡面放相依的chart設定檔
├── templates # 樣板
│   ├── NOTES.txt #
│   ├── _helpers.tpl # golang的template
│   ├── deployment.yaml # Kubernetes deployment
│   ├── hpa.yaml # Kubernetes hpa
│   ├── ingress.yaml # Kubernetes ingress
│   ├── service.yaml # Kubernetes service
│   ├── serviceaccount.yaml # Kubernetes serviceaccount
│   └── tests
│       └── test-connection.yaml
└── values.yaml # 把原本hardcode寫死在yaml裡面的value抽出來放到values.yaml上面,部署時才把values.yaml的值渲染到yaml上面。
helm有以下特點
因為開發環境是mac,所以很簡單的...
brew install helm
安裝好後,可以執行helm指令看看,如果有正常show出資料就是安裝成功了
helm
The Kubernetes package manager

Common actions for Helm:

- helm search:    search for charts
- helm pull:      download a chart to your local directory to view
- helm install:   upload the chart to Kubernetes
- helm list:      list releases of charts
.
.
.
etc
helm create mytest
建立成功後可以看到chart的資料結構如下圖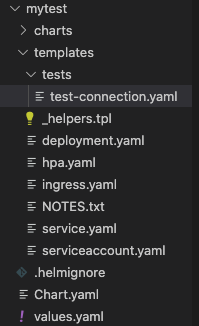
根據個人需求,沒用到的yaml檔可以刪除掉沒差。
先看這個檔案,不然等等的deployment會一頭霧水。不一定要定義在_helpers.tpl,可以依需求直接定義在deployment裡面也是可以的
define : 定義一個變數(?),可以讓deployment呼叫使用default : 如果沒有A值,就回傳B值
#如果values檔案裡面沒有宣告nameOverride的值時,預設帶chart的名稱
default .Chart.Name .Values.nameOverride
if else : 這個就不解釋了...
{{/*
Expand the name of the chart.
*/}}
{{- define "mytest.name" -}}
{{- default .Chart.Name .Values.nameOverride | trunc 63 | trimSuffix "-" }}
{{- end }}

### 這邊有提到一個很重要的限制,k8s的name長度不能超過63位元
{{/*
Create a default fully qualified app name.
We truncate at 63 chars because some Kubernetes name fields are limited to this (by the DNS naming spec).
If release name contains chart name it will be used as a full name.
*/}}
{{- define "mytest.fullname" -}}
{{- if .Values.fullnameOverride }}
{{- .Values.fullnameOverride | trunc 63 | trimSuffix "-" }}
{{- else }}
{{- $name := default .Chart.Name .Values.nameOverride }}
{{- if contains $name .Release.Name }}
{{- .Release.Name | trunc 63 | trimSuffix "-" }}
{{- else }}
{{- printf "%s-%s" .Release.Name $name | trunc 63 | trimSuffix "-" }}
{{- end }}
{{- end }}
{{- end }}

#剩下的就先不列上來
點開deployment.yaml來看,看到{{ }}的的區域都是使用Go的template的自定義區域,根據敘述決定資料來源是values.yaml還是_helpers.tpl
apiVersion: apps/v1
kind: Deployment
metadata:
  name: {{ include "mytest.fullname" . }} # mytest.fullname來自_helpers.tpl定義的變數
  labels:
    {{- include "mytest.labels" . | nindent 4 }} # nindent 4 縮排四個空白
spec:
  {{- if not .Values.autoscaling.enabled }} #如果沒有要開啟hpa時才會渲染這段敘述,資料來源為values.yaml
  replicas: {{ .Values.replicaCount }}
  {{- end }}
  selector:
    matchLabels:
      {{- include "mytest.selectorLabels" . | nindent 6 }}
  template:
    metadata:
      {{- with .Values.podAnnotations }}
      annotations:
        {{- toYaml . | nindent 8 }}
      {{- end }}
      labels:
        {{- include "mytest.selectorLabels" . | nindent 8 }}
    spec:
      {{- with .Values.imagePullSecrets }}
      imagePullSecrets:
        {{- toYaml . | nindent 8 }}
      {{- end }}
      serviceAccountName: {{ include "mytest.serviceAccountName" . }}
      securityContext:
        {{- toYaml .Values.podSecurityContext | nindent 8 }}
      containers:
        - name: {{ .Chart.Name }}
          securityContext:
            {{- toYaml .Values.securityContext | nindent 12 }}
          image: "{{ .Values.image.repository }}:{{ .Values.image.tag | default .Chart.AppVersion }}"
          imagePullPolicy: {{ .Values.image.pullPolicy }}
          ports:
            - name: http
              containerPort: 80
              protocol: TCP
          livenessProbe:
            httpGet:
              path: /
              port: http
          readinessProbe:
            httpGet:
              path: /
              port: http
          resources:
            {{- toYaml .Values.resources | nindent 12 }}
      {{- with .Values.nodeSelector }}
      nodeSelector:
        {{- toYaml . | nindent 8 }}
      {{- end }}
      {{- with .Values.affinity }}
      affinity:
        {{- toYaml . | nindent 8 }}
      {{- end }}
      {{- with .Values.tolerations }}
      tolerations:
        {{- toYaml . | nindent 8 }}
      {{- end }}
#部署前記得要先確定目前k8s cluster是什麼喔
kubectl config current-context

helm install test1 ./mytest

NAME: test1
LAST DEPLOYED: Thu Sep 23 14:20:30 2021
NAMESPACE: default
STATUS: deployed
REVISION: 1
NOTES:
1. Get the application URL by running these commands:
  export POD_NAME=$(kubectl get pods --namespace default -l "app.kubernetes.io/name=mytest,app.kubernetes.io/instance=test1" -o jsonpath="{.items[0].metadata.name}")
  export CONTAINER_PORT=$(kubectl get pod --namespace default $POD_NAME -o jsonpath="{.spec.containers[0].ports[0].containerPort}")
  echo "Visit http://127.0.0.1:8080 to use your application"
  kubectl --namespace default port-forward $POD_NAME 8080:$CONTAINER_PORT

helm ls   #確認安裝狀態
NAME    NAMESPACE       REVISION        UPDATED                                 STATUS          CHART           APP VERSION
test1   default         1               2021-09-23 14:20:30.791658 +0800 CST    deployed        mytest-1.0.1    1.16.0
這時候如果status如果是deployed就表示部署成功了
接下來繼續介紹helm的其他指令