前一天,我們使用了simple_form_for提到了新增表單寫法,而今天要講一個上傳情境。這個上傳想要做的事情在特殊新增頁籤中新增或更新id=1,2,3,4的資料,上傳後轉址回首頁,並且存在的的id: 1-4 的值會被填寫在表單上面。
form_for / simple_form_for 的情境為一般crud上傳,而上述情境的特殊上傳並不是遵照慣例的上傳法,所以我們用form_tag的方式,寫出我們想要的功能。這裡講一下 form_for / simple_form_for / form_tag的差別
Rails 內建的表單結構,適合寫新增、更新單筆資料用。Rails提供的helper,但使用方式為普通的form。寫法比較自由,但寫的行數比較多simple_form,並且做一些基本的設定。這是基於 form_for 所延伸的更簡易的用法,是我愛用的用法以下為關於 form_tag 的雷:
#====== 錯誤用法
form_tag(controller: "people", action: "search", method: "get", class: "nifty_form")
#=> '<form accept-charset="UTF-8" action="/people/search?class=nifty_form&method=get" method="post">'

#====== 正確用法
form_tag({ controller: "people", action: "search" }, method: "get", class: "nifty_form")
#=> '<form accept-charset="UTF-8" action="/people/search" class="nifty_form" method="get">'
上方的錯誤用法為form_tag 將 method: "get", class: "nifty_form" 當作網址的參數,因此我們必須要將:controller, :action用大括號包住。
這裡很容易被雷到,所以一定要注意!而由上述的例子我們也可以知道,當我們要傳get參數,可以用上面用法進行參數傳遞
不免俗的講解一下樣式
= tab_content(blog_genre.second[:id]) do
  - form_tag({ controller: 'admin/blogs', action: 'special_update' },
               method: "post", class: "nifty_form")
    - @ten_blogs.each do |blog|
      = text_field(:blog, :title, multiple: true)
      = text_field(:blog, :content, multiple: true)
由於 input element 為行內排列,因此做簡單的排版後,輸入框會排成一列。
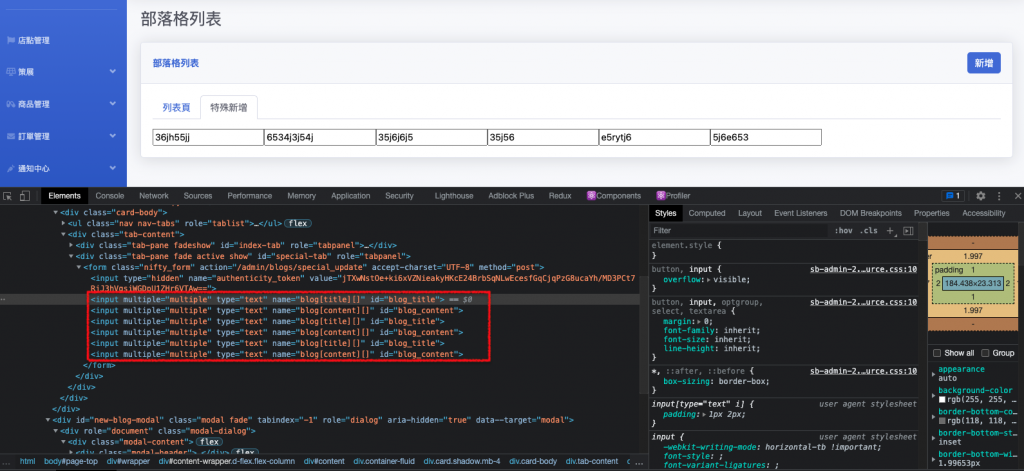
Inline element 無法用區塊的方式控制,因此<input>無法用padding, margin 控制。
另外加了multiple: true後,可以允許傳複數值,因此name屬性會從blog[title] 轉為 blog[title][],但不過這也不是我們想要的樣子。因此我們直接暴力的將name屬性寫在上面,並且仿照simple_form刻畫畫面的方式做樣式的撰寫,最後版本如下:
- form_tag({ controller: 'admin/blogs', action: 'special_update' },
method: "post", class: "nifty_form")
= grid_div(1, 1, style: "column-gap: 10px;") do
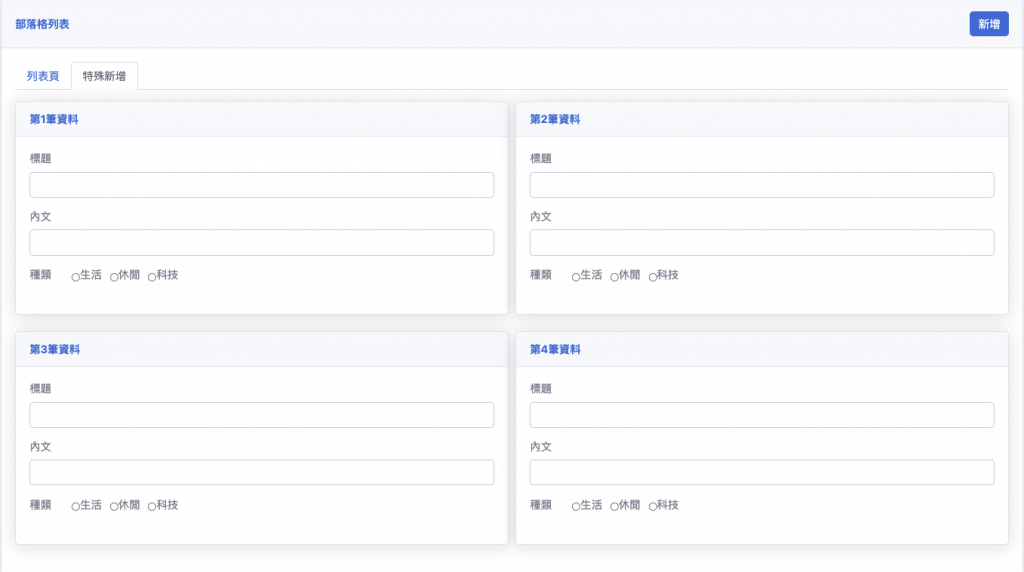
- @ten_blogs.each.with_index(1) do |blog, index|
= card do
= card_header(title: "第#{index}筆資料")
= card_body do
= tag.div class: 'form-group blog__title'
= label_tag :blog__title, "標題"
= text_field_tag "blog[][title]", nil, class: 'form-control string required'
= tag.div class: 'form-group string required blog__content'
= label_tag :blog__content, "內文"
= text_field_tag "blog[][content]", nil, class: 'form-control string required'
= grid_div(1, 10) do
= label_tag nil, "種類"
= tag.div do
- [["生活", :life], ["休閒", :casual], ["科技", :technology]].each do |e|
= tag.div class: 'form-check form-check-inline'
= radio_button_tag "blog[][genre]", e.second, false
= label_tag :blog__genre, e.first
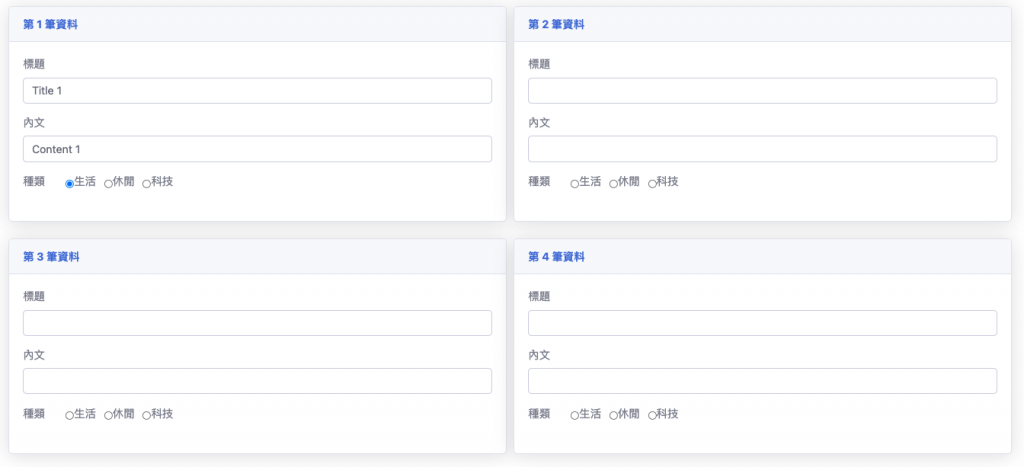
再來我們開始填寫預設值進去
- form_tag({ controller: 'admin/blogs', action: 'special_update' },
           method: "post", class: "nifty_form")
  = grid_div(1, 1, style: "column-gap: 10px;") do
    - @ten_blogs.each.with_index(1) do |blog, index|
      = card do
        = card_header(title: "第 #{index} 筆資料")
        = card_body do
          = tag.div class: 'form-group blog__title'
            = label_tag :blog__title, "標題"
            = text_field_tag "blog[][title]", blog.title,
                             class: 'form-control string required'
          = tag.div class: 'form-group string required blog__content'
            = label_tag :blog__content, "內文"
            = text_field_tag "blog[][content]", blog.content,
                             class: 'form-control string required'
          = grid_div(1, 10) do
            = label_tag nil, "種類"
            = tag.div do
              - [["生活", :life], ["休閒", :casual], ["科技", :technology]].each do |e|
                = tag.div class: 'form-check form-check-inline'
                  = radio_button_tag "blog[][genre]",
                    e.second, e.second === blog.genre&.to_sym
                  = label_tag :blog__genre, e.first
下列的文字是我們設定的預設文字
上述情境並非依照慣例撰寫,因此程式碼會寫得比較多行。不過由此我們可以細細品察form_tag的用法
接著,我們回到Day23的例子,我們看一下在simple_form中到底幫忙radio button做多少事情,以至於我們不用像剛剛在form_tag時寫得那麼多
= f.input :genre, as: :radio_buttons, label: tag.strong('分類'),
          collection: [["生活", :life], ["休閒", :casual], ["科技", :technology]],
          selected: :casual, item_wrapper_class: 'form-check form-check-inline'
上面的slim所對應的html 如下
<fieldset class="form-group radio_buttons required blog_genre">
  <legend class="col-form-label pt-0">
    <strong>分類</strong> <abbr title="required">*</abbr>
  </legend>
  <input type="hidden" name="blog[genre]" value="" />
  <div class="form-check form-check-inline">
    <input
      class="form-check-input radio_buttons required"
      type="radio"
      value="life"
      name="blog[genre]"
      id="blog_genre_life"
    /><label
      class="form-check-label collection_radio_buttons"
      for="blog_genre_life"
      >生活</label>
  </div>
  <div class="form-check form-check-inline">
    <input
      class="form-check-input radio_buttons required"
      selected="selected"
      type="radio"
      value="casual"
      name="blog[genre]"
      id="blog_genre_casual"
    /><label
      class="form-check-label collection_radio_buttons"
      for="blog_genre_casual"
      >休閒</label>
  </div>
  <div class="form-check form-check-inline">
    <input
      class="form-check-input radio_buttons required"
      type="radio"
      value="technology"
      name="blog[genre]"
      id="blog_genre_technology" /><label
      class="form-check-label collection_radio_buttons"
      for="blog_genre_technology"
      >科技</label>
  </div>
</fieldset>
下面一行為隱藏區塊,這是rails的貼心設計。當沒有填值時,會傳一個空字串。
<input type="hidden" name="blog[genre]" value="" />
接著我們來看看 controller 的邏輯
在資料庫只創建到第二筆的情況下,當我們傳了新的一筆,該筆的id會等於3。當我們表單送出時,會在第3筆資料顯示資料。

以下為新增表單按下送出按鈕時,從畫面傳過來的值
params
#=> <ActionController::Parameters {"authenticity_token"=>"an8nw1/cmx7KOMq42araGAwTHwA894VnMDszcCBKTbBlxHQGj1l8nmCs79wgh55aoUSOG4/Ta9VxupUmSENi2Q==", "blog"=><ActionController::Parameters {"title"=>"哈囉", "content"=>"哈囉", "genre"=>"casual"} permitted: false>, "button"=>"", "controller"=>"admin/blogs", "action"=>"create"} permitted: false>

blog_params
#=> <ActionController::Parameters {"title"=>"哈囉", "content"=>"哈囉", "genre"=>"casual"} permitted: true>
按下送出後,就會觸發controller#create 邏輯。以下為送出表單的 controller#create 邏輯
module Admin
  class BlogsController < ApplicationController
    def index
      # 單筆資料新增一筆待儲存的紀錄
      @blog = current_user.blogs.new
    end

    # 創建一筆新的紀錄
    def create
      if current_user.blogs.create(blog_params).persisted?
        flash[:notice] = '建立成功'
      else
        flash[:alert] = '建立失敗'
      end

      redirect_to admin_blogs_path
    end

    private

    # 單筆資料用
    def blog_params
      params.require(:blog).permit(:title, :content, :genre)
    end
  end
end
下列為上傳 id: 1-4 筆,送出後重新導向原畫面的動作

下列為從畫面傳過去的 params
params
#=> <ActionController::Parameters {"authenticity_token"=>"yG9dFBySr22K4cTR8AwBivWqn03ZYr6ZL/8HIEISBpvH1A7RzBdI7SB14bUJIUXIWP0OVmpGUCtufqF2Khsp8g==", "blog"=>[<ActionController::Parameters {"title"=>"Title 1", "content"=>"Content 1", "genre"=>"life"} permitted: false>, <ActionController::Parameters {"title"=>"cxzbdsb", "content"=>"hrahr"} permitted: false>, <ActionController::Parameters {"title"=>"", "content"=>""} permitted: false>, <ActionController::Parameters {"title"=>"", "content"=>""} permitted: false>], "commit"=>"送出", "controller"=>"admin/blogs", "action"=>"special_update"} permitted: false>

special_blog_params
#=> [<ActionController::Parameters {"title"=>"標題1", "content"=>"內文1"} permitted: true>,
#    <ActionController::Parameters {"title"=>"", "content"=>""} permitted: true>,
#    <ActionController::Parameters {"title"=>"標題2", "content"=>"6666", "genre"=>"life"} permitted: true>,
#    <ActionController::Parameters {"title"=>"", "content"=>""} permitted: true>]
按下送出後,就會觸發controller#special_update 邏輯。以下為送出表單的 controller#special_update 邏輯
module Admin
  class BlogsController < ApplicationController
    def index
      # 取得id: 1-4 的資料,若娶不到則會新增一筆待儲存的紀錄
      @ten_blogs = SPECIAL_ARTICLE.map { |n| Blog.find_or_initialize_by(id: n) }
    end

    # 創建或修改id: 1-4
    def special_update
      blogs = Blog.where(id: SPECIAL_ARTICLE)

      special_blog_params.each.with_index(1) do |params, index|
        next unless params.values.any?(&:present?)

        blog = blogs.find_or_initialize_by(id: index)

        blog.title = params[:title]
        blog.content = params[:content]
        blog.genre = params[:genre]
        blog.user = current_user

        blog.save
      end

      flash[:notice] = '建立成功'

      redirect_to admin_blogs_path
    end

    private

    # 多筆資料用
    def special_blog_params
      params.permit(blog: [:title, :content, :genre]).try(:[], :blog)
    end
  end
end
今天主要講的是表單的部分,以下整理出這章節講到的幾個重點
form_tag的使用
simple_form對於radio_button的使用
<input> 為行內元素,並非區塊元素
前幾天我們也講到<button>也為行內元素,要記住喔!
controller針對單筆新增 / 多筆新增的處理
目前尚未介紹的內容


 iThome鐵人賽