在講解基本的表單架構以前,我們先將基本的CRUD建立起來。
以下的前情提要會提到有關mvc & routes的建設,還不熟悉 Rails 框架的讀者們,可以趁者以下舉的例子熟悉基本的架構

首先我們先建立部落格的model。部落格的欄位 ➡️ 標題、內文、種類、創建者
rails g model Blog title content user:belongs_to genre:integer
確認無誤migration以後,我們進行資料庫migrate
class CreateBlogs < ActiveRecord::Migration[6.0]
  def change
    create_table :blogs do |t|
      t.string :title
      t.string :content
      t.references :user, null: false
      t.integer :genre
      t.timestamps
    end
  end
end
rails db:migrate
資料遷徙完後,開始做以下設定
user 做 foreign key 做設定。
has_many blogsbelongs_to userinteger,並使用Rails內建的enum
Blog的3個欄位:title, :content :genre 不能為空值# 備註: 由於這邊不會帶到會員,所以假設會員都已經設定完成的前提下進行串接
class User < ApplicationRecord
has_many :blogs
end
class Blog < ApplicationRecord
belongs_to :user
validates :title, :content, :genre, presence: true
enum genre: {
life: 0,
casual: 1,
technology: 2,
}
end
建立完資料庫以後,就可以實作資料的新增、刪除、改動的動作。因此創建完以後我會先在Rails Console 動手實作一遍
rails console
#===== 確定存在的欄位為空值的時候不能存取
User.first.blogs.create!
# ActiveRecord::RecordInvalid (校驗失敗: Title 不能為空白, Content 不能為空白, Genre 不能為空白)
順道一提,如果沒有加驚嘆號(意思為 bang)!, 便不會引發錯誤,但這邊我們可以看到id: nil,代表實際上這筆資料沒有被存進去。
User.first.blogs.create
#=> #<Blog id: nil, title: nil, content: nil, user_id: 1, genre: nil, created_at: nil, updated_at: nil>
我們也可以使用model的方法判斷這筆資料在哪一個生命週期。這裡我們要使用 new_record?, persisted? 判斷這一筆是否已經被存進資料庫。
User.first.blogs.create.new_record?   #=> true
User.first.blogs.create.persisted?    #=> false
以下為 ActiveRecord 的生命週期
new record ➡️ 尚未寫入階段會判斷為true
blog = Item.new
blog.new_record? #=> true
persisted ➡️ 已寫入階段會判斷為true
blog.save
blog.persisted? #=> true
changed ➡️ 資料被改寫但尚未存進資料庫會被判斷true
blog.name = "other"
blog.changed? #=> true
destroyed ➡️ 資料被刪除但該筆紀錄,但還沒重整。因此該筆資料暫時存在在model。遇到這種情況則會判斷為true
blog.destroy
blog.destroyed? #=> true
接著我們試著存入一筆
User.first.blogs.create!(title: 'Title 1', content: 'Content 1', genre: :life)
#=> #<Blog id: 1, title: "Title 1", content: "Content 1", user_id: 1, genre: "life", created_at: "2021-09-18 12:11:56", updated_at: "2021-09-18 12:11:56">
  User Load (1.0ms)  SELECT `users`.* FROM `users` WHERE `users`.`banned` = FALSE ORDER BY `users`.`id` ASC LIMIT 1

  Blog Create (15.3ms)  INSERT INTO `blogs` (`title`, `content`, `user_id`, `genre`, `created_at`, `updated_at`) VALUES ('Title 1', 'Content 1', 1, 0, '2021-09-18 12:11:56.986857', '2021-09-18 12:11:56.986857')
確認 model 運作可以的話,我們便可以繼續下一步的操作。我們會在Day29-30講更多關於Model,Model的部分就先打住
接著,我們先製造可以讀取到的路徑
Rails.application.routes.draw do
  namespace :admin do
    # 基本路徑
    resources :blogs do
      post :spectial_update, on: :collection
    end
  end
end
使用了resources,Rails會創造8種路徑。
$ rails routes -g blog

         Prefix Verb   URI Pattern                     Controller#Action
spectial_update_admin_blogs POST   /admin/blogs/spectial_update(.:format) admin/blogs#spectial_update
                admin_blogs GET    /admin/blogs(.:format)                 admin/blogs#index
                            POST   /admin/blogs(.:format)                 admin/blogs#create
             new_admin_blog GET    /admin/blogs/new(.:format)             admin/blogs#new
            edit_admin_blog GET    /admin/blogs/:id/edit(.:format)        admin/blogs#edit
                 admin_blog GET    /admin/blogs/:id(.:format)             admin/blogs#show
                            PATCH  /admin/blogs/:id(.:format)             admin/blogs#update
                            PUT    /admin/blogs/:id(.:format)             admin/blogs#update
                            DELETE /admin/blogs/:id(.:format)             admin/blogs#destroy
接著我們將controller所有的動作內容定義出來(以下內容會慢慢帶到)
# in app/controllers/admin/blogs_controller.rb
#
module Admin
  class BlogsController < ApplicationController
    before_action :set_blog, only: %i(show edit update)
    SPECIAL_ARTICLE = 1..3

    def index
      # 單筆資料新增一筆待儲存的紀錄
      @blog = current_user.blogs.new
    end

    # 創建一筆新的紀錄
    def create
    end

    # 創建或修改前10筆
    def special_update
    end

    def show; end
  end
end
我們先建立部落格相關的列表頁 index
module BlogHelper
  def blog_genre
    [
      { id: 'index', wording: '列表頁' },
      { id: 'special', wording: '特殊新增' },
    ]
  end
end
我們使用 Day22 介紹的自定義 helper 組成我們要的畫面
// in app/views/admin/blogs/index.html.slim

= title '部落格列表'

/ 卡片內容
= card do
  = card_header(title: '部落格列表') do
    = link_to '新增', '#', class: 'ml-auto btn btn-primary',
              data: { toggle: 'modal', target: '#new-blog-modal' }
  = card_body do
    = tab_list(blog_genre)
    = tab_contents do
      / 當前顯示內容
      = tab_active_content(blog_genre.first[:id]) do
        / 頁籤1內容
        = tag.span "列表頁"
      / 隱藏內容
      = tab_content(blog_genre.second[:id]) do
        / 頁籤2內容
        = tag.span "特殊新增"

/ 彈跳視窗
= modal(id: 'new-blog-modal', confirm_wording: '送出文章',
        confirm_form: nil, title: '新增文章') do
  = tag.span "我是彈跳視窗內容"

畫面上有幾個看點
新增按鈕使用的是ml-auto,若沒有margin-left: auto則會是以下的樣子。在 Day19, Day20 提過margin相關技巧。
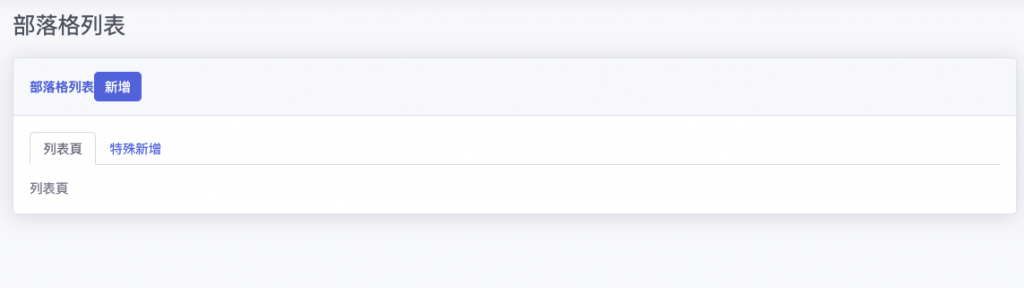
頁籤的切換與彈跳視窗的自定義helper,在 Day22 介紹過。
將基本的環境設置完後,我們便開始使用simple_form寫新增彈跳視窗的表單
/ 彈跳視窗
= modal(id: 'new-blog-modal', confirm_wording: '送出文章',
        confirm_form: 'new_modal', title: '新增文章') do
  = simple_form_for [:admin, @blog], html: { method: :post, id: :new_modal } do |f|
    = f.input :title, label: tag.strong('標題')
    = f.input :content, label: tag.strong('內文')
    = f.input :genre, as: :select, label: tag.strong('分類')
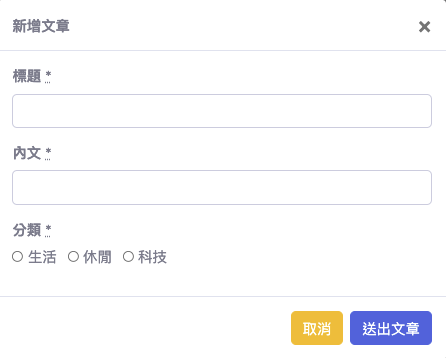
而產生的畫面如下 ⬇️
我們可以看到,當我們將標題、內文、分類設為必填之後,simple_form 幫忙新增了米字號*。
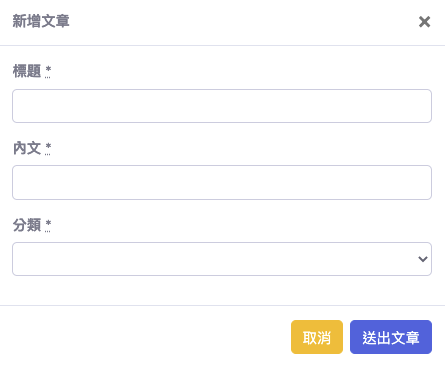
而不幸的是,simple_form沒有辦法幫我們判斷是否有使用enum
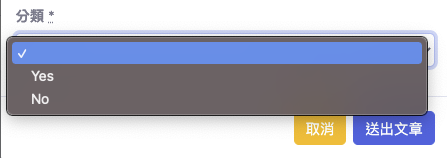
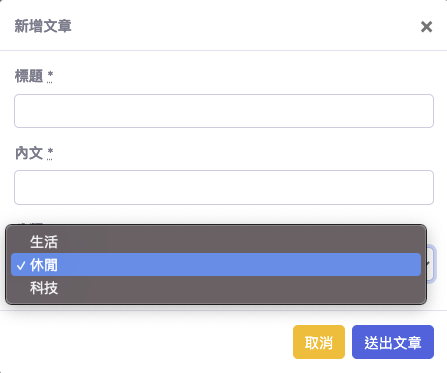
因此我們要將選項填上去,並且使用:selected預設選擇休閒
/ 彈跳視窗
= modal(id: 'new-blog-modal', confirm_wording: '送出文章',
        confirm_form: 'new_modal', title: '新增文章') do
  = simple_form_for [:admin, @blog], html: { method: :post, id: :new_modal } do |f|
    = f.input :title, label: tag.strong('標題')
    = f.input :content, label: tag.strong('內文')
    = f.input :genre, as: :select, label: tag.strong('分類'),
              collection: [["生活", :life], ["休閒", :casual], ["科技", :technology]],
              selected: :casual
接著我們看看簡單的使用simple_form查看對應的html 畫面為何
<form
  class="simple_form new_blog"
  id="new_modal"
  novalidate="novalidate"
  action="/admin/blogs"
  accept-charset="UTF-8"
  method="post"
>
  <input
    type="hidden"
    name="authenticity_token"
    value="jJ2jdgkIRXRXE8Ioz7i3kEe3Se/tVTXMJd0qAsB+Sw2DJvCz2Y2i9P2H50w2lfPS6uDY9F5x235kXIxUqHdkZA=="
  />
  <div class="form-group string required blog_title">
    <label class="string required" for="blog_title"
      ><strong>標題</strong> <abbr title="required">*</abbr></label
    ><input
      class="form-control string required"
      type="text"
      name="blog[title]"
      id="blog_title"
    />
  </div>
  <div class="form-group string required blog_content">
    <label class="string required" for="blog_content"
      ><strong>內文</strong> <abbr title="required">*</abbr></label
    ><input
      class="form-control string required"
      type="text"
      name="blog[content]"
      id="blog_content"
    />
  </div>
  <div class="form-group select required blog_genre">
    <label class="select required" for="blog_genre"
      ><strong>分類</strong> <abbr title="required">*</abbr></label
    ><select
      class="form-control select required"
      name="blog[genre]"
      id="blog_genre"
    >
      <option value="life">生活</option>
      <option selected="selected" value="casual">休閒</option>
      <option value="technology">科技</option>
    </select>
  </div>
</form>
除了以下這段和CSRF token有關,其他都為與我們有關的內容。
  <input
    type="hidden"
    name="authenticity_token"
    value="..."
  />
可以看到Rails幫忙處理很多表單的問題,讓我們不必自己重刻html。
若使用:radio_buttons
= modal(id: 'new-blog-modal', confirm_wording: '送出文章',
        confirm_form: 'new_modal', title: '新增文章') do
  = simple_form_for [:admin, @blog], html: { method: :post, id: :new_modal } do |f|
    = f.input :title, label: tag.strong('標題')
    = f.input :content, label: tag.strong('內文')
    = f.input :genre, as: :radio_buttons, label: tag.strong('分類'),
              collection: [["生活", :life], ["休閒", :casual], ["科技", :technology]],
              selected: :casual
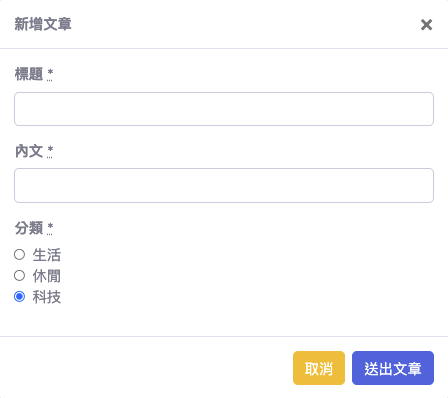
當我們加入了item_wrapper_class: 'form-check form-check-inline'排列成inline,會是我們預期的樣子。
= simple_form_for [:admin, @blog], html: { method: :post, id: :new_modal } do |f|
  = f.input :title, label: tag.strong('標題')
  = f.input :content, label: tag.strong('內文')
  = f.input :genre, as: :radio_buttons, label: tag.strong('分類'),
            collection: [["生活", :life], ["休閒", :casual], ["科技", :technology]],
            selected: :casual, item_wrapper_class: 'form-check form-check-inline'
即便方便,在simple_form上面會遇到一些困難
網路上相關資訊不多,若經驗不足的讀者也許可以在自己專案內找到其他人的用法。不過我同事基本上不會用simple_form,所以我只能靠自己經驗摸索
simple_form_for 若要加上html屬性,key 要為:html
裡面的f.input若要加上html屬性,key 要為:input_html
多留意radio_button, checkbox的用法
今天介紹了基本的CRUD,以及基本的simple_form技巧。明天會開始介紹表單的用法及玩法!