本系列文已改編成書「Arduino 自造趣:結合 JavaScript x Vue x Phaser 輕鬆打造個人遊戲機」,本書改用 Vue3 與 TypeScript 全面重構且加上更詳細的說明,
在此感謝 iT 邦幫忙、博碩文化與編輯小 p 的協助,歡迎大家前往購書,鱈魚在此感謝大家 (。・∀・)。
若想 DIY 卻不知道零件去哪裡買的讀者,可以參考此連結 。( •̀ ω •́ )✧
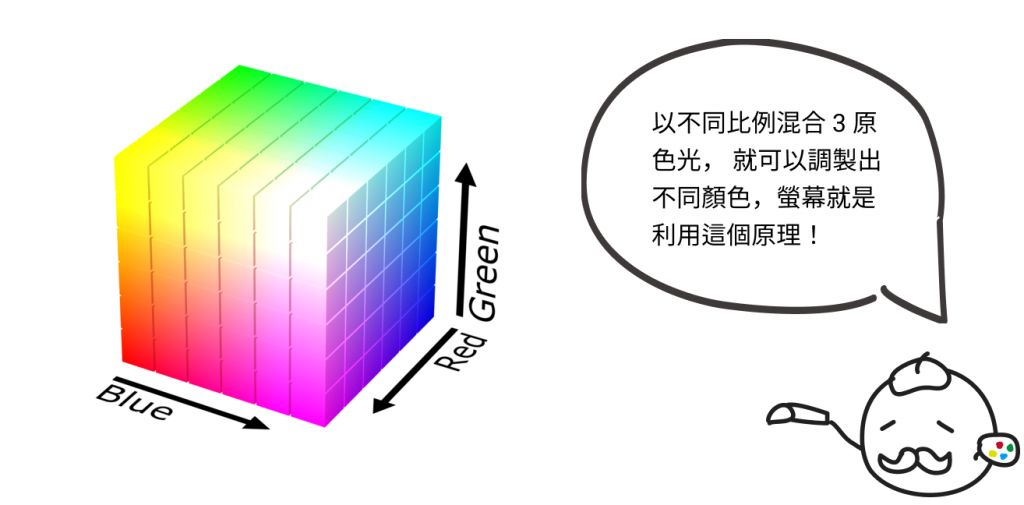
接下來我們要利用「 PWM」與「RGB LED」設計調色盤功能。
首先來認識一下新朋友 - 「RGB LED」
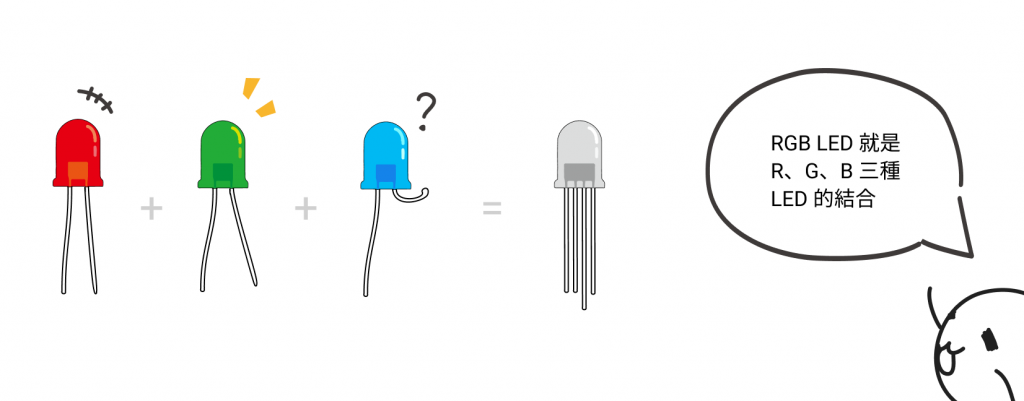
電子助教:「所以為甚麼要把三種 LED 合在一起?( ´ ▽ ` )ノ」
鱈魚:「這就是一個很長的故事了。很久以前,R LED 與 G LED 的祖先們發生了不可告人的...」
電子助教:「不要瞎掰好嗎,明明就是為了要混色!(°c_,°`)」
鱈魚:「你明明就知道是問個毛線喔... ('◉◞⊖◟◉` )」
需要準備以下設備與零件:
三用電表 * 1
麵包板 * 1
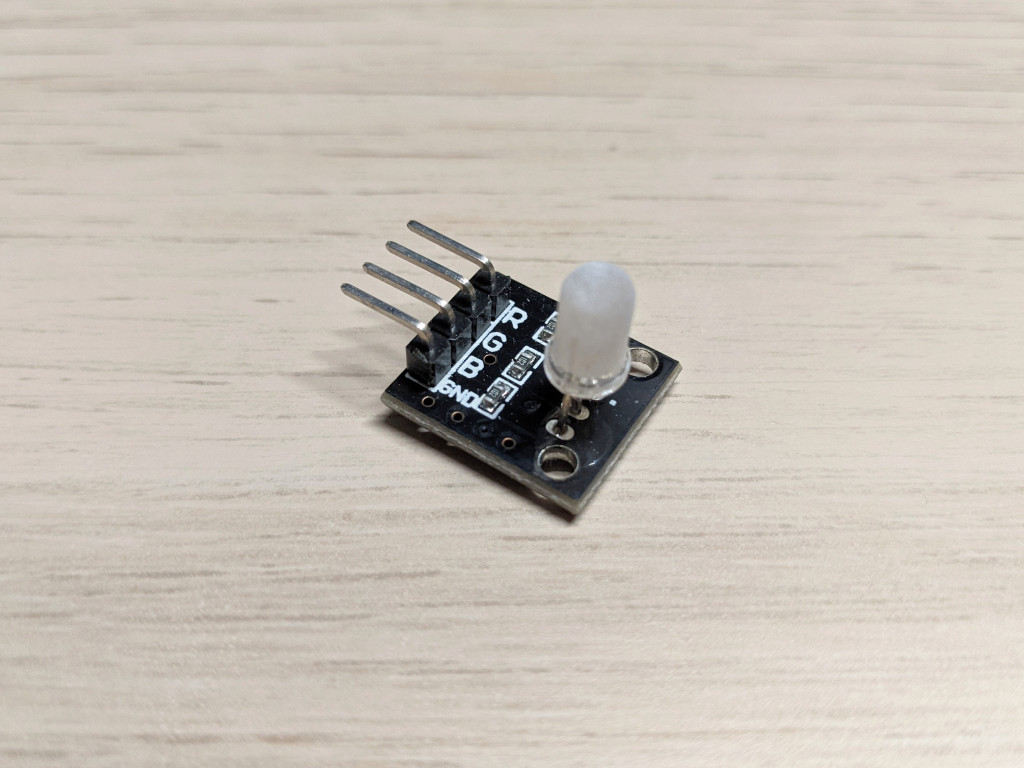
RGB LED * 1
推薦大家買這種模組式的 RGB LED,因為上面已經配好電阻,可以直接接線。
老樣子要檢查小夥伴們是否正常。
測試方式與一般 LED 概念相同。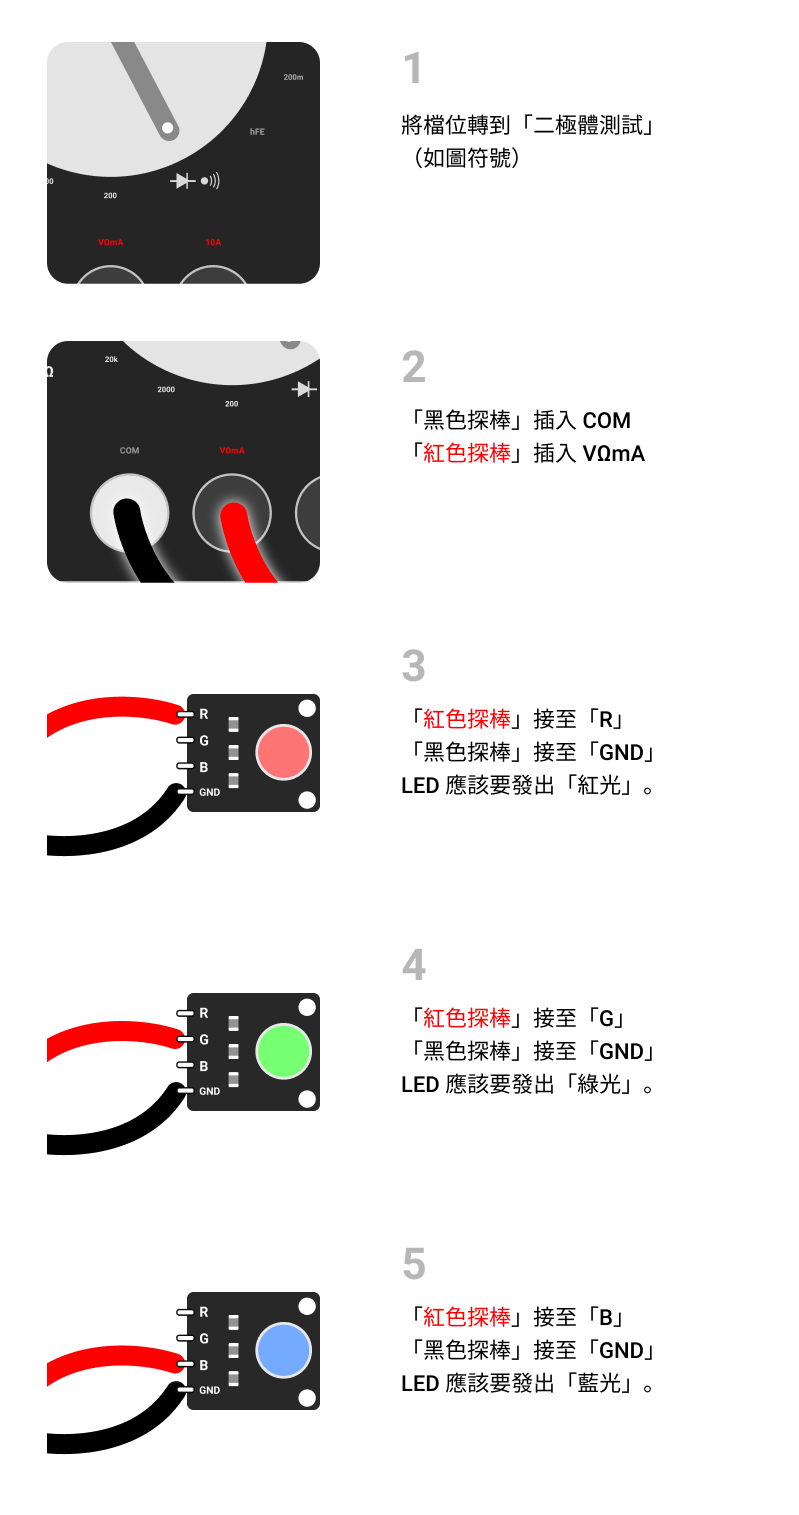
若有任一種顏色沒有亮,表示此顏色之 LED 損壞,請換一個 RGB LED。
以下為參考接線方式,可以不用完全相同,只要效果相同即可。
使用 Uno 板子上的 5V 為 +、GND 為 -。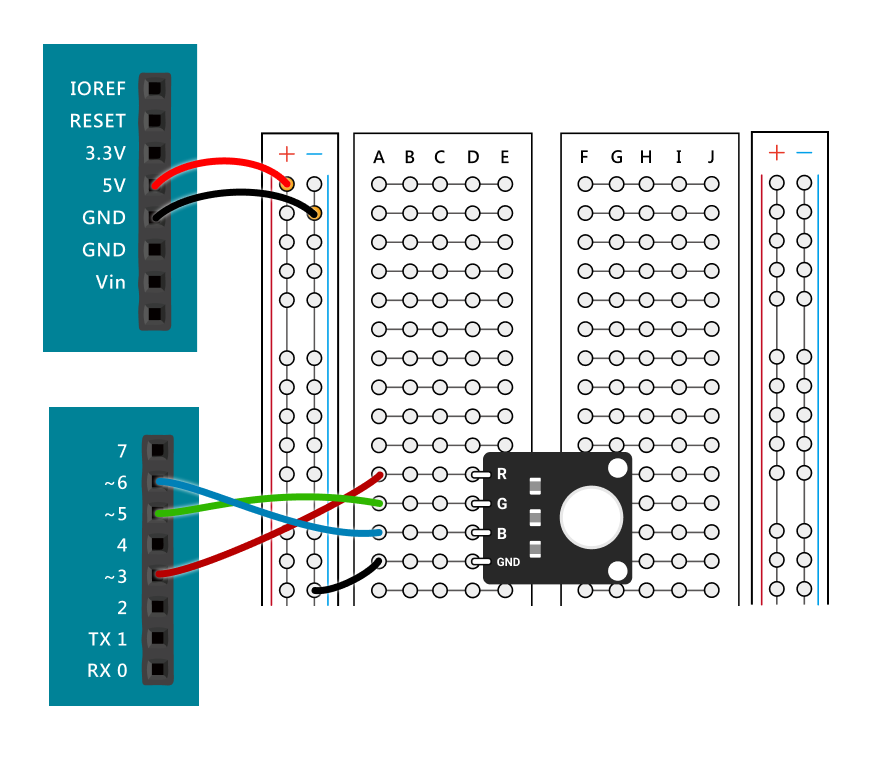
將 window-example.vue 複製一份後改個名字,建立 window-app-rgb-led-palette.vue。
調色盤相關檔案建立一個 src\components\window-app-rgb-led-palette\ 資料夾整理。
src\components\window-app-rgb-led-palette\window-app-rgb-led-palette.vue
<template lang="pug">
base-window.window-app-rgb-led-palette(
  :pos='pos',
  header-icon-color='blue-grey',
  header-icon='r_palette',
  body-class='c-col h-330px',
  title='RGB LED 調色盤'
)
</template>

<style lang="sass">
</style>

<script>
import mixinWindow from '@/mixins/mixin-window';

import BaseWindow from '@/components/base-window.vue';

export default {
  name: 'WindowAppRgbLedPalette',
  components: {
    'base-window': BaseWindow,
  },
  mixins: [mixinWindow],
  props: {},
  data() {
    return {};
  },
  computed: {},
  watch: {},
  created() {
    console.log(`[ ${this.$options.name} created ] id : `, this.id);
  },
  mounted() {},
  methods: {},
};
</script>
接著回到 app.vue,將右鍵選單內加入『新增「RGB LED 調色盤」』選項,並引入組件。
src\app.vue <template lang="pug">
.screen(@click='handleClick')
  // ...

	// 右鍵選單
  q-menu(context-menu, content-class='border-radius-s')
    q-list.min-w-260px
      q-item(@click='addWindow("window-digital-io")', clickable, v-close-popup)
        q-item-section
          | 新增「數位 I/O 視窗」
			q-item(@click='addWindow("window-analog-input")', clickable, v-close-popup)
        q-item-section
          | 新增「類比輸入視窗」
			q-item(@click='addWindow("window-pwm-output")', clickable, v-close-popup)
        q-item-section
          | 新增「PWM 輸出視窗」
			q-separator

      q-item(
        @click='addWindow("window-app-rgb-led-palette")',
        clickable,
        v-close-popup
      )
        q-item-section
          | 新增「RGB LED 調色盤」
src\app.vue <script>
// ...

import WindowDigitalIo from '@/components/window-digital-io.vue';
import WindowAnalogInput from '@/components/window-analog-input.vue';
import WindowPwmOutput from '@/components/window-pwm-output.vue';

import WindowAppRgbLedPalette from '@/components/window-app-rgb-led-palette/window-app-rgb-led-palette.vue';

export default {
  name: 'App',
  components: {
		'dialog-system-setting': DialogSystemSetting,

    'window-digital-io': WindowDigitalIo,
    'window-analog-input': WindowAnalogInput,
    'window-pwm-output': WindowPwmOutput,

		'window-app-rgb-led-palette': WindowAppRgbLedPalette,
  },
  // ...
};
增加以下程式:
base-select-pin.vue。data()
ledPin 儲存 RGB 3 個腳位。colorVal 儲存目前顏色。methods
handleErr(msg) 處理錯誤訊息src\components\window-app-rgb-led-palette\window-app-rgb-led-palette.vue <script>
import mixinWindow from '@/mixins/mixin-window';

import BaseWindow from '@/components/base-window.vue';
import BaseSelectPin from '@/components/base-select-pin.vue';

export default {
  name: 'WindowAppRgbLedPalette',
  components: {
    'base-window': BaseWindow,
    'base-select-pin': BaseSelectPin,
  },
  mixins: [mixinWindow],
  props: {},
  data() {
    return {
      ledPin: {
        r: null,
        g: null,
        b: null,
      },

      colorVal: '',
    };
  },
  computed: {},
  watch: {},
  created() {
    console.log(`[ ${this.$options.name} created ] id : `, this.id);
  },
  mounted() {},
  methods: {
		handleErr(msg) {
      this.$q.notify({
        type: 'negative',
        message: msg,
      });
    },
	},
};
src\components\window-app-rgb-led-palette\window-app-rgb-led-palette.vue <template lang="pug">
base-window.window-app-rgb-led-palette(
  :pos='pos',
  header-icon-color='blue-grey',
  header-icon='r_palette',
  body-class='c-col h-330px',
  title='RGB LED 調色盤'
)
  .h-full.overflow-hidden
    .setting-form
      .text-14px.mb-14px
        | 設定 RGB LED 腳位
      .led-item
        q-icon(name='r_emoji_objects', color='red-5', size='34px')
        base-select-pin.w-full(
          v-model='ledPin.r',
          color='red-2',
          placeholder='點擊選擇',
          @err='handleErr'
        )

      .led-item
        q-icon(name='r_emoji_objects', color='green-5', size='34px')
        base-select-pin.w-full(
          v-model='ledPin.g',
          color='green-2',
          placeholder='點擊選擇',
          @err='handleErr'
        )

      .led-item
        q-icon(name='r_emoji_objects', color='blue-5', size='34px')
        base-select-pin.w-full(
          v-model='ledPin.b',
          color='blue-2',
          placeholder='點擊選擇',
          @err='handleErr'
        )
src\components\window-app-rgb-led-palette\window-app-rgb-led-palette.vue <style lang="sass">
@import '@/styles/quasar.variables.sass'

.window-app-rgb-led-palette
  width: 300px
  .setting-form
    position: absolute
    padding: 30px
    width: 100%
    height: 100%
    .led-item
      display: flex
      align-items: center
      margin-bottom: 10px
      .q-icon
        margin-right: 14px
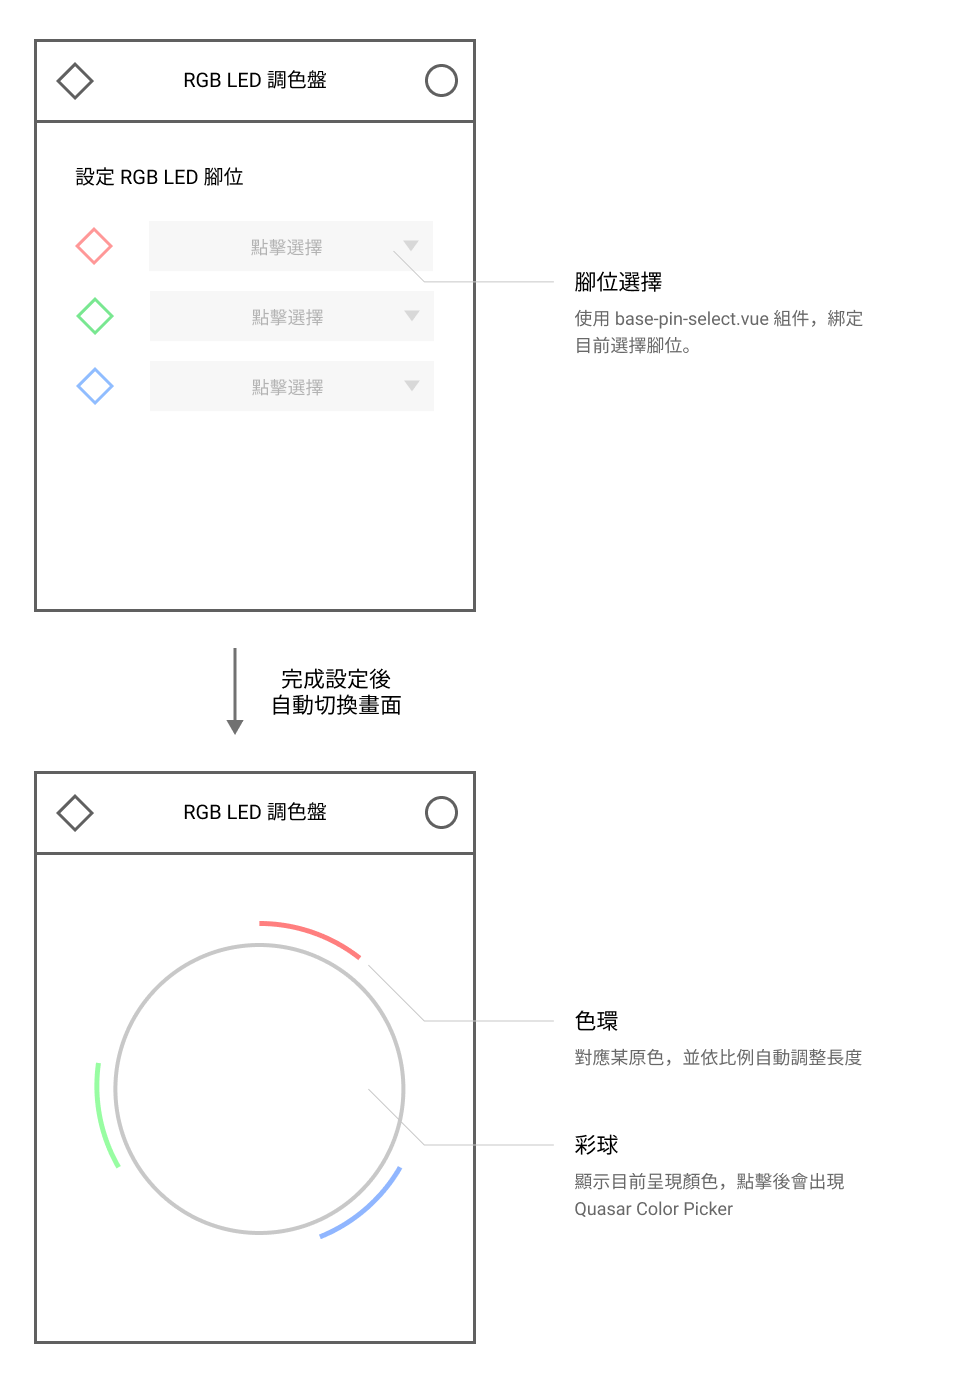
設定欄位外觀完成。
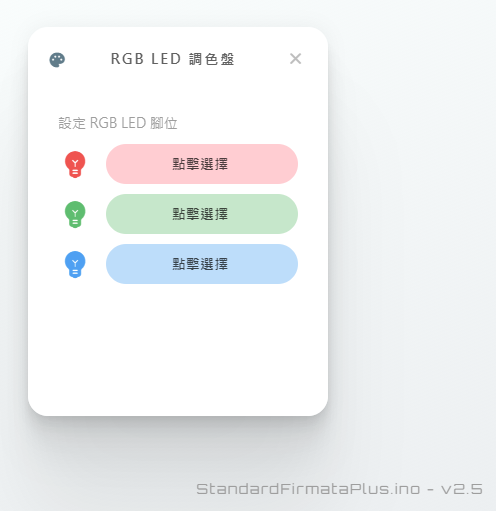
功能需求為:
src\components\window-app-rgb-led-palette\window-app-rgb-led-palette.vue <script>
/**
 * @typedef {import('@/script/modules/port-transceiver').default} PortTransceiver
 *
 * @typedef {import('@/types/type').PinInfo} PinInfo
 * @typedef {import('@/types/type').PinCapability} PinCapability
 */

import { mapState } from 'vuex';

// ...

import { PinMode } from '@/script/utils/firmata.utils';
const { PWM } = PinMode;

export default {
  name: 'WindowAppRgbLedPalette',
	// ...
	watch: {
    'ledPin.r': {
      handler(newVal, oldVal) {
        this.handlePinSelect(newVal, oldVal);
      },
    },
    'ledPin.g': {
      handler(newVal, oldVal) {
        this.handlePinSelect(newVal, oldVal);
      },
    },
    'ledPin.b': {
      handler(newVal, oldVal) {
        this.handlePinSelect(newVal, oldVal);
      },
    },
  },
  // ...
  computed: {
    ...mapState({
      boardPins: (state) => state.board.info.pins,

      /** @type {PortTransceiver} */
      portTransceiver: (state) => state.core.transceiver,
    }),

		/** 支援功能的腳位 */
    supportPins() {
      /** @type {PinInfo[]} */
      const boardPins = this.boardPins;

      return boardPins.filter((pin) =>
        pin.capabilities.some((capability) => PWM === capability.mode)
      );
    },

    /** 判斷所有 Pin 腳是否選擇完成 */
    isSettingOk() {
      return Object.values(this.ledPin).every((pin) => pin);
    },
  },
  // ...
	methods: {
    // ...

    /** 處理腳位選擇事件,回報 Vuex 新增、移除占用腳位
     * @param {PinInfo} newVal
     * @param {PinInfo} oldVal
     */
    handlePinSelect(newVal, oldVal) {
      if (newVal) {
        this.$store.commit('window/addOccupiedPin', {
          id: this.id,
          pin: newVal,
        });
      }

      if (oldVal) {
        this.$store.commit('window/deleteOccupiedPin', {
          id: this.id,
          pin: oldVal,
        });
      }
    },
  },
};
將每個 base-select-pin 傳入 supportPins。
src\components\window-app-rgb-led-palette\window-app-rgb-led-palette.vue <template lang="pug">
base-window.window-app-rgb-led-palette(
  :pos='pos',
  header-icon-color='blue-grey',
  header-icon='r_palette',
  body-class='c-col h-330px',
  title='RGB LED 調色盤'
)
  .h-full.overflow-hidden
    .setting-form
      .text-14px.mb-14px
        | 設定 RGB LED 腳位
      .led-item
        q-icon(name='r_emoji_objects', color='red-5', size='34px')
        base-select-pin.w-full(
          v-model='ledPin.r',
          :pins='supportPins',
          color='red-2',
          placeholder='點擊選擇',
          @err='handleErr'
        )

      .led-item
        q-icon(name='r_emoji_objects', color='green-5', size='34px')
        base-select-pin.w-full(
          v-model='ledPin.g',
          :pins='supportPins',
          color='green-2',
          placeholder='點擊選擇',
          @err='handleErr'
        )

      .led-item
        q-icon(name='r_emoji_objects', color='blue-5', size='34px')
        base-select-pin.w-full(
          v-model='ledPin.b',
          :pins='supportPins',
          color='blue-2',
          placeholder='點擊選擇',
          @err='handleErr'
        )
嘗試看看。

成功!再來就是自動切換畫面的部分,我們使用 transition 達成效果。
src\components\window-app-rgb-led-palette\window-app-rgb-led-palette.vue <template lang="pug">
base-window.window-app-rgb-led-palette(
  :pos='pos',
  header-icon-color='blue-grey',
  header-icon='r_palette',
  body-class='c-col h-330px',
  title='RGB LED 調色盤'
)
  .h-full.overflow-hidden
		// 設定完成後,顯示這一區
    transition(name='switch-right')
      .text-30px.absolute(v-if='isSettingOk') (´,,•ω•,,)

		// 設定完成前,顯示設定欄位
    transition(name='switch-left')
      .setting-form(v-if='!isSettingOk')
        .text-14px.mb-14px
          | 設定 RGB LED 腳位
        .led-item
          q-icon(name='r_emoji_objects', color='red-5', size='34px')
          base-select-pin.w-full(
            v-model='ledPin.r',
            :pins='supportPins',
            color='red-2',
            placeholder='點擊選擇',
            @err='handleErr'
          )

        .led-item
          q-icon(name='r_emoji_objects', color='green-5', size='34px')
          base-select-pin.w-full(
            v-model='ledPin.g',
            :pins='supportPins',
            color='green-2',
            placeholder='點擊選擇',
            @err='handleErr'
          )

        .led-item
          q-icon(name='r_emoji_objects', color='blue-5', size='34px')
          base-select-pin.w-full(
            v-model='ledPin.b',
            :pins='supportPins',
            color='blue-2',
            placeholder='點擊選擇',
            @err='handleErr'
          )
定義過場動畫。
src\components\window-app-rgb-led-palette\window-app-rgb-led-palette.vue <style lang="sass">
@import '@/styles/quasar.variables.sass'

.window-app-rgb-led-palette
  width: 300px
  // ...

  .switch-left-enter-active, .switch-left-leave-active
    transition-timing-function: cubic-bezier(0.945, -0.290, 0.165, 1.360)
    transition-duration: 0.8s
    pointer-events: none
  .switch-left-enter, .switch-left-leave-to
    transform: translateX(100%) !important
    opacity: 0 !important

  .switch-right-enter-active, .switch-right-leave-active
    transition-timing-function: cubic-bezier(0.945, -0.290, 0.165, 1.360)
    transition-duration: 0.8s
    pointer-events: none
  .switch-right-enter, .switch-right-leave-to
    transform: translateX(-100%) !important
    opacity: 0 !important
實測效果。

成功切換畫面了!✧*。٩(ˊᗜˋ*)و✧*。
下一章節進入實作彩球的部分!
以上程式碼已同步至 GitLab,大家可以前往下載:

