人生苦短 我用 Python
顧名思義,就是將程式中的數據,持久的保存到電腦設備中。
記事本保存文字或 Excel 保存表格,都是一種持久化的實現。

不過,在程式設計的領域,主要會透過 SQL 結構化查詢語言,
來對資料庫進行儲存、操作與檢索的動作。

Python 常見的網路爬蟲、數據分析或網站開發,基本上都會有大量的數據產生。
要如何妥善的保存這些資料?
這會是程式開發者,一個非常重要的課題 !
如果你剛學習完 Python 程式語言,還不知道要精進哪一方面的技能,
先來了解 Python 的 SQL 操作,會是一個好的選擇 !
https://gitlab.com/GammaRayStudio/DevelopmentGroup/Python/PythonSQL
資料庫工具: DB Browser for SQLite
創建空白檔案,副檔名為 .db 或 .sqlite
然後拖曳到 DB Browser for SQLite 裡面,就可以將這個檔案 作為 sqlite 的資料庫。
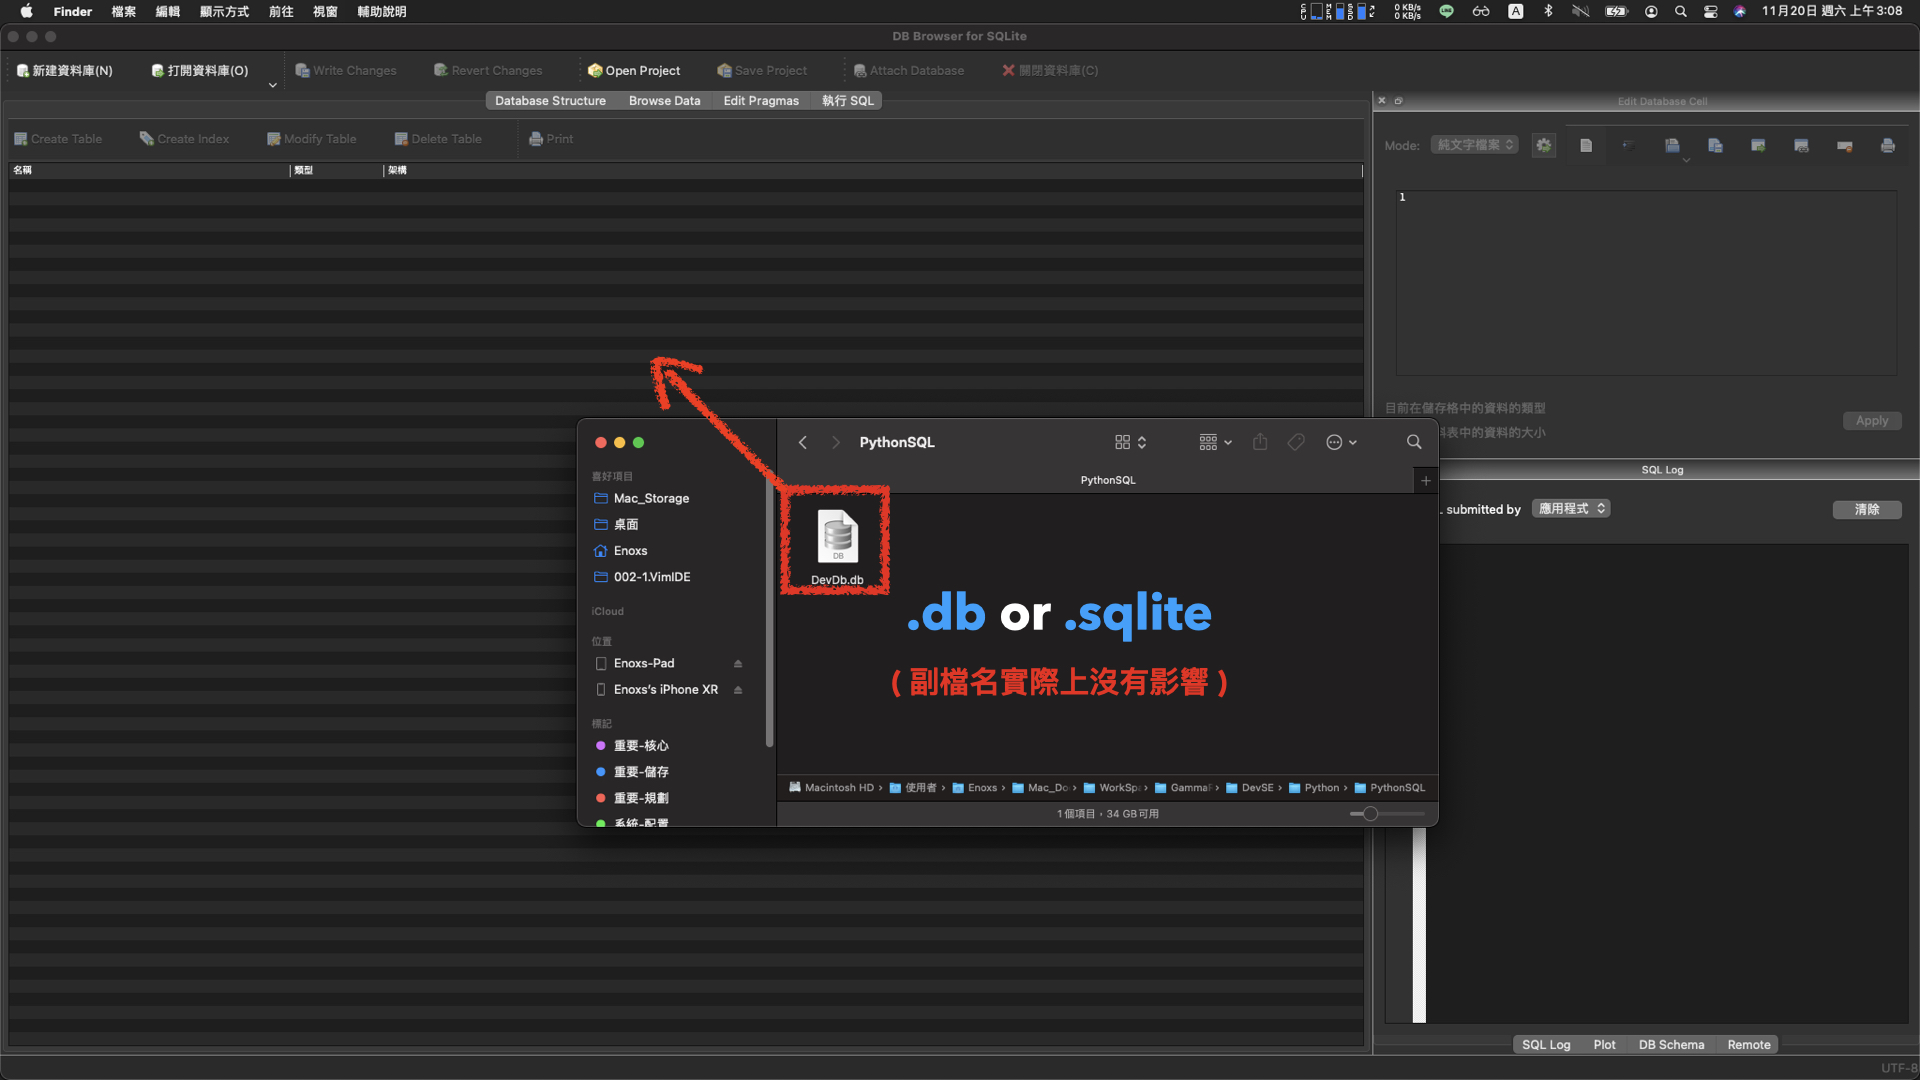
創建資料表

新增資料
有了表格與資料後,接下來就可以使用 SQL 語法進行測試。
測試的操作如下:

查詢 SQL 語法
SELECT * FROM data_table;
語法結構:
測試 SQL:
SELECT * FROM app_info WHERE id = 1;
新增
INSERT INTO data_table (name, version, remark)
VALUES('App', '1.0.1', 'App-v1');
語法結構:
測試 SQL:
INSERT INTO app_info (name, version, author, date, remark)
VALUES ('App', 'v1.0.1', 'DevAuth', '2021-11-20', 'App-v1.0.1');
修改
UPDATE data_table
SET name='AppNew', version='1.0.2'
WHERE id=1;
語法結構: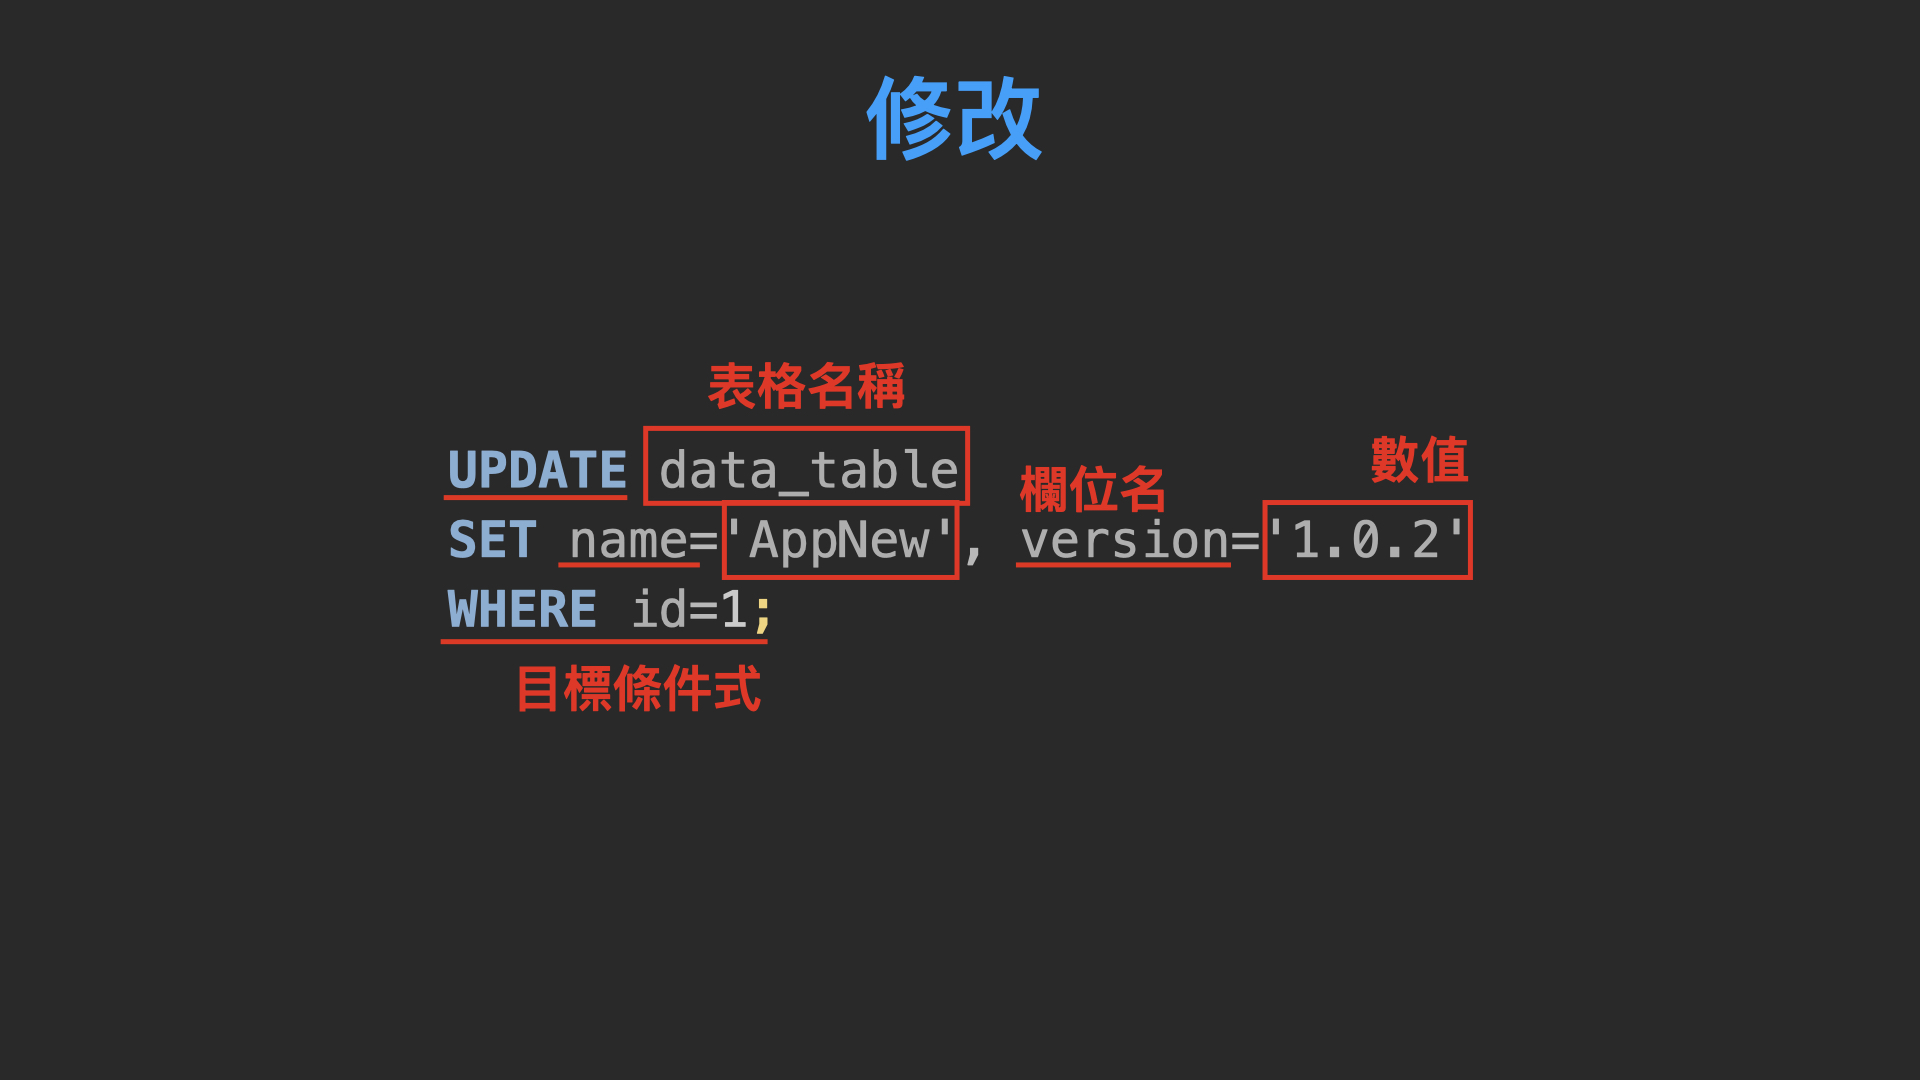
測試 SQL:
UPDATE app_info
SET name='AppNew', version='1.0.2', remark='AppNew-v1.0.2'
WHERE id=1;
刪除
DELETE FROM data_table WHERE id=1;
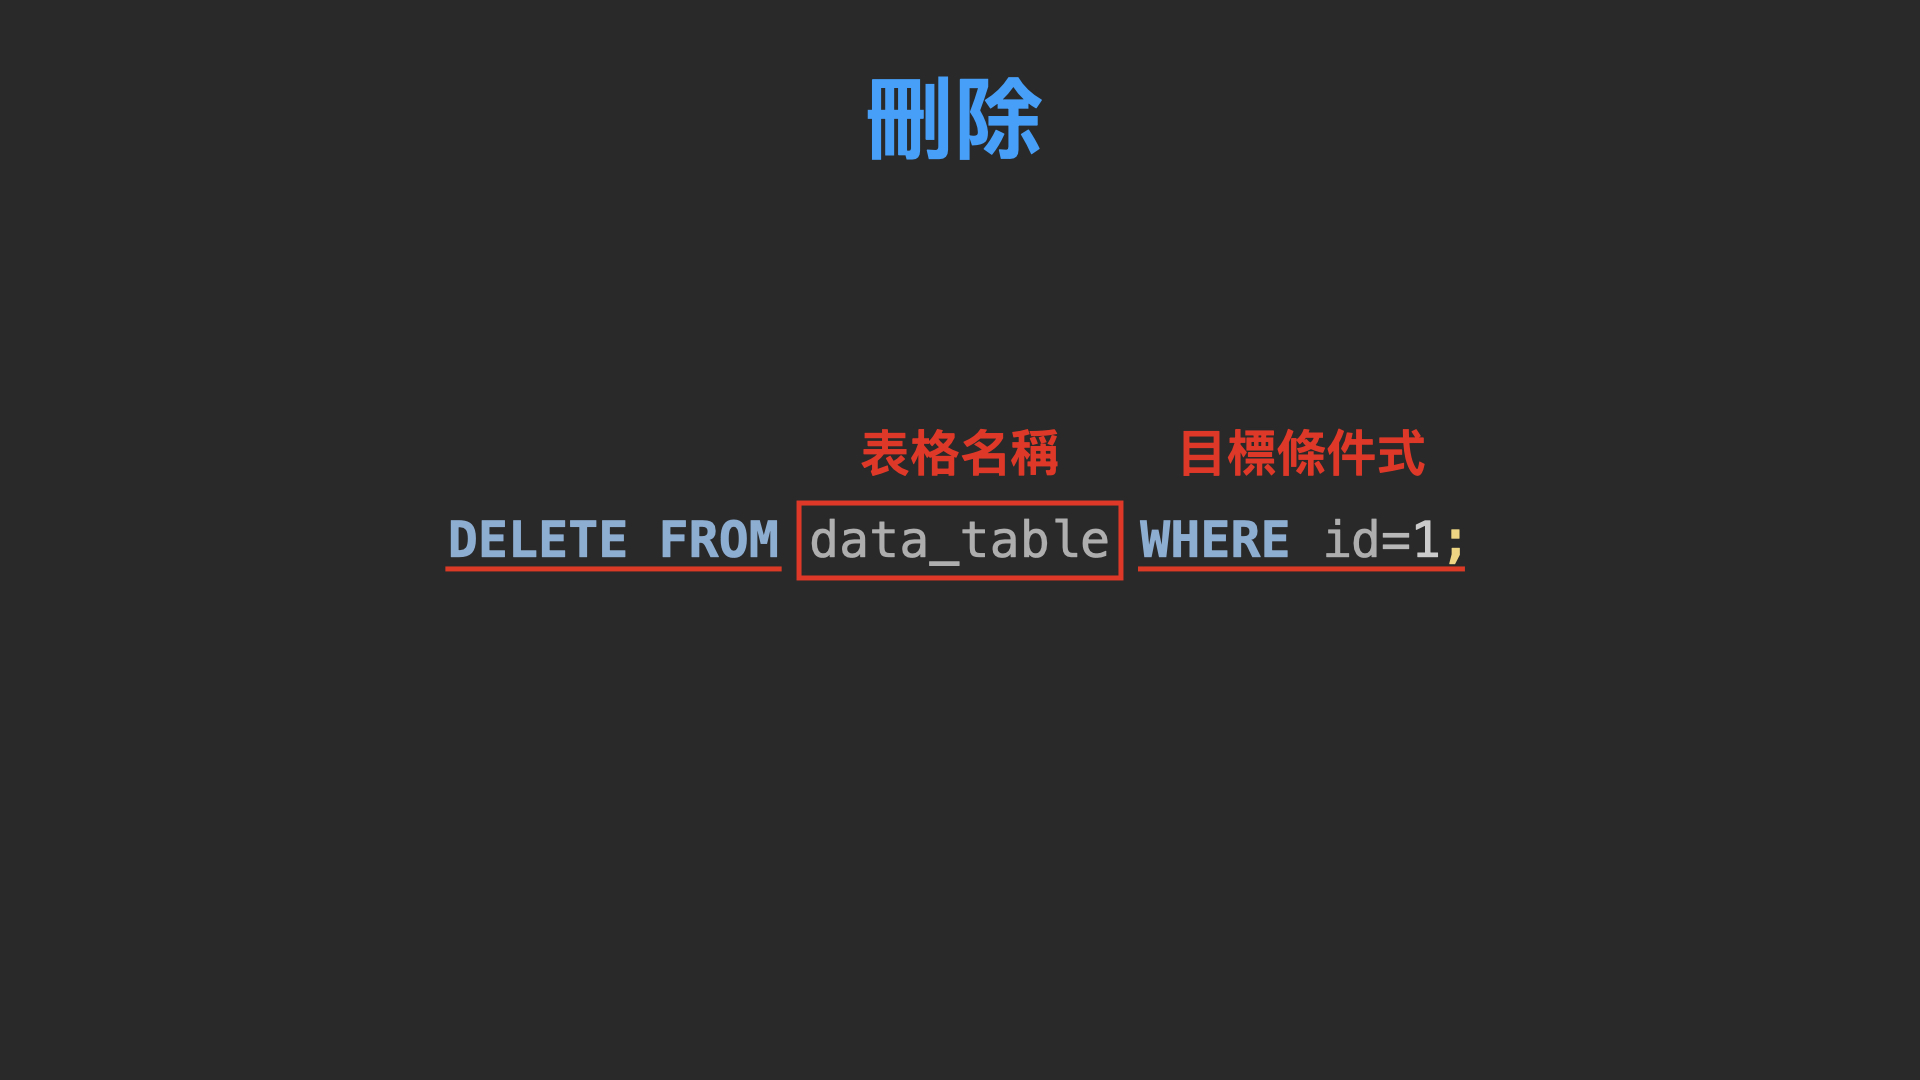
測試 SQL:
DELETE FROM app_info WHERE id=2;
sqlite3 模組是 Python 標準庫裡面的內容,不用 pip 安裝套件,可以直接導入!
sqlite-conn.py
SQLite 資料庫連線 與 執行查詢的SQL 語法
import sqlite3 #導入模組

conn = sqlite3.connect('DevDb.db') #建立連線

cursor = conn.cursor() #取得游標物件
cursor.execute('SELECT * FROM `app_info`;') #執行 SQL 語法

records = cursor.fetchall() #取得回傳資料
print(records)
print("record type => ", type(records)) #回傳資料型態
print("record[0] type => ", type(records[0])) #回傳資料內部的元素型態

for r in records: # list 型態,可回圈迭代
    print(r)

print("\n---\n")

for r in records:
    app_id, app_name, app_ver, app_author, app_date, app_remark = r # tuple 元素拆解
    print("id => ", app_id)
    print("name => ", app_name)
    print("\n---\n")

cursor.close() # 釋放資源
conn.close()
Output:
[(1, 'PythonSQL', '1.0.1', 'DevAuth', '2021-11-20', 'PythonSQL-v1.0.1')]
record type =>  <class 'list'>
record[0] type =>  <class 'tuple'>
(1, 'PythonSQL', '1.0.1', 'DevAuth', '2021-11-20', 'PythonSQL-v1.0.1')

---

id =>  1
name =>  PythonSQL

---
sqlite-ctrl.py
用 While 迴圈與 input 方法,實作依據動作代碼,執行相應操作的互動程式
import sqlite3

conn = sqlite3.connect('DevDb.db')

cursor = conn.cursor()

appDesc = """
Please input action code :

1 - Insert Data
2 - Update Data
3 - Delete Date
--- --- ---
0 - exit

"""

isRun = True
while isRun:
    cursor.execute('SELECT * FROM `app_info`;')
    records = cursor.fetchall()

    for r in records:
        print(r)

    ctrl = input(appDesc)
    if ctrl == "0": # 結束程式
        isRun = False
    elif ctrl == "1": # 執行插入的 SQL 語法
        sql = """
        INSERT INTO app_info (name, version, author, date, remark)
        VALUES ('App', 'v1.0.1', 'DevAuth', '2021-11-20', 'App-v1.0.1');
        """
        cursor.execute(sql)
        conn.commit() # 新增的語法必須要再加上提交的操作
    elif ctrl == "2": # 執行更新的 SQL 語法
        row_id = input("row_id = ? ") # input 方法,動態決定目標 id
        sql = """
        update app_info
        set name = 'AppNew' , version='1.0.2' , remark = 'App-v1.0.2'
        WHERE id={};
        """.format(row_id)
        cursor.execute(sql)
        conn.commit()# 更新的語法必須要再加上提交的操作
    elif ctrl == "3": # 執行刪除的 SQL 語法
        row_id = input("row_id = ? ") # input 方法,動態決定目標 id
        sql = """
        delete from app_info
        where id={};
        """.format(row_id)
        cursor.execute(sql)
        conn.commit()# 刪除的語法必須要再加上提交的操作

cursor.close()
conn.close()
新增操作(動作代碼1):
(1, 'PythonSQL', '1.0.1', 'DevAuth', '2021-11-20', 'PythonSQL-v1.0.1')

Please input action code :

1 - Insert Data
2 - Update Data
3 - Delete Date
--- --- ---
0 - exit

1
(1, 'PythonSQL', '1.0.1', 'DevAuth', '2021-11-20', 'PythonSQL-v1.0.1')
(2, 'App', 'v1.0.1', 'DevAuth', '2021-11-20', 'App-v1.0.1')

Please input action code :

1 - Insert Data
2 - Update Data
3 - Delete Date
--- --- ---
0 - exit

1
(1, 'PythonSQL', '1.0.1', 'DevAuth', '2021-11-20', 'PythonSQL-v1.0.1')
(2, 'App', 'v1.0.1', 'DevAuth', '2021-11-20', 'App-v1.0.1')
(3, 'App', 'v1.0.1', 'DevAuth', '2021-11-20', 'App-v1.0.1')
修改操作(動作代碼2):
Please input action code :

1 - Insert Data
2 - Update Data
3 - Delete Date
--- --- ---
0 - exit

2
row_id = ? 2
(1, 'PythonSQL', '1.0.1', 'DevAuth', '2021-11-20', 'PythonSQL-v1.0.1')
(2, 'AppNew', 'v1.0.2', 'DevAuth', '2021-11-20', 'App-v1.0.2')
(3, 'App', 'v1.0.1', 'DevAuth', '2021-11-20', 'App-v1.0.1')
刪除操作(動作代碼3):
Please input action code :

1 - Insert Data
2 - Update Data
3 - Delete Date
--- --- ---
0 - exit

3
row_id = ? 3
(1, 'PythonSQL', '1.0.1', 'DevAuth', '2021-11-20', 'PythonSQL-v1.0.1')
(2, 'AppNew', 'v1.0.2', 'DevAuth', '2021-11-20', 'App-v1.0.2')
主流 MySQL 模組有三種:
(其中 mysqldb 只支援 python 2,python 3 的 改名叫 mysqlclient,這邊沒有額外的去測試。)
PyPI 安裝套件
SQLite3 vs PyMySQL

PyMySQL vs mysql-connector-python
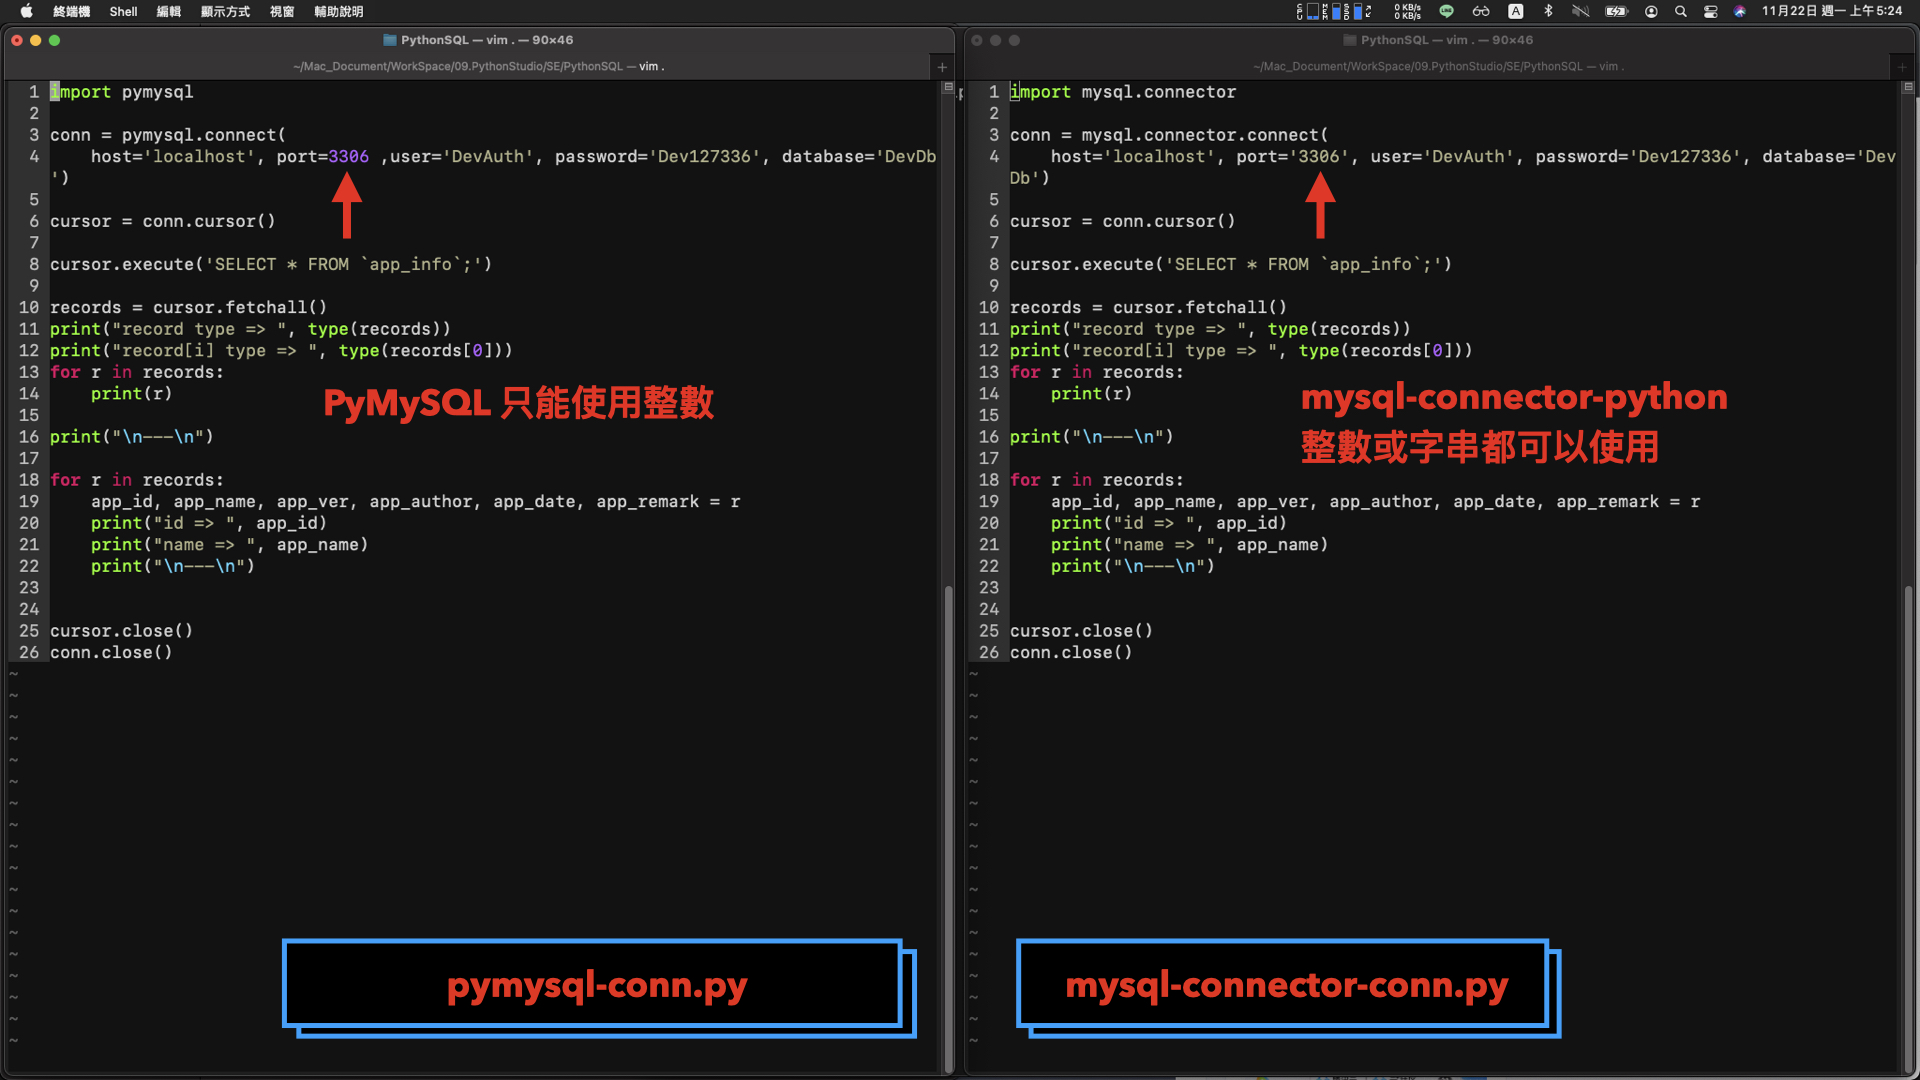
pymysql-conn.py
import pymysql # 導入 pymysql 參數

conn = pymysql.connect( # 填入 MySQL 資料庫,連線需要的參數
    host='localhost', port=3306, user='DevAuth', password='Dev127336', database='DevDb')

cursor = conn.cursor()

cursor.execute('SELECT * FROM `app_info`;')

records = cursor.fetchall()
print("record type => ", type(records))
print("record[i] type => ", type(records[0]))
for r in records:
    print(r)

print("\n---\n")

for r in records:
    app_id, app_name, app_ver, app_author, app_date, app_remark = r
    print("id => ", app_id)
    print("name => ", app_name)
    print("\n---\n")


cursor.close()
conn.close()
pymysql-ctrl.py
import sqlite3

conn = sqlite3.connect('DevDb.db')

cursor = conn.cursor()

appDesc = """
Please input action code :

1 - Insert Data
2 - Update Data
3 - Delete Date
--- --- ---
0 - exit

"""

isRun = True
while isRun:
    cursor.execute('SELECT * FROM `app_info`;')
    records = cursor.fetchall()

    for r in records:
        print(r)

    ctrl = input(appDesc)
    if ctrl == "0":
        isRun = False
    elif ctrl == "1":
        sql = """
        INSERT INTO app_info (name, version, author, date, remark)
        VALUES ('App', 'v1.0.1', 'DevAuth', '2021-11-20', 'App-v1.0.1');
        """
        cursor.execute(sql)
        conn.commit()
    elif ctrl == "2":
        row_id = input("row_id = ? ")
        sql = """
        update app_info
        set name = 'AppNew' , version='1.0.2' , remark = 'App-v1.0.2'
        WHERE id={};
        """.format(row_id)
        cursor.execute(sql)
        conn.commit()
    elif ctrl == "3":
        row_id = input("row_id = ? ")
        sql = """
        delete from app_info
        where id={};
        """.format(row_id)
        cursor.execute(sql)
        conn.commit()

cursor.close()
conn.close()
兩個範例執行的結果,跟 SQLite 的範例一模一樣
若還未安裝過 MySQL 資料庫,可參考「Docker 攻略 : MySQL 安裝篇」
Python 的 ORM 框架
Object Relational Mapping
意思是將程式中的物件,對應到資料庫中的表格:
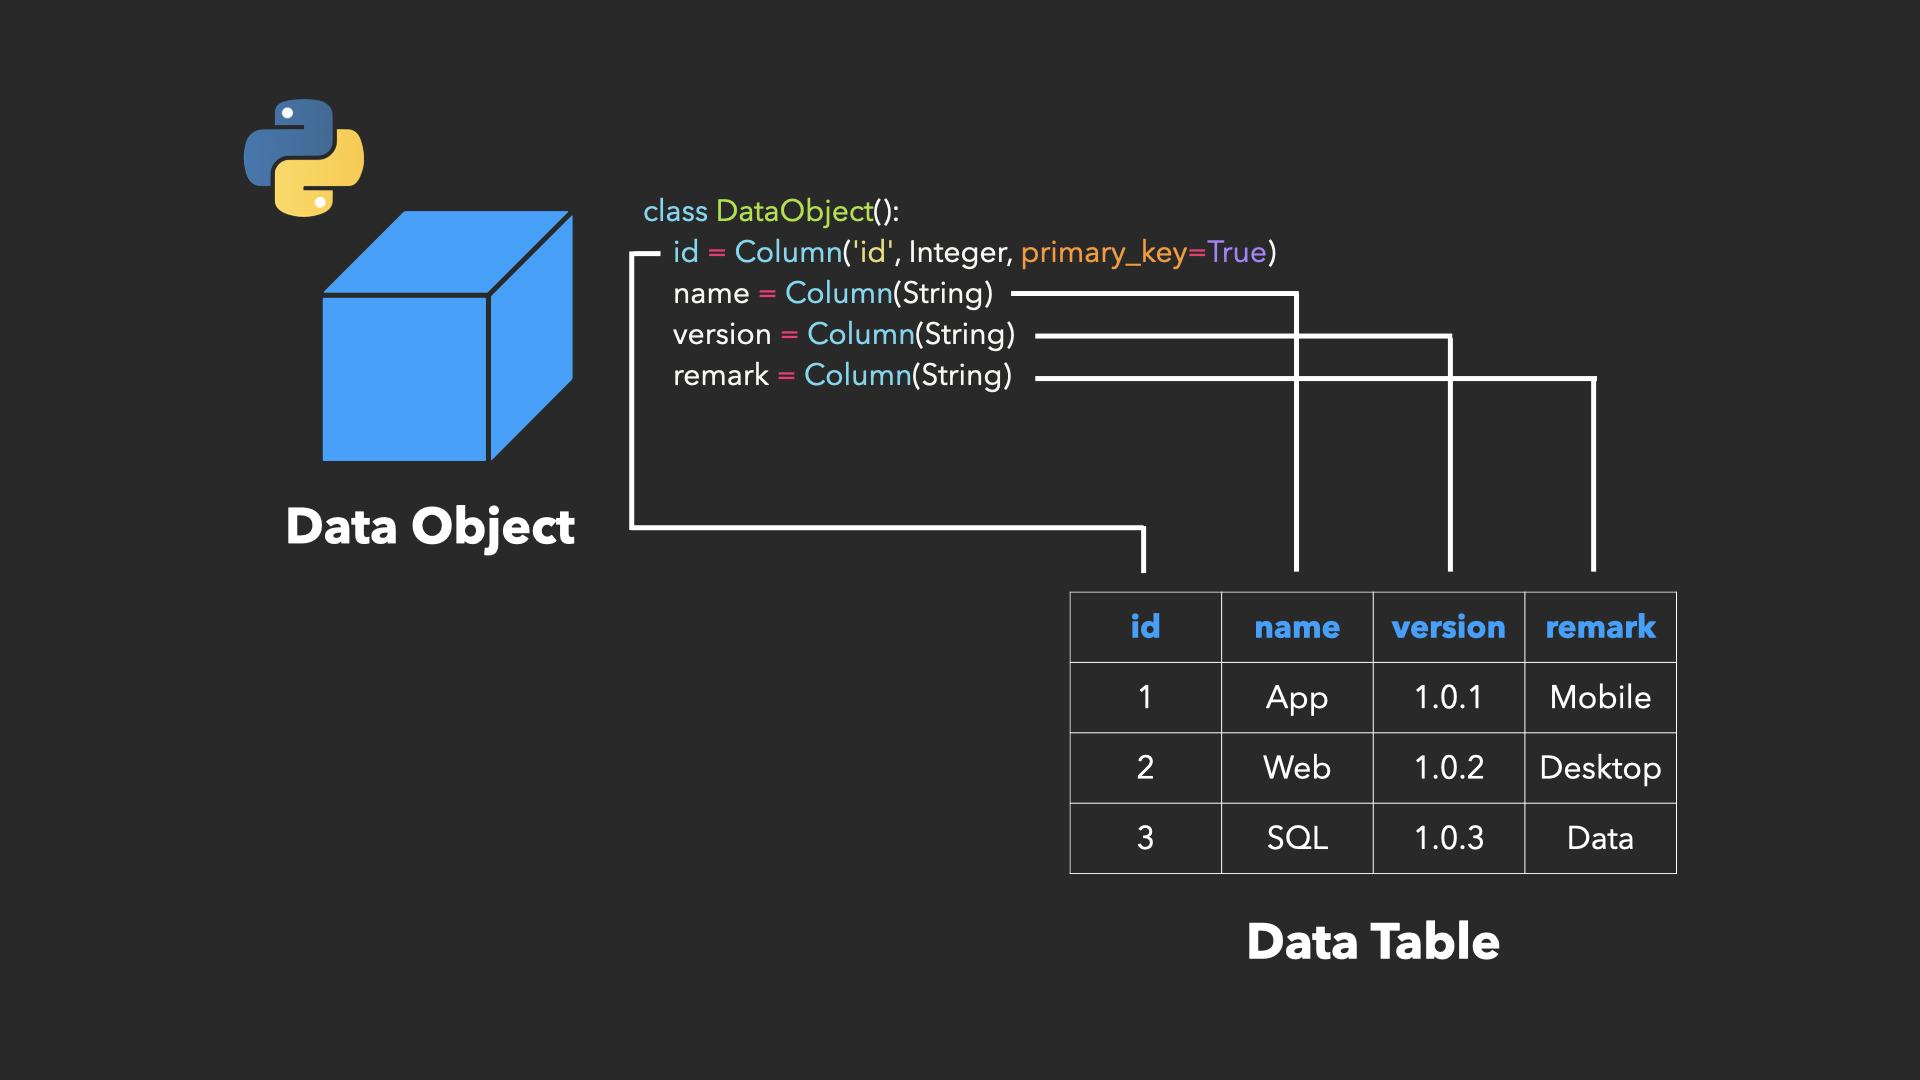
也就是說,在 Python 程式中,操作物件的增、刪、改、查,就等於操作資料表的增、刪、改、查。

sql-alchemy-ddl.py
使用程式物件的方式,創建資料表
from sqlalchemy import *

engine = create_engine('sqlite:///DevDb.db', echo=True) # 建立連線

db = MetaData() # 取得類似於 Cursor 的物件

demo_table = Table( # 代表資料表數據的物件
    'demo_table', db,
    Column('id', Integer, primary_key=True),
    Column('name', String),
    Column('data', String),
)

db.create_all(engine) # 創建資料表
sql-alchemy-conn.py
結構相似於之前的 sqlite-conn.py 範例
from sqlalchemy import *

engine = create_engine('sqlite:///DevDb.db', echo=False)

conn = engine.connect()
db = MetaData()

demo_table = Table(
    'demo_table', db,
    Column('id', Integer, primary_key=True),
    Column('name', String),
    Column('data', String),
)

sql = demo_table.select() # 使用 select 函式

print("sql => ", str(sql), '\n') # 完整 SQL 語句

result = conn.execute(sql) # 執行 SQL 方法

print("result type => ", type(result), '\n') # <class 'sqlalchemy.engine.cursor.LegacyCursorResult'>

for row in result: # 具有 list 型態特性,可回圈迭代
    print(type(row)) # <class 'sqlalchemy.engine.row.LegacyRow'>
    demo_id, demo_name, demo_data = row # 具有 tuple 元素特性,可拆分為參數
    print("id => ", demo_id)
    print("name => ", demo_name)
延伸用法: Where 子句
print("sql: select * from demo_table where id = 1 => \n")
sql = demo_table.select().where(demo_table.c.id == 1) # select 包含 where 子句的用法
result = conn.execute(sql)
for row in result:
    demo_id, demo_name, demo_data = row
    print("id => ", demo_id)
    print("name => ", demo_name)

print("\n---\n")
print("sql_text: select * from demo_table where id = 1 => \n")
sql_text = text( # text() 函式
    "select * from demo_table where id = :app_id") # sql 語法 + 參數

result = conn.execute(sql_text, app_id='1').fetchall() # where 子句,欄位 id 的數值
print(result)
sql-alchemy-ctrl.py
結構相似於之前的 sqlite-ctrl.py 範例
from sqlalchemy import *

engine = create_engine('sqlite:///DevDb.db', echo=False)

conn = engine.connect()
db = MetaData()

demo_table = Table(
    'demo_table', db,
    Column('id', Integer, primary_key=True),
    Column('name', String),
    Column('data', String),
)


appDesc = """
Please input action code :

1 - Insert Data
2 - Update Data
3 - Delect Date
--- --- ---
0 - exit

"""
isRun = True

while(isRun):
    sql = demo_table.select()
    result = conn.execute(sql)

    for row in result:
        print(row)

    ctrl = input(appDesc)
    if ctrl == "0":
        isRun = False
    elif ctrl == "1":
        sql = demo_table.insert().values(name='App', data="text") # 插入操作 :  insert() + values()
        conn.execute(sql)
    elif ctrl == "2":
        row_id = input("row_id = ? ")
        sql = demo_table.update().values( # 更新操作 : update() + values() + where()
            name='AppNew', data="new text").where(demo_table.c.id == row_id)
        conn.execute(sql)
    elif ctrl == "3":
        row_id = input("row_id = ?")
        sql = demo_table.delete().where(demo_table.c.id == row_id) # 刪除操作 : delete() + where()
        conn.execute(sql)
使用真正的資料物件,相似於 sqlite-conn.py 範例
sql-alchemy-orm-object.py
from sqlalchemy.orm import sessionmaker
from sqlalchemy.ext.declarative import declarative_base
from sqlalchemy import Column, Integer, String
from sqlalchemy import create_engine

engine = create_engine('sqlite:///DevDb.db', echo=False) # 連線
Base = declarative_base() # 取得類似於 Cursor 的物件


class AppInfo(Base): # class 宣告 AppInfo 類別
    __tablename__ = 'app_info' # 表格名稱
    id = Column('id', Integer, primary_key=True) # id 欄位 , Integer 型態 , 主鍵
    name = Column(String) # name 欄位 , String 型態
    version = Column(String) # versione 欄位 , String 型態
    author = Column(String) # author 欄位 , String 型態
    date = Column(Integer) # date 欄位 , String 型態
    remark = Column(String) # remark 欄位 , String 型態


Session = sessionmaker(bind=engine)
session = Session() # 取得 Session 物件
result = session.query(AppInfo).all() # 執行查詢方法

for row in result:
    print(type(row)) # <class '__main__.AppInfo'>
    print("id => ", row.id)
    print("name => ", row.name)
sql-alchemy-orm-mysql.py
使用真正的資料物件,相似於 sqlite-ctrl.py 範例
from sqlalchemy.orm import sessionmaker
from sqlalchemy.ext.declarative import declarative_base
from sqlalchemy import Column, Integer, String
from sqlalchemy import create_engine
from datetime import datetime

engine = create_engine( # 改成 mysql 的連線方式
    'mysql+pymysql://DevAuth:Dev127336@127.0.0.1:3306/DevDb', echo=False)
Base = declarative_base()


class AppInfo(Base):
    __tablename__ = 'app_info'
    id = Column('id', Integer, primary_key=True)
    name = Column(String)
    version = Column(String)
    author = Column(String)
    date = Column(Integer)
    remark = Column(String)

    def __init__(self, name, version, author, date, remark):
        self.name = name
        self.version = version
        self.author = author
        self.date = date
        self.remark = remark

    def __str__(self):
        return """
        app_id => {},
        app_name => {},
        app_version => {},
        app_author => {},
        app_date => {},
        app_remark => {}
        """.format(self.id, self.name, self.version, self.author, self.date, self.remark)


Session = sessionmaker(bind=engine)
session = Session()

appDesc = """
Please input action code :

1 - Insert Data
2 - Update Data
3 - Delect Date
--- --- ---
0 - exit

"""
isRun = True

while(isRun):
    result = session.query(AppInfo).all()
    for row in result:
        print(row)

    ctrl = input(appDesc)
    if ctrl == "0":
        isRun = False
    elif ctrl == "1":
        appInfo = AppInfo('App', '1.0.1', 'DevAuth', # 宣告 AppInfo 物件
                          datetime(2021, 11, 8, 12, 30, 10), 'App-v1.0.1')
        session.add(appInfo) # add() 方法,參數帶入目標物件
        session.commit() # 新增的操作必須要加上提交的方法
    elif ctrl == "2":
        row_id = input("id = ? ")
        appInfo = session.query(AppInfo).filter_by(id=row_id).first() # 先查詢出目標物件
        appInfo.name = "AppNew" # 直接修改物件的參數
        appInfo.version = "1.0.2"
        appInfo.remark = "App-v1.0.2"
        session.commit() # 更新的操作必須要加上提交的方法
    elif ctrl == "3":
        row_id = input("id = ? ")
        appInfo = session.query(AppInfo).filter_by(id=row_id).first() # 先查詢出目標物件
        session.delete(appInfo) # delete 方法,參數帶入目標物件
        session.commit() # 刪除的操作必須要加上提交的方法
(操作更精準)
這一次的 Python SQL 的教程,實際上是要用來補充之前 Python Flask 框架,後端 持久化的部分。
(一不小心,擴充成現在的內容)
程式碼的部分有更新在 「Python Flask : 入門指南」的範例程式中 :
要先 PyPI 安裝 Flask_SQLAlchemy 套件
接著執行 DbDao.py 範例
python DbDao.py
啟動程式後,訪問網站
http://localhost:5000

程式碼的部分,如果有看過 Flask 入門指南,
以及剛才的 SQL-Alchemy 章節,應該可以很容易的理解。
https://gitlab.com/GammaRayStudio/DevelopmentGroup/Python/PythonSQL
https://gitlab.com/GammaRayStudio/DevelopmentGroup/Python/FlaskSE
https://pypi.org/project/PyMySQL/
https://pypi.org/project/mysql-connector-python/
https://pypi.org/project/SQLAlchemy/
https://pypi.org/project/Flask-SQLAlchemy/
https://cloud.tencent.com/developer/article/1399154
 Enoxs
Enoxs

 iThome鐵人賽