Leaflet 是一個開源的函式庫,能夠實現基本的地圖操作,建立圖層、標記、彈出窗口、縮放等操作。
以下3種方式引入建立地圖前需要的 CSS 和 JS 資料。
 <link rel="stylesheet" href="https://unpkg.com/leaflet@1.8.0/dist/leaflet.css" integrity="sha512-hoalWLoI8r4UszCkZ5kL8vayOGVae1oxXe/2A4AO6J9+580uKHDO3JdHb7NzwwzK5xr/Fs0W40kiNHxM9vyTtQ==" crossorigin="" />

<script src="https://unpkg.com/leaflet@1.8.0/dist/leaflet.js" integrity="sha512-BB3hKbKWOc9Ez/TAwyWxNXeoV9c1v6FIeYiBieIWkpLjauysF18NzgR1MBNBXf8/KABdlkX68nAhlwcDFLGPCQ==" crossorigin="">
</script>
直接下載再引入檔案
官網載點: https://leafletjs.com/download.html

下載後解壓縮將檔案引入
<link rel="stylesheet" href="/path/to/leaflet.css" />
<script src="/path/to/leaflet.js"></script>
下載至 package.json
在專案終端機執行 npm install leaflet
這時候看 package.json 的 dependencies 就能看到目前安裝的版本
"dependencies": {
    "leaflet": "^1.8.0",
},
因為我是用 npm install 的方式所以使用 import 將 leaflet 引入
<script setup>
import L from "leaflet";
import "leaflet/dist/leaflet.css";
</script>
產生地圖物件:
建立地圖區塊,用 ref 獲取節點
<template>
  <div class="mapContainer" ref="mapContainer"></div>
</template>
<script setup>
import L from "leaflet";
import "leaflet/dist/leaflet.css";
import { ref } from "vue";

const mapContainer = ref(null);
</script>
在 Vue onMounted 階段建立地圖物件
onMounted(() => {
  const map = L.map(mapContainer.value, {
    center: [23.611, 120.768],
    zoom: 8,
  });
});
L.map(<String> id | <HTMLElement> el , options)
L.map 第1個參數能接收 ID 選取器或 DOM , 第2個參數 options 用物件設定需要的屬性,以上面為例
{
    L.map(mapContainer.value, {
    center: [23.611, 120.768],
    zoom: 8,
  })
}
第二個參數 options:
center : 設定地圖經緯度
zoom : 設定地圖縮放層級
這裡我使用官方範例 openstreetmap 建立圖資
openstreetmap 網址: https://www.openstreetmap.org/#map=11/23.6502/121.0226
L.tilelayer(<String> urlTemplate, <TileLayer options> options?)
L.tileLayer("https://{s}.tile.openstreetmap.org/{z}/{x}/{y}.png", {
attribution: '© <a href="https://www.openstreetmap.org/copyright">OpenStreetMap</a> contributors',
}).addTo(map);
設定圖資後使用 addTo() 進入map 物件
urlTemplate : 圖資請求設定 https://{s}.tile.openstreetmap.org/{z}/{x}/{y}.png
底下圖磚為例
https://c.tile.openstreetmap.org/8/213/110.png
attribution: 圖資版權設定
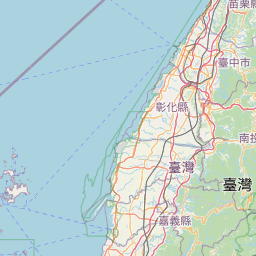
地圖建立完成:
完整程式碼
<template>
  <div class="mapContainer" ref="mapContainer"></div>
</template>
<script setup>
import L from "leaflet";
import "leaflet/dist/leaflet.css";
import { onMounted, ref } from "vue";
const mapContainer = ref(null);
onMounted(() => {
const map = L.map(mapContainer.value, {
center: [23.611, 120.768],
zoom: 8,
});
L.tileLayer("https://{s}.tile.openstreetmap.org/{z}/{x}/{y}.png", {
attribution: '© <a href="https://www.openstreetmap.org/copyright">OpenStreetMap</a> contributors',
}).addTo(map);
});
</script>

