表單是 Angular 應用程式常見實作的功能,除了提供使用者輸入對應的資料欄位,也會針對這些欄位進行資料驗證,這一篇就來針對表單元件撰寫單元測試程式。
這一篇會撰寫 ShoppingCartFormComponent 元件的單元測試程式。這個元件是一個實作了 ControlValueAccessor 的表單元件,用以讓使用者輸入購物車裡各項目的購買數量。
@Component({
  selector: 'app-shopping-cart-form',
  templateUrl: './shopping-cart-form.component.html',
  styleUrls: ['./shopping-cart-form.component.css'],
  providers: [
    {
      provide: NG_VALUE_ACCESSOR,
      useExisting: forwardRef(() => ShoppingCartFormComponent),
      multi: true,
    },
    {
      provide: NG_VALIDATORS,
      useExisting: forwardRef(() => ShoppingCartFormComponent),
      multi: true,
    },
  ],
})
export class ShoppingCartFormComponent
  implements OnInit, ControlValueAccessor, Validator, OnDestroy
{
  ...
}
因為 ShppingCartFormComponent 是一個表單元件,所以除了測試元件本身的職責外,還會去測試在使用此元件的時候,資料與介面的綁定是否正確 (我常常忘記寫元件的 providers 設定)。因此在測試程式上,會如同下面程式包含了兩大部份:
describe('ShoppingCartFormComponent', () => {
  beforeEach(async () => {
    await TestBed.configureTestingModule({
      imports: [
        NoopAnimationsModule,
        ReactiveFormsModule,
        MatFormFieldModule,
        MatInputModule,
        MatIconModule,
      ],
      declarations: [ShoppingCartFormComponent, TestComponent],
    }).compileComponents();
  });

  describe('購物車項目元件', () => {});

  describe('購物車項目表單元件', () => {});
});
一開始來針對 ShoppingCartFormComponent 中數量欄位的驗證訊息:當數量為 0 時,會出現「數量最小為 1 」的錯誤訊息。
<mat-form-field>
  <input
    type="number"
    min="1"
    matInput
    placeholder="數量"
    formControlName="count"
    required
  />
  <mat-error *ngIf="count.hasError('required')">請輸入數量</mat-error>
  <mat-error *ngIf="count.hasError('min')">
    數量最小為 {{ count.getError("min").min }}
  </mat-error>
</mat-form-field>
如上面程式,因為在 Angular Material 中,會把 <input> 輸入項放在 <mat-form-field> 內,所以測試上有時會先取得 MatFormField 的 DebugElement 物件,再從此物件取得 HTMLInputElement 元素與 MatError 元素:
it('當輸入數量為 0, 應顯示錯誤訊訊為 "數量最小為 1"', async () => {
  // Arrange
  const formFieldElement = fixture.debugElement.query(
    By.directive(MatFormField)
  );
  const inputElement: HTMLInputElement = formFieldElement.query(
    By.css('input')
  ).nativeElement;

  // Act
  inputElement.value = '0';
  inputElement.dispatchEvent(new Event('input'));
  inputElement.dispatchEvent(new Event('blur'));
  fixture.detectChanges();

  // Assert
  const errorElement = formFieldElement.query(By.directive(MatError));
  expect(errorElement.nativeElement.textContent.trim()).toBe(
    '數量最小為 1'
  );
});
接著在設定 input 元素值之後,除了要觸發 input 事件外,因為 Angular Material 預設的錯誤訊息需要表單的狀況為 dirty 時才會顯示,所以還需要觸發 blur 事件。最後,在觸發 Angular 變更檢測後,就可以去檢查錯誤訊息的正確性。
在表單元件的測試部份,一開始要先建立一個測試元件做為測試目標,來驗證使用者輸入表單後,此測試元件是否可正確的運作。
@Component({
  template: `<app-shopping-cart-form [formControl]="formControl"></app-shopping-cart-form>`,
})
class TestComponent {
  @ViewChild(ShoppingCartFormComponent) itemForm!: ShoppingCartFormComponent;
  formControl = new FormControl();
}

describe('購物車項目表單元件', () => {
  let component: TestComponent;
  let fixture: ComponentFixture<TestComponent>;

  beforeEach(() => {
    fixture = TestBed.createComponent(TestComponent);
    component = fixture.componentInstance;
  });
});
首個測試情境是當 TestComponent 的表單被設定時,其內使用的 ShoppingCartFormComponent 元件所記錄的表單是否也被設定。此情境用來檢查 model 變更時是否可以正確改變頁面 (view) 的顯示。
it('當指定表單值, 驗證其元件內表單值正確性 (model -> view)', () => {
  // Arrange
  const item = new ShoppingCartItem({
    id: 1,
    productId: 1,
    product: new Product({ id: 1, name: '產品 A', price: 999 }),
    count: 1,
  });

  // Act
  component.formControl.patchValue(item);
  fixture.detectChanges();

  // Assert
  expect(component.itemForm.formData).toEqual(
    new ShoppingCartItem({
      id: 1,
      productId: 1,
      product: new Product({ id: 1, name: '產品 A', price: 999 }),
      count: 1,
    })
  );
});
其次,則檢查在使用者輸入表單 (view) 後,是否也會改變 TestComponent 的表單值 (model)。
it('當輸入表單資料, 驗證表單值正確性 (view -> model)', async () => {
  // Arrange
  const item = new ShoppingCartItem({
    id: 1,
    productId: 1,
    product: new Product({ id: 1, name: '產品 A', price: 999 }),
    count: 1,
  });
  component.formControl.patchValue(item);
  fixture.detectChanges();

  // Act
  const inputElement: HTMLInputElement = fixture.debugElement.query(
    By.css('input')
  ).nativeElement;
  inputElement.value = '2';
  inputElement.dispatchEvent(new Event('input'));
  inputElement.dispatchEvent(new Event('blur'));
  fixture.detectChanges();

  // Assert
  expect(component.formControl.value).toEqual(
    new ShoppingCartItem({
      id: 1,
      productId: 1,
      product: new Product({ id: 1, name: '產品 A', price: 999 }),
      count: 2,
    })
  );
});
除了表單值的變化檢查外,ShoppingCartFormComponent 元件有針對數量進行驗證,所以也要對此進行檢查。
  it('當頁面載入後, 表單驗證應為不通過', () => {
    // Arrange
    const item = new ShoppingCartItem({
      id: 1,
      productId: 1,
      product: new Product({ id: 1, name: '產品 A', price: 999 }),
      count: 1,
    });
    component.formControl.patchValue(item);
    fixture.detectChanges();

    // Act
    const inputElement: HTMLInputElement = fixture.debugElement.query(
      By.css('input')
    ).nativeElement;
    inputElement.value = '0';
    inputElement.dispatchEvent(new Event('input'));
    inputElement.dispatchEvent(new Event('blur'));
    fixture.detectChanges();

    // Assert
    expect(component.itemForm.form.valid).toBeFalse();
    expect(component.formControl.valid).toBeFalse();
  });

  it('當資料完整輸入後, 表單驗證應為通過', () => {
    // Arrange
    const item = new ShoppingCartItem({
      id: 1,
      productId: 1,
      product: new Product({ id: 1, name: '產品 A', price: 999 }),
      count: 1,
    });
    component.formControl.patchValue(item);
    fixture.detectChanges();

    // Act
    const inputElement: HTMLInputElement = fixture.debugElement.query(
      By.css('input')
    ).nativeElement;
    inputElement.value = '2';
    inputElement.dispatchEvent(new Event('input'));
    inputElement.dispatchEvent(new Event('blur'));
    fixture.detectChanges();

    // Assert
    expect(component.itemForm.form.valid).toBeTrue();
    expect(component.formControl.valid).toBeTrue();
  });
最後就執行 ng test 來確認測試執行的結果。
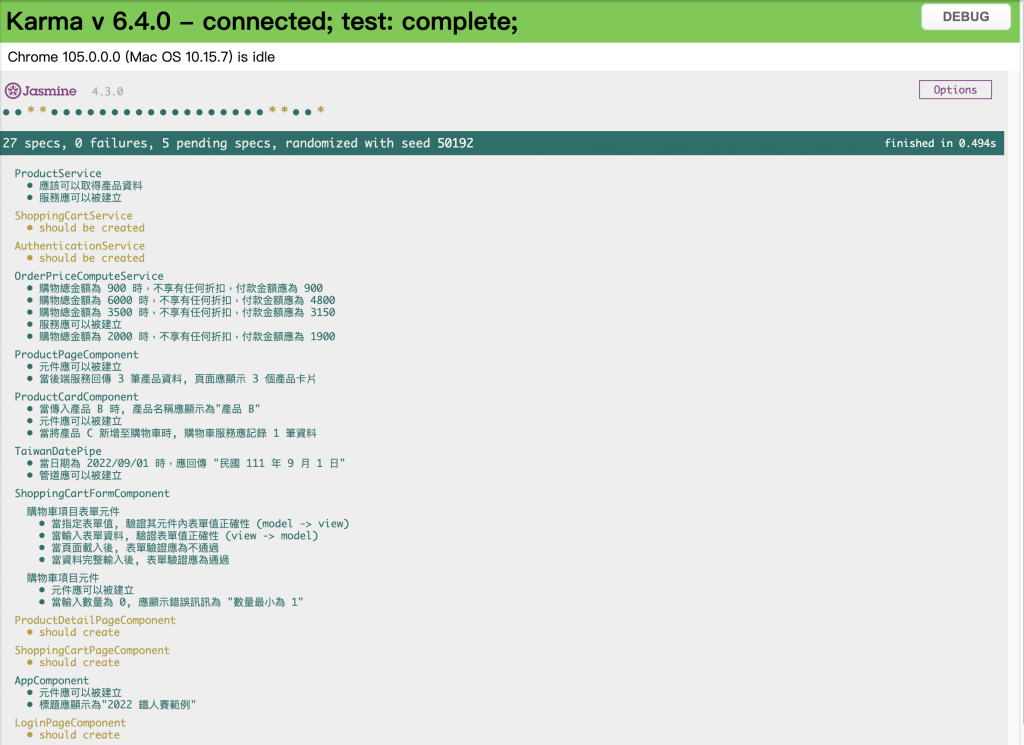
今天說明了使用者輸入表單的測試程式,也針對表單元件的使用進行撰寫測試程式,完整的測試程式可以參考 GitHub。然而,實務上,也會針對欄位進行非同步的驗證,下一篇會說明如何在有非同步處理的狀況下,要如何撰寫單元測試程式。