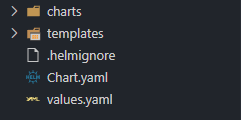
這篇要來介紹 Helm Chart 的基本架構,理解基礎架構後如果後面遇到問題,也可以自己嘗試 Debug 看看。
今天就來看看 Chart 裡面賣的什麼藥,用 create 來建立吧:
helm create my-chart

可以先往 Chart.yaml 看內容:
apiVersion: v2
name: my-chart
description: A Helm chart for Kubernetes

# A chart can be either an 'application' or a 'library' chart.
#
# Application charts are a collection of templates that can be packaged into versioned archives
# to be deployed.
#
# Library charts provide useful utilities or functions for the chart developer. They're included as
# a dependency of application charts to inject those utilities and functions into the rendering
# pipeline. Library charts do not define any templates and therefore cannot be deployed.
type: application

# This is the chart version. This version number should be incremented each time you make changes
# to the chart and its templates, including the app version.
# Versions are expected to follow Semantic Versioning (https://semver.org/)
version: 0.1.0

# This is the version number of the application being deployed. This version number should be
# incremented each time you make changes to the application. Versions are not expected to
# follow Semantic Versioning. They should reflect the version the application is using.
# It is recommended to use it with quotes.
appVersion: "1.16.0"
裡面顯示的參數有這些:
apiVersion:通常都會是 v2 這比較沒什麼爭議,指的就是 Chart 格式版本。name:Chart 的名字。type:Chart 型態,有以下兩種變數
application:應用程式,大部分都是採用這個。library:給予 chart 開發者使用,可以把一些常用的模板定義出來,但不能拿來安裝,筆者也很少使用它。version:Chart 的版本,要使用 Semantic Versioning,Helm 主要看這個安裝。appVersion:Chart 的應用程式版本,開發人員可以自己訂,用引號括起來即可。當然 Chart.yaml 不只這些,還有一些相依性應用程式可以裝,就不用為了相依性重寫版本,不過這可以靠 helm dependency 命令完成,資料夾 charts 就是下載 Dependency chart 資料夾,那就簡單介紹到這裡。
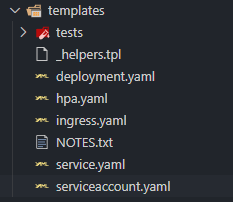
接下來可以往裡面看 templates

先從比較熟悉的 service.yaml 看起:
apiVersion: v1
kind: Service
metadata:
  name: {{ include "my-chart.fullname" . }}
  labels:
    {{- include "my-chart.labels" . | nindent 4 }}
spec:
  type: {{ .Values.service.type }}
  ports:
    - port: {{ .Values.service.port }}
      targetPort: http
      protocol: TCP
      name: http
  selector:
    {{- include "my-chart.selectorLabels" . | nindent 4 }}
看起來跟原本的 YAML 設定檔很像,但只要打上 {{ }} 就是 Helm 的特有語法。
打上 .Values 就會使用 values.yaml 的內容,後面接的就會是相對應的內容,假設 values.yaml 內容長這樣:
service:
  type: ClusterIP
  port: 80
經過 Helm 的 render 之後會變成這樣:
apiVersion: v1
kind: Service
metadata:
  name: # 先省略...
  labels:
    # 先省略...
spec:
  type: ClusterIP
  ports:
    - port: 80
      targetPort: http
      protocol: TCP
      name: http
  selector:
    # 先省略...
Templates 也支援 if else,像是 ingress.yaml 的 Line 9-15:
{{- if semverCompare ">=1.19-0" .Capabilities.KubeVersion.GitVersion -}}
apiVersion: networking.k8s.io/v1
{{- else if semverCompare ">=1.14-0" .Capabilities.KubeVersion.GitVersion -}}
apiVersion: networking.k8s.io/v1beta1
{{- else -}}
apiVersion: extensions/v1beta1
{{- end }}
雖然不一定看過 ingress 的內容,但看語意可以大概猜一下,這是判斷 K8s 版本來決定 apiVersion 要選哪一種,如果想要做相容性,Helm 就很實用。
如果想要對 values.yaml 內容做迴圈處理,也可以使用 range:
{{- range .Values.ingress.tls }}
- hosts:
    {{- range .hosts }}
    - {{ . | quote }}
    {{- end }}
  secretName: {{ .secretName }}
{{- end }}
這裡面的詳細語法不會講太多,需要使用或查看就再查語法就好。
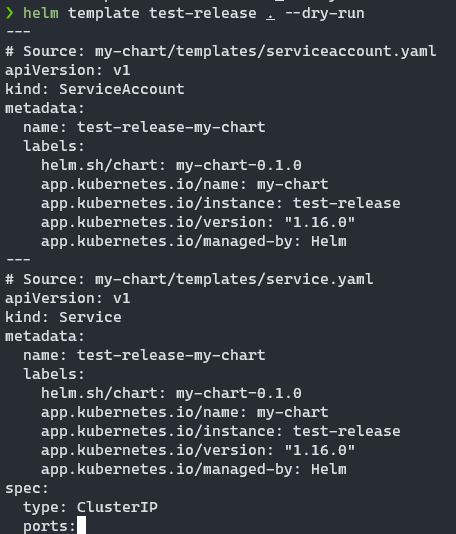
開發完成後可以使用 helm template 除錯一下
# helm template <RELEASE_NAME> <CHART_PATH> --dry-run
# --dry-run 可以模擬安裝
helm template test-release . --dry-run

就會去模擬名為 test-release 安裝這個 Chart 的時候會 render 出來的樣子。
但這只是幫你協助產生設定檔,如果內容設定檔不符合規定,K8s 還是會擋下來,需要照正確格式設定喔!
這裡簡單介紹了 Helm Chart 的基礎用法,雖然我後面沒有要去寫它,後面要安裝的內容都會使用 Helm,給大家做個參考。
下一篇會繼續介紹私有雲會需要用到的 Application,與此同時,挑戰終於進行到一半了!
本系列內容也會同步貼到我的 Blog https://blog.yangjerry.tw 歡迎來我的 Blog 點一下 RSS 追蹤,那我們就下一篇文章見啦!
