這次的目標是寫一個能利用 API Hook 來注入自訂功能的工具,我選用了 Debug API 這個方法以除錯法的方式來進行注入,那先看看成果如何 :
本程式在 x64 Windows 10 確認可以執行。
https://github.com/Dinlon5566/IT_Reverse_Engineering/tree/main/Dx25
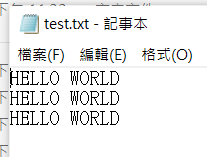
WriteFile() 被調用,把他傳入的文字修改成全部大寫。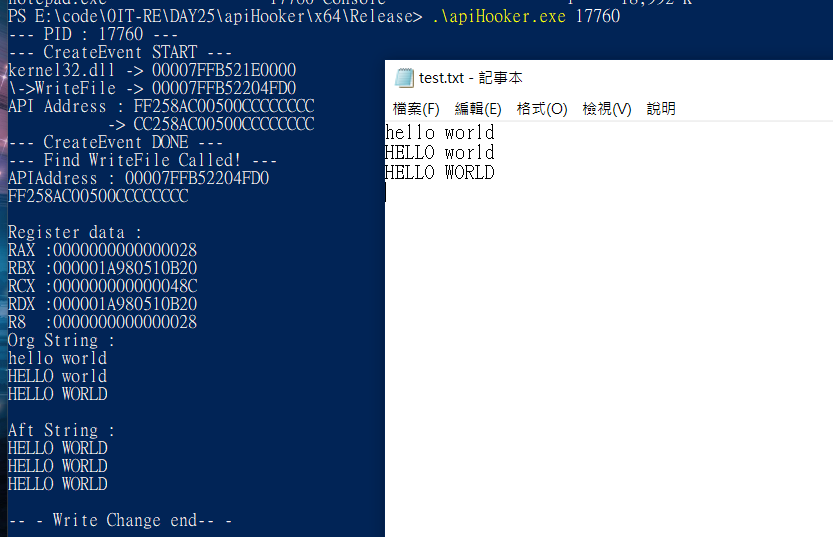
如果存檔時發現記事本無回應,請立即使用工作管理員把記事本關閉。否則會一直寫入錯誤的記憶體區間導致卡死。這是因為新增檔案的時候並不是使用
WriteFile(),插入的 Hook 未取出所導致的記憶體存取錯誤。
那先來看看,這個工具實際上要如何製作呢 ? 首先先看簡單的流程 :
StayDebugEvent() 等待事件發生doCreateEvent()。
WriteFile() 位置0xCC。當程序碰到 0xCC 時會觸發 INT3 例外,由此把程序交到 Deubger (注入器) 手上。doExceptionEvent()。
StayDebugEvent()
API Hook 的很多東西,等等慢慢講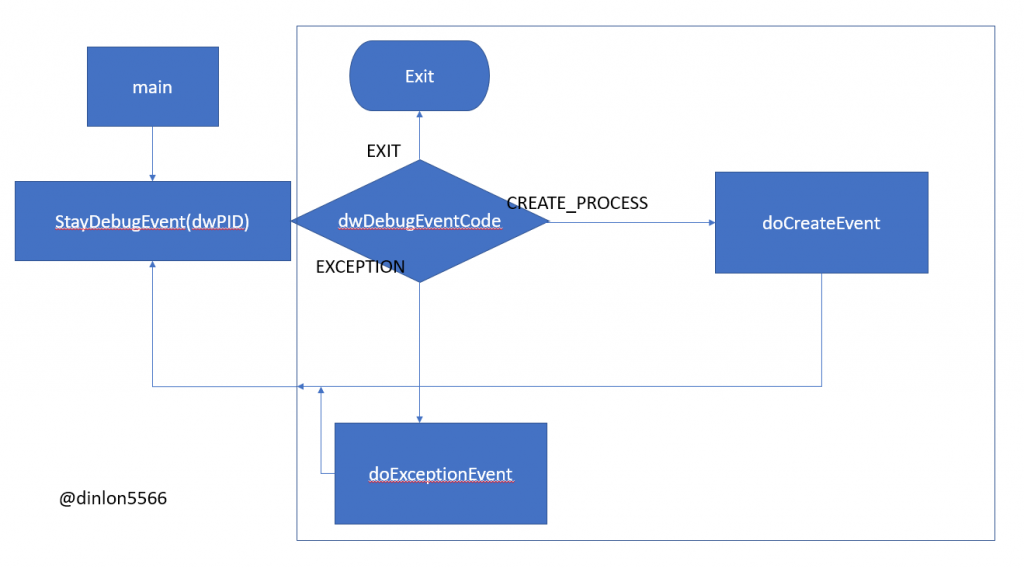
那我們開始吧,程式碼裡的註解說明了指令的功能與目標 :
首先,main() 的部分像這樣。
先把參數轉為數字做為 PID,利用 DebugActiveProcess() 來檢查目標程序是否存在。
int main(int argc, char* argv[]) {
	if (argc != 2) {
		printf("USEAGE : apiHooker.exe <PID> \n");
		// 這一行方便我取用 notepad.exe 的 PID
		system("tasklist | findstr notepad");
		return 1;
	}

	DWORD dwPID = atol(argv[1]);
	if (!dwPID) {
		printf("PID error!");
		return 0;
	}
	printf("--- PID : %d ---\n", dwPID);
// 檢查是否程序是否存在
	if (!DebugActiveProcess(dwPID)) {
		printf("Debug Fail\n");
		printf("Error code : %d", GetLastError());
		return 1;
	}
	StayDebugEvent();
	return 0;

}
等待事件的地方,當有事件時 WaitForDebugEvent 就會把事件發到 debugEvent,透過比對 EventCode 來判斷事件類型。之後並把 debugEvent 作為媒介發給 doCreateEvent() 與 doExceptionEvent() 方便之後直接利用。
當一圈跑完之後需要 Continue 讓事件後的指令繼續跑下去。
BOOL StayDebugEvent() {

	DEBUG_EVENT debugEvent;
	DWORD dwStat;
// 等待事件發生
	while (WaitForDebugEvent(&debugEvent, INFINITE)) {
		if (debugEvent.dwDebugEventCode == CREATE_PROCESS_DEBUG_EVENT) {
			doCreateEvent(&debugEvent);
		}
		else if (debugEvent.dwDebugEventCode == EXCEPTION_DEBUG_EVENT)
		{
			doExceptionEvent(&debugEvent);
		}
		else if (debugEvent.dwDebugEventCode == EXIT_PROCESS_DEBUG_EVENT) {
			printf("Process %d is down!\n", debugEvent.dwProcessId);
			break;
		}
	 // 繼續跑下去
		ContinueDebugEvent(debugEvent.dwProcessId, debugEvent.dwThreadId, DBG_CONTINUE);
	}

	return 1;
}
首先這邊是宣告的變數
// 用來存 WriteFile 的位置
LPVOID pfWriteFile = NULL;
// 放置 CREATE_PROCESS 時的資料(來自於debugEvent->u.CreateProcessInfo)
CREATE_PROCESS_DEBUG_INFO debugInfo;
// 用於放置替換資料與備份資料 (第一個 BYTE),0xCC藉此觸發INT3斷點異常
BYTE chINT3 = 0xCC, chOrgByte = 0;
看到 doCreateEvent :
主要用於把函式庫的位置記下來,並把 Hook 接上去。使 0xCC INT3 例外發生時就會觸發事件。
BOOL doCreateEvent(LPDEBUG_EVENT debugEvent) {
	printf("--- CreateEvent START ---\n");

	//取得函式庫與得到 WriteFile API 的位置
	HMODULE module = GetModuleHandleA("kernel32.dll");
	pfWriteFile = GetProcAddress(module, "WriteFile");

	//輸出
	printf("kernel32.dll -> %p\n", module);
	printf("\\->WriteFile -> %p\n", pfWriteFile);

	// 將 debugEvent 的 CreateProcessInfo 寫到 debugInfo,u.CreateProcessInfo 的結構為 CREATE_PROCESS_DEBUG_INFO。
	// https://learn.microsoft.com/en-us/windows/win32/api/minwinbase/ns-minwinbase-debug_event
	memcpy(&debugInfo, &debugEvent->u.CreateProcessInfo, sizeof(CREATE_PROCESS_DEBUG_INFO));


	// 讀入目標程序的 pfWriteFile 位置。
	BYTE arr[10];
	ReadProcessMemory(debugInfo.hProcess, pfWriteFile, arr , sizeof(BYTE)*10, NULL);
	// 用來還原 API 位置
	chOrgByte = arr[0];

	printf("API Address : ");
	for (BYTE i : arr) {
		printf("%02X", i);
	}

	// 將第一個 BYTE 改成 0xCC 接上 Hook
	WriteProcessMemory(debugInfo.hProcess, pfWriteFile, &chINT3, sizeof(BYTE), NULL);

	// 讀入更改後的WriteFile並顯示 (其實不需要這個步驟)
	ReadProcessMemory(debugInfo.hProcess, pfWriteFile, arr, sizeof(arr), NULL);
	printf("\n           -> ");
	for (BYTE i : arr) {
		printf("%02X", i);
	}

	printf("\n--- CreateEvent DONE ---\n");
	return 1;
}
BOOL doExceptionEvent(LPDEBUG_EVENT debugEvent) {

	CONTEXT context;
	PBYTE pBuf = NULL;
	ULONG_PTR ulpWriteLen, ulpBufAddress;
	PEXCEPTION_RECORD64 debugRecord = (PEXCEPTION_RECORD64)&debugEvent->u.Exception.ExceptionRecord;
	BYTE arr[10];

	// 確認 Exception 的位置為原本的 WriteFile 位置,正是設立INT3中斷的位置。
	if (debugRecord->ExceptionCode == EXCEPTION_BREAKPOINT &&
		debugRecord->ExceptionAddress==(DWORD64)pfWriteFile
		) {
		printf("--- Find WriteFile Called! ---\n");
		printf("APIAddress : %p\n",(DWORD64)pfWriteFile);

		// 把之前改過的 API 位置改回去( 取走 Hook )
		WriteProcessMemory(debugInfo.hProcess, pfWriteFile, &chOrgByte, sizeof(BYTE), NULL);

		// 輸出 API 位置
		ReadProcessMemory(debugInfo.hProcess, pfWriteFile, arr, sizeof(arr), NULL);
		for (BYTE i : arr) {
			printf("%02X", i);
		}
		printf("\n");
在取得我們輸入的資料的時候,必須得到暫存器中的值用於獲得 notepad.exe 傳遞給 WriteFile() 的參數,可以透過以下來查看暫存器的資料
		// 取得 Register
		context.ContextFlags = CONTEXT_FULL;
		GetThreadContext(debugInfo.hThread,&context);

		// 輸出 Register,方便查看
		printf("\nRegister data :\n");
		printf("RAX :%p\n", context.Rax);
		printf("RBX :%p\n", context.Rbx);
		printf("RCX :%p\n", context.Rcx);
		printf("RDX :%p\n", context.Rdx);
		printf("R8  :%p\n", context.R8);
這邊直接指明 RDX 是存放字串的地方,而 R8 傳遞了資料的長度。
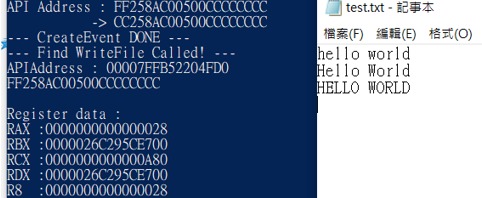
可以透過查看檔案來確認 28 為文件大小 :

接下去
		// 將傳遞值由寄存器撈上來
		ulpBufAddress = context.Rdx;
		ulpWriteLen = context.R8;

		// 宣告緩衝區空間與清空
		pBuf = (PBYTE)malloc(ulpWriteLen+1);
		memset(pBuf,0,ulpWriteLen+1);

		// 讀取文字位置的內容到緩衝區
		ReadProcessMemory(debugInfo.hProcess,(LPVOID)ulpBufAddress,pBuf,ulpWriteLen,NULL);
		printf("Org String :\n%s\n",pBuf);

		// 把字都變成大寫
		for (unsigned int i = 0; i < (unsigned int)ulpWriteLen; i++) {
			if ('a' <= pBuf[i] && pBuf[i] <= 'z') {
				pBuf[i] -= 0x20;
			}
		}

		printf("Aft String :\n%s\n", pBuf);

		// 將緩衝區內容存到原本放字串的位置
		WriteProcessMemory(debugInfo.hProcess,(LPVOID)ulpBufAddress,pBuf,ulpWriteLen,NULL);

		// 緩衝區沒用了,釋放掉
		free(pBuf);

		// 把執行位置調到 WriteFile 的位置
		context.Rip = (DWORD64)pfWriteFile;
		// 然後把 Context 的資料設置給 Thread
		SetThreadContext(debugInfo.hThread,&context);

		// 原程序可以繼續行動了
		ContinueDebugEvent(debugEvent->dwProcessId,debugEvent->dwThreadId,DBG_CONTINUE);

		// 把 WriteFile 的第一 BYTE 改回 0xCC ( 把 Hook 放回去 )
		WriteProcessMemory(debugInfo.hProcess, pfWriteFile, &chINT3, sizeof(BYTE),NULL);

		printf("-- - Write Change end-- - \n");
	}
	return 1;
}
這篇主要是在程式中學習如何利用除錯法來進行 API HOOK,在使用 DEBUG API 寫了這份程式後就會發現其實看起來有很多東西,不過實際上流程是很明確的。但是在編輯的時候記憶體控制要很精確,不然就會發生這種東西 :
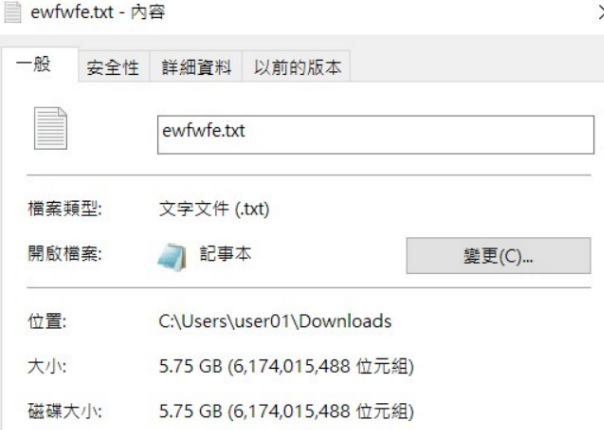
對。快 6 GB 的文件檔,差點把電腦搞壞 : /
寫這種東西時討厭的是因為系統架構不同 ( 像是 XP / Win7 / Win10 ),導致以前的代碼無法在新架構上使用,都要到各個地方查資料很花時間。
資料來源 :
https://www.codeproject.com/Articles/43682/Writing-a-basic-Windows-debugger
https://www.cnblogs.com/UnGeek/p/3515995.html
https://www.cnblogs.com/whitehawk/p/11166557.html
https://www.apriorit.com/dev-blog/727-win-guide-to-hooking-windows-apis-with-python


 iThome鐵人賽