在上一篇【Azure MLOps - 3】使用Azure DevOps建立訓練模型的CI pipeline(上)中執行測試程式碼的任務,這篇會繼續建立後半部
本篇文章架構:
前一篇完成程式碼測試後,接下來就要建立:「可以使agent執行Azure Machine Learning Workspace (AML worksapce)各種功能」。
「資料科學家在Azure Machine Learning worksapce做什麼,agent就在AML worksapce做什麼。」
資料科學家需要(1)擁有一個Azure Machine Learning Workspace;(2)上傳資料到AML data store;(3)建立compute以訓練模型;(4)註冊模型。要實現這些任務,資料科學家有兩個選擇:
Azure Cloud Shell可以想像成Azure portal (Azure入口網站)指令版本,可以用指令代替UI點選。
選最上方功能列的>_小圖,就可以使用了,會提示:輸入az使用Azure CLI。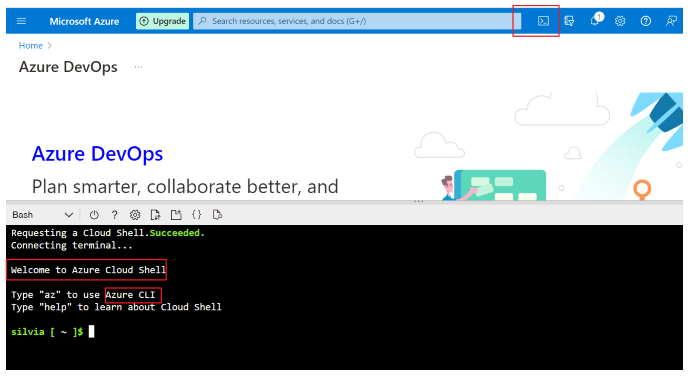
要如何使用Azure CLI命令完成AML上的各項任務?必須安裝Azure Machine Learning CLI extension (機器學習延伸模組),CLI指令很龐大,所以會根據使用者目的,安裝特定的延伸模組。輸入以下指令可以列出可用的模組和是否安裝:
az extension list-available -o table

Azure CLI機器學習延伸模租安裝說明,詳細解說可以參考說明文件,其實就是在命令列當中輸入以下指令,把機器學習延伸模組加入就是了,這裡需要注意的是Machine Learning CLI目前已經有新版的了,舊版只支援到2025年9月: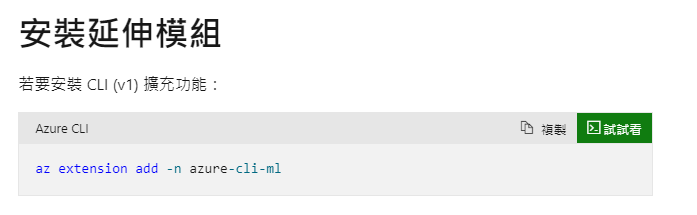
安裝好延伸模組後,就可以使用各種az ml的指令,來對AML進行操作,例如可以用以下命令,在AML上新增compute instance: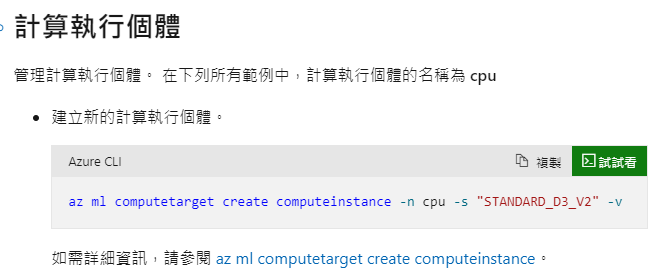
總結以上,因為agent並竟不是人,他沒有坐在電腦螢幕前點選UI的選項,所以一定要透過第二個方法:Azure Cloud Shell方式來對AML進行操作,所以我們想讓Agent有操作AML的能力,除了前幾篇建立好與AML連線之外(service connection),第一步就是安裝Azure CLI,後續再使用az ml各種指令完成工作: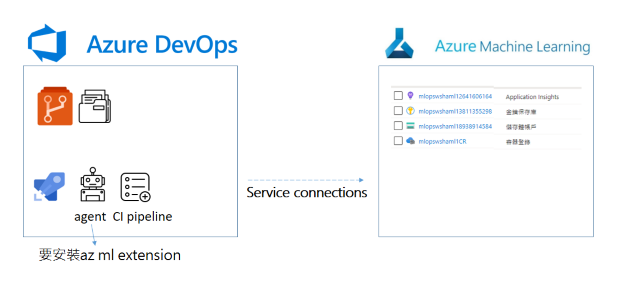
繼續在前一篇做到一半的CI pipeline下新增一個任務,點選agent旁邊的+,搜尋Azure CLI,點選Add: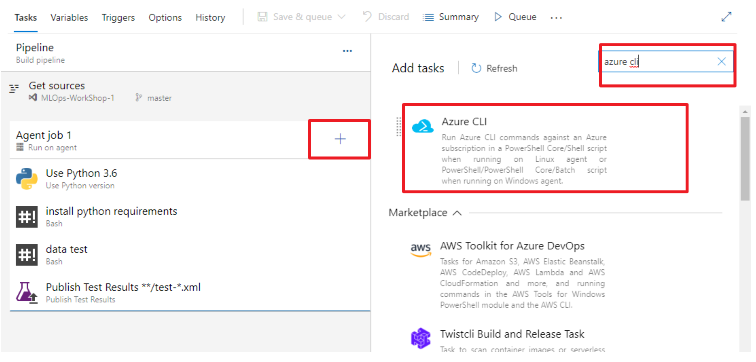
輸入這個任務的名稱,點選connection,script type選擇shell,因為要直接輸入安裝指令,所以選擇inline script: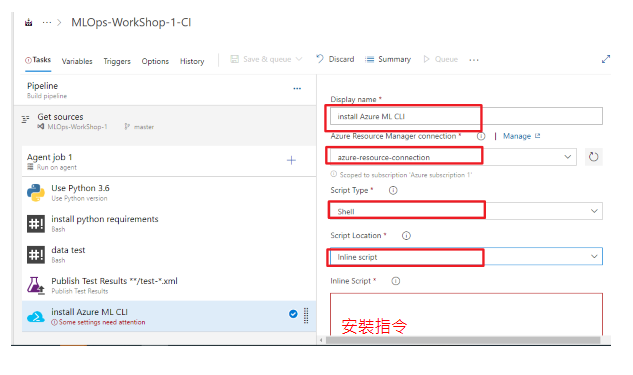
安裝指令,就依據說明文件,填入以下指令:
az extension add -n azure-cli-ml
在【Azure MLOps - 1】使用Azure DevOps建立AML pipelines中,一開始就已經建立好相關的AML資源,所以workspace也已經有了。不過我們也可以多增加一個任務,就是讓agent執行「az ml 建立新的aml worksapce」指令,確保在執行AML CI pipeline的時候「擁有workspace」可以順利執行訓練模型等步驟。
如同上一個步驟新增一個任務,點選agent旁邊的+,搜尋Azure CLI,點選Add,填入任務名稱:create Azure ML worksapce: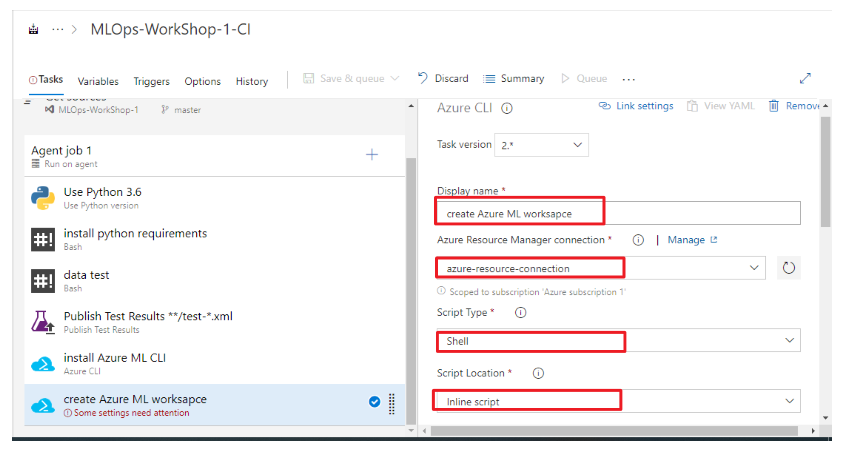
輸入新增workspace的指令,這個指令大意是在指定的資源群組(-g 後面的參數是資源群組的名稱變數),建立一個AML worksapce(-w 後面的參數是worksapce名稱變數),指定資源位置 (-l 後面的參數是位置名稱變數), --exist-ok 則是當worksapce存在就不建立。
az ml workspace create -g $(azureml.resourceGroup) -w $(azureml.workspaceName) -l $(azureml.location) --exist-ok --yes
這邊需要特別說明的是$()裡面放的是名稱變數,方便這個指令重複使用,但是需要在這個pipeline裡面特別定義好變數,點選variable:
點選add,把變數填進去,就按照你的資源群組名稱、AML名稱等等,還有資源位置輸入: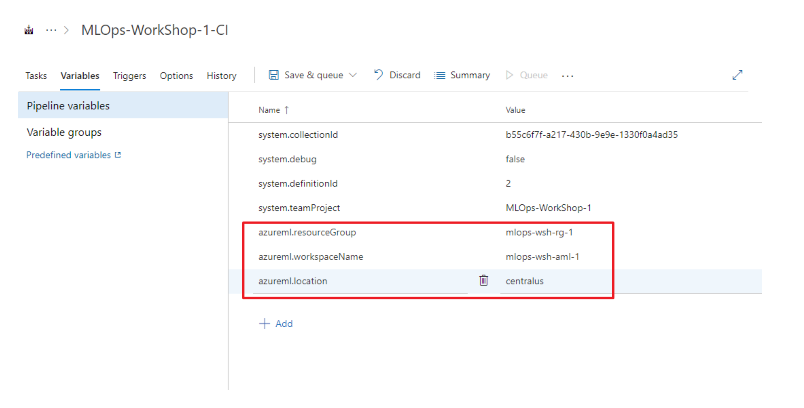
azureml.resourceGroup mlops-wsh-rg-1
azureml.workspaceName mlops-wsh-aml-1
azureml.location centralus
資料科學家使用AML訓練模型時,會需要先建立運算資源,會點選compute,建立相對應的運算資源,例如,想要執行autoML就會建立compute cluster等等: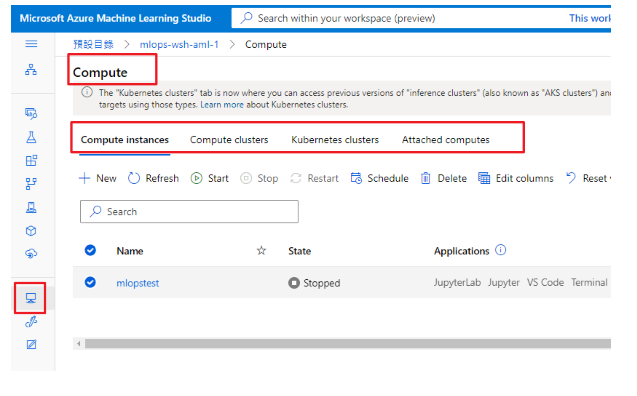
所以下一個Agent要執行的任務就會是建立運算資源,點選agent旁邊的+,搜尋Azure CLI,點選Add,填入任務名稱: Azure ML Compute Cluster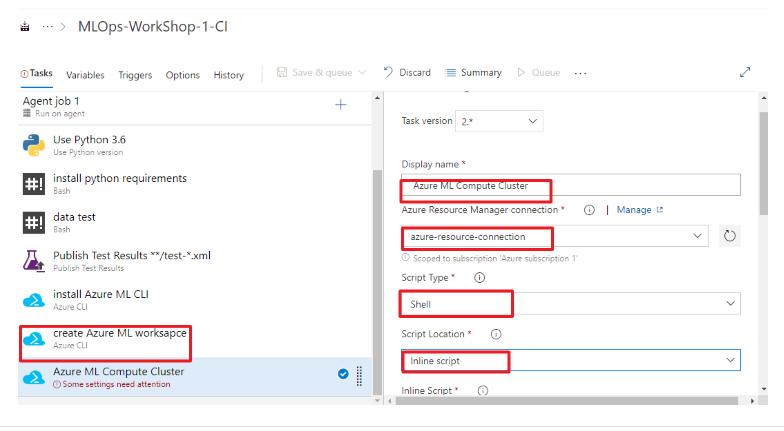
在inline script當中輸入az ml computetarget create amlcompute指令,在指令當中一樣會有必要參數輸入,詳細說明可參閱說明文件,大概會是指定在哪個資源群組、哪個AML worksapce建立compute,還有機器規格,基本上在AML使用UI建立運算資源時,下拉選單的項目,就會是用Azure CLI指令中對應參數:
az ml computetarget create amlcompute -g $(azureml.resourceGroup) -w $(azureml.workspaceName) -n $(amlcompute.clusterName) -s $(amlcompute.vmSize) --min-nodes $(amlcompute.minNodes) --max-nodes $(amlcompute.maxNodes) --idle-seconds-before-scaledown $(amlcompute.idelSecondsBeforeScaledown)
輸入完成後點選variable,輸入指令中的名稱變數: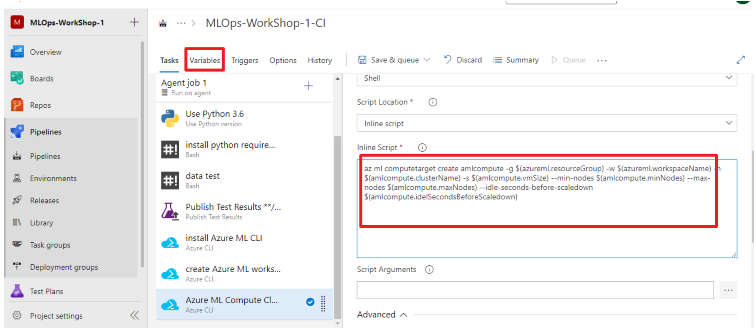
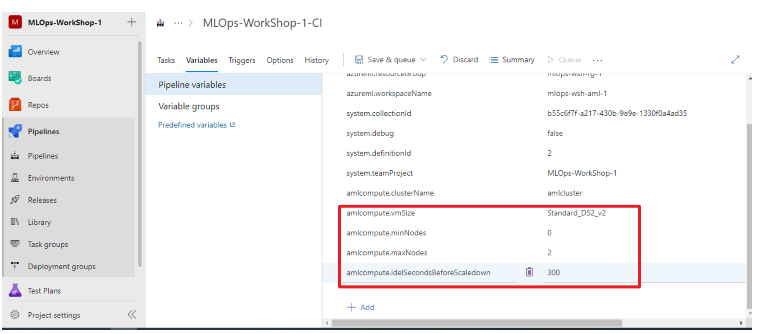
amlcompute.clusterName amlcluster
amlcompute.vmSize Standard_DS2_v2
amlcompute.minNodes 0
amlcompute.maxNodes 2
amlcompute.idelSecondsBeforeScaledown 300
資料科學家使用AML訓練模型時,會需要在AML worksapce 新增data assets,以追蹤資料版本: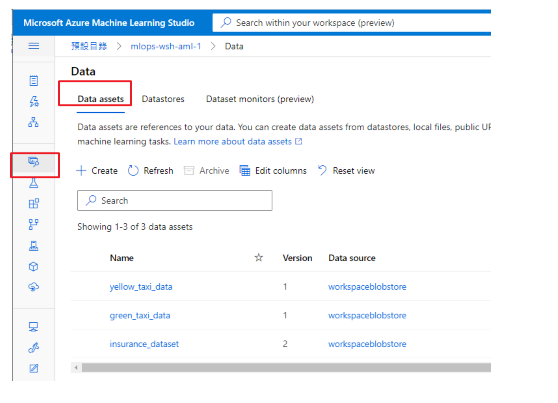
所以下一個Agent要執行的任務就會是上傳訓練資料集,一樣新增一個Azure CLI task,點選agent旁邊的+,搜尋Azure CLI,點選Add,填入任務名稱: upload data to Datastore,並且輸入inline script指令: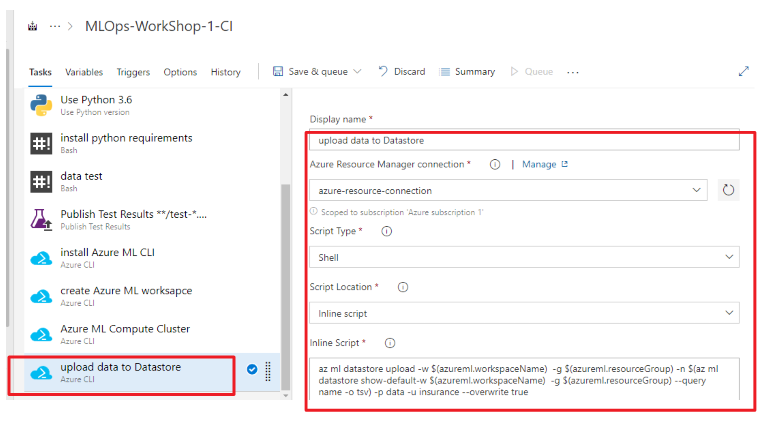
輸入的az ml datastore uploadscript如下,相關參數說明可搜尋微軟說明文件:
az ml datastore upload -w $(azureml.workspaceName) -g $(azureml.resourceGroup) -n $(az ml datastore show-default -w $(azureml.workspaceName) -g $(azureml.resourceGroup) --query name -o tsv) -p data -u insurance --overwrite true
計算資源有了,訓練資料集也有了,接下來的Agent的任務會是:執行Azure DevOps Repo的train_aml.py訓練模型,並且把訓練完的模型檔案和部署模型的必要資料,也載下來到Azure DevOps中。
備註:本次練習情境中,train_aml.py是新版本的訓練模型程式碼
訓練模型的主程式碼:
這裡會需要說明一下,在這個練習情境中,選擇的方式是把訓練後產出的模型檔案、模型的metadata和其他資料,載到Azure DevOps pipeline當中的【Published artifacts】區域,一旦後面的CD pipeline(目前我們還沒建立CD pipeline)偵測到CI pipeline有新的產出模型,就會觸發執行CD pipeline: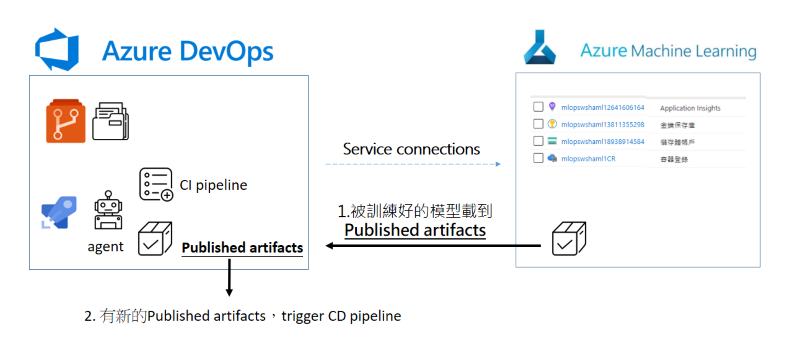
到這裡可能有個疑問,為什麼要那麼大費周章把模型檔案和metadata,載到Azure DevOps pipeline published artifact裡面。是不是能夠讓CD pipeline觸發條件改成是「AML model 區有新的模型產生」?
完全是可以的,之後有機會再分享另一個MLOPS作法,總之MLOPS沒有固定模式和流程,一切看專案情境與需求,本次練習情境示意圖如下:
不過在放到 pipeline published artifact之前,別忘了所有任務都是使用agent和AML互動,這些載下來的模型資料會先放在agent這台機器身上,再從agent身上發布到【pipeline published artifact區域】。
為了之後訓練好的模型檔案和metadata擺放有條有理方便管理,所以這個在訓練模型之前,先於agent上面新增放置檔案的目錄。
新增一個bash指令任務,任務名稱:Make Metadata and Model directory。點選agent旁邊的+,搜尋bash,add bash task,輸入 make directory :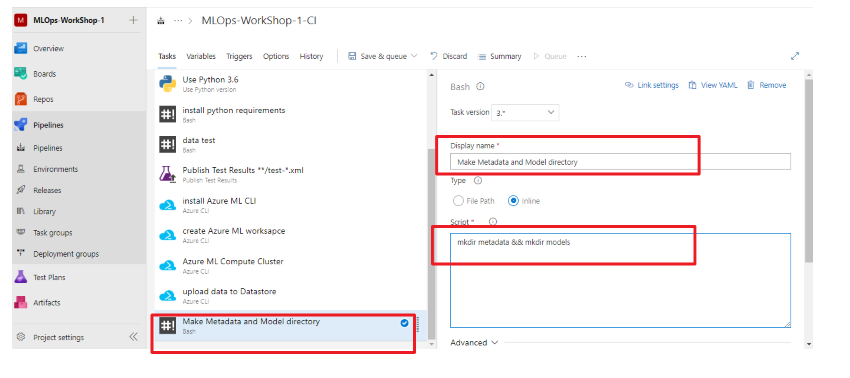
指令:
mkdir metadata && mkdir models
接下來,要新增一個訓練模型任務,新增一個任務,點選agent旁邊的+,搜尋Azure CLI,點選Add,填入任務名稱:Training Model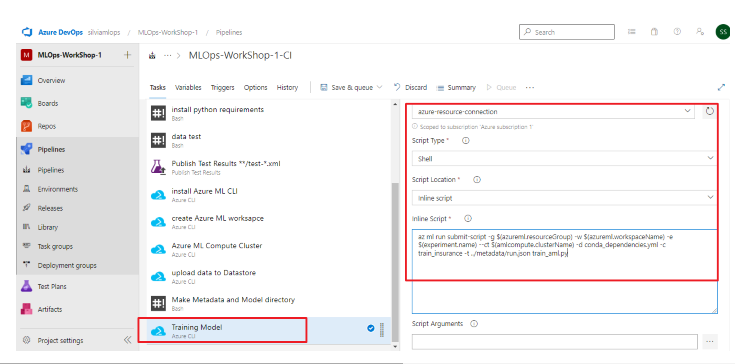
在inline script當中使用「az ml run submit-script」,代表要執行一個程式碼檔案,要執行訓練的主程式碼是train_aml.py,其他參數可參考官方說明文件:
az ml run submit-script -g $(azureml.resourceGroup) -w $(azureml.workspaceName) -e $(experiment.name) --ct $(amlcompute.clusterName) -d conda_dependencies.yml -c train_insurance -t ../metadata/run.json train_aml.py
新增$(experiment.name)和($model.name)變數名稱: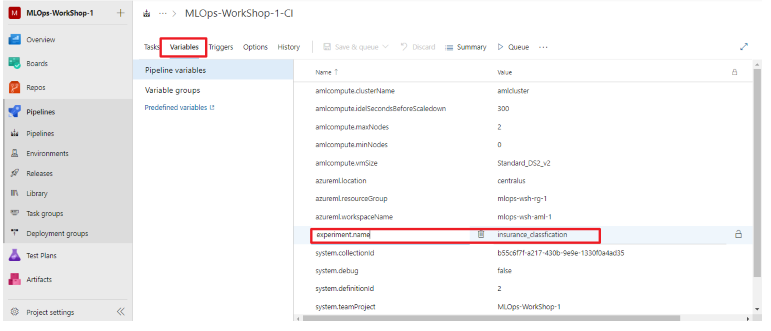
experiment.name insurance_classification
model.name insurance_model
因為主程式碼「train_aml.py」位於Azure DevOps Repo的training資料夾裡面,所以指定工作目錄,往下捲,到Advanced設定區,選擇Working Directory: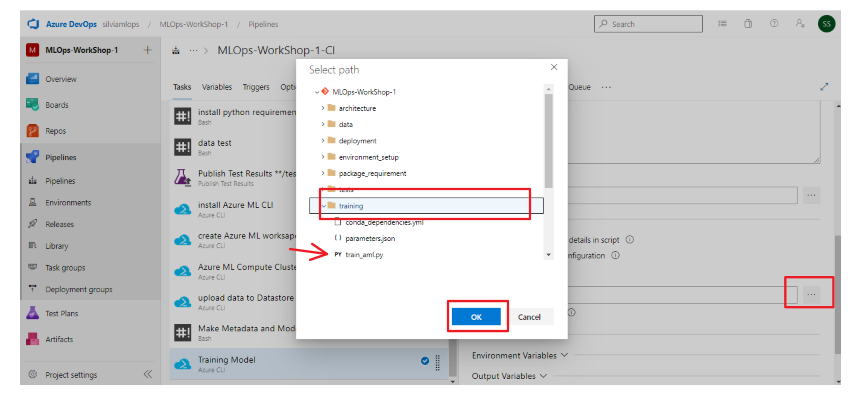
接下來,要新增一個註冊模型任務,依舊使用az ml 指令註冊模型,新增一個任務,點選agent旁邊的+,搜尋Azure CLI,點選Add,填入任務名稱:Registering Model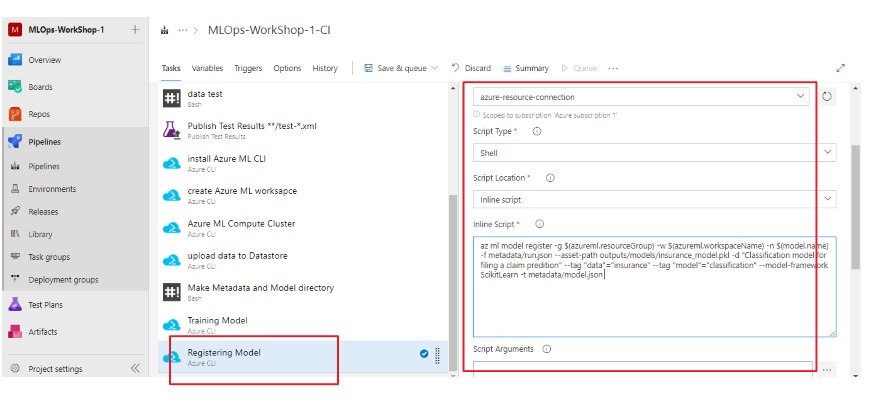
在inline script當中使用「az ml model register」CLI指令,代表要註冊模型,模型位置在outputs/models/insurance_model.pkl,其他參數使用參考官方文件:
az ml model register -g $(azureml.resourceGroup) -w $(azureml.workspaceName) -n $(model.name) -f metadata/run.json --asset-path outputs/models/insurance_model.pkl -d "Classification model for filing a claim predition" --tag "data"="insurance" --tag "model"="classification" --model-framework ScikitLearn -t metadata/model.json
當AML每次訓練與註冊完模型的時候,模型會在workspace model區裡(如下圖),我們要根據「model ID」下載指定模型到agent在6-1步驟中所建立的目錄裡。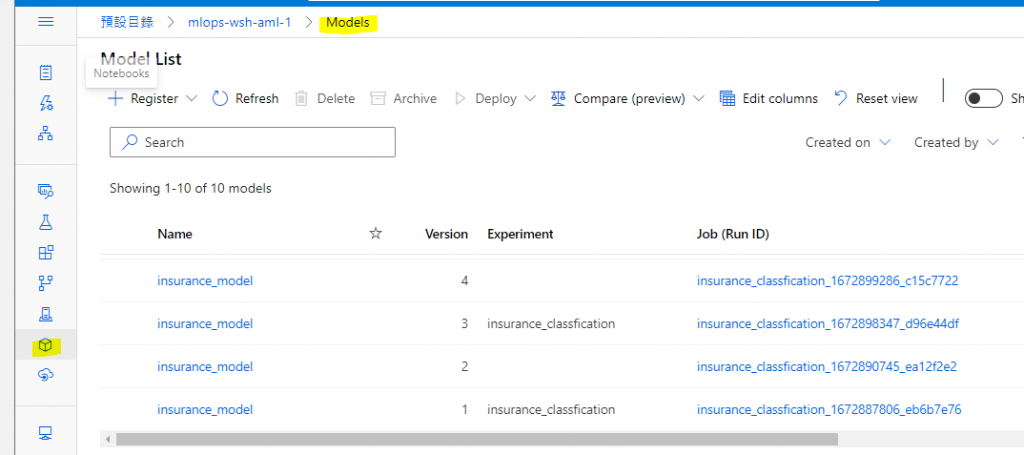
所以接下來,要新增一個下載模型任務,使用az ml 指令下載模型,新增一個任務,點選agent旁邊的+,搜尋Azure CLI,點選Add,填入任務名稱:Downloading Model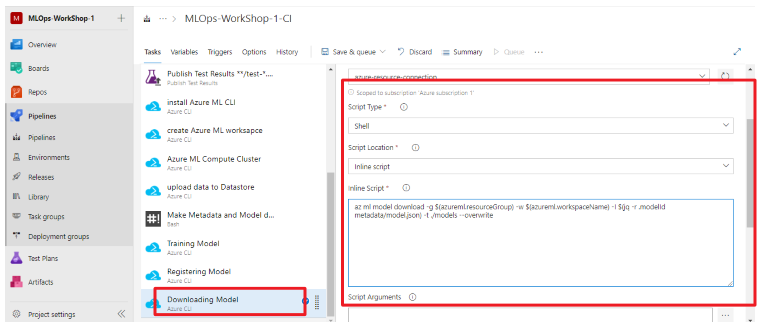
在inline script當中使用「az ml model download」,代表要下載模型,-i 參數是model ID,這個練習裡面是從metadata/model.json檔取得model ID,所以使用jq指令,jq指令介紹參考資料
az ml model download -g $(azureml.resourceGroup) -w $(azureml.workspaceName) -i $(jq -r .modelId metadata/model.json) -t ./models --overwrite
備註model.json檔案格式長這樣:
{"modelId": "insurance_model:10", "workspaceName": "mlops-wsh-aml-1", "resourceGroupName": "mlops-wsh-rg-1"}
除了模型檔下載到agent之外,還要把發佈到【pipeline published artifact區域】,首先先把資料從$(agent.builddirectory)複製到$(build.artifactstagingdirectory)。
要新增一個copy file任務,點選agent旁邊的+,搜尋copy file,點選Add,使用預設的任務名稱也可以: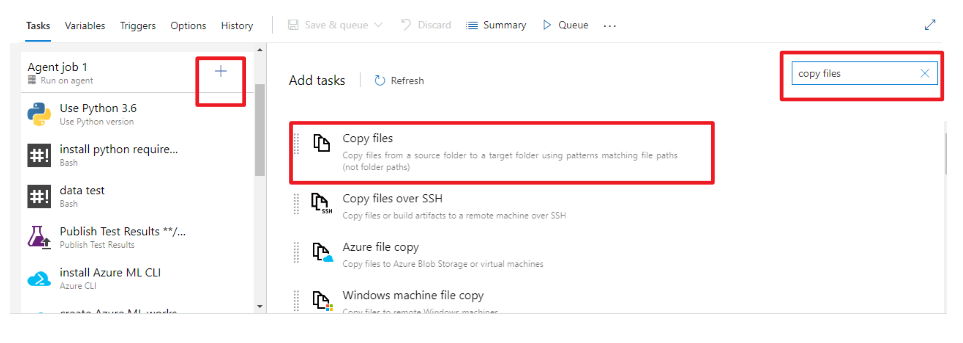
使用預設的source folder:$(agent.builddirectory)和target folder:$(build.artifactstagingdirectory)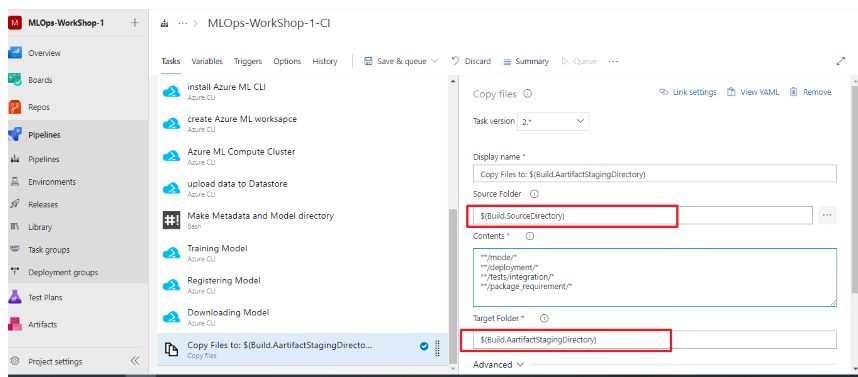
要複製的folder path輸入在Contents下,要複製的檔案path很多,為了後續使用方便,把部署模型會用到的資料(例如:/deployment/與/tests/integration/)也一並copy:
**/metadata/*
**/models/*
**/deployment/*
**/tests/integration/*
**/package_requirement/*
最後一個步驟就是把$(build.artifactstagingdirectory)的資料,通通發佈到【pipeline published artifact區域】,要新增一個publish pipeline artifact任務,點選agent旁邊的+,搜尋publish pipeline,點選Add,使用預設的任務名稱也可以: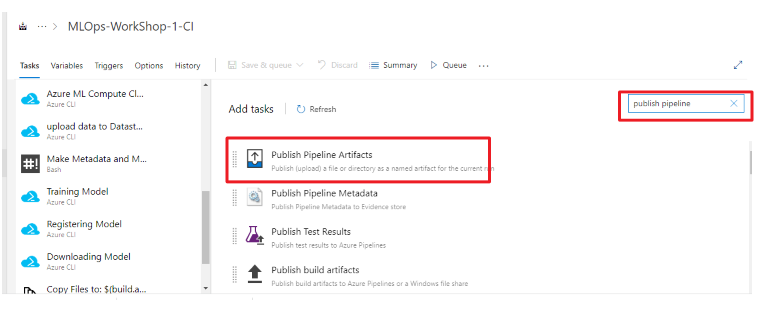
artifacts名稱不拘,如果不設定他也會給你一個唯一的ID,我這裡取名為Landing。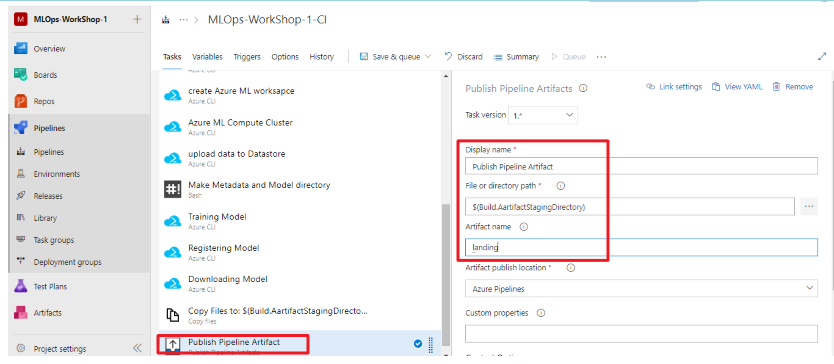
大功告成~這篇可能是本系列文章最長的一篇!
接下來我們就可以來嘗試執行這個pipeline了,預期會看到AML workspace有資料集、實驗和模型被註冊,在【pipeline published artifact區域】中也可以看到模型檔案!
下一篇【Azure MLOps - 5】執行Azure DevOps CI pipeline
 silviasu
